Creating your own Blockchain Network
Last Updated :
09 Apr, 2024
The blockchain is another revolutionary technology that can change the ways of the internet just like open-sourced software did. As blockchain is a distributed P2P ledger system, anyone can see other users’ entries, but undoubtedly no one can alter it. You can only update the blockchain using a consensus algorithm. So, when a new set of information gets uploaded to the system, no one can alter it. The blockchain will contain accurate and reliable information on the ledger.
The core idea behind blockchains is their decentralized nature. Blockchain might sound simple, but inside there are a lot of protocols and algorithms that make it happen.
How Blockchain Works?
A basic blockchain works as follows:
- A user requests a transaction.
- A block representing the transaction is created.
- The block is broadcast to all the nodes of the network.
- All the nodes validate the block and the transaction
- The block is added to the chain.
- The transaction gets verified and executed.
Prerequisites
- Basic knowledge of Python.
- Basic knowledge of the flask micro-framework.
- An IDE (VS Code/PyCharm are preferred).
Approach
- Initializing the blockchain
- Integration of the blockchain
- API integrations for users to interact
Important Functions for Blockchain
- Creating a new block and add to the chain.
- Initialize the blockchain.
- Add a new transaction.
- Hashing a block.
- Register a node to the network.
- Validate the chain.
- Validate the block before submission to the chain.
- Implementation of the “proof of consensus”.
Structure of a Block
- Index.
- Creation/Updation Timestamp.
- Transactions list.
- Proof.
- Previous Block hash (very important).
Getting Started with Creating your own Blockchain Network
In this implementation, the Linux machine is being used for development, so some of the commands may be linux specific.
1. Install the Dependencies
Create a python virtual environment, activate the newly created environment and install the flask and requests package
- $ python3 -m venv .venv
- $ source .venv/bin/activate
- $ pip install flask requests
2. Implement the Basic Blockchain Class
Create a file with name ‘blockchain.py’ with the following contents:
Python
# blockchain.py

import json
from hashlib import sha256
from time import time


class Blockchain(object):
    def __init__(self):
        self.chain = []
        self.current_transactions = []
        self.new_block(previous_hash=1, proof=100)

    def proof_of_work(self, last_proof):
        # This method is where you the consensus algorithm is implemented.
        # It takes two parameters including self and last_proof
        proof = 0
        while self.valid_proof(last_proof, proof) is False:
            proof += 1
        return proof

    @staticmethod
    def valid_proof(last_proof, proof):
        # This method validates the block
        guess = f'{last_proof}{proof}'.encode()
        guess_hash = sha256(guess).hexdigest()
        return guess_hash[:4] == "0000"

    def new_block(self, proof, previous_hash=None):
        # This function creates new blocks and then adds to the existing chain
        # This method will contain two parameters proof, previous hash
        block = {
            'index': len(self.chain) + 1,
            'timestamp': time(),
            'proof': proof,
            'previous_hash': previous_hash or self.hash(self.chain[-1]),
            'transactions': []
        }
        # Set the current transaction list to empty.
        self.current_transactions = []
        self.chain.append(block)
        return block

    def new_transaction(self, sender, recipient, amount):
        # This function adds a new transaction to already existing transactions
        # This will create a new transaction which will be sent to the next block.
        # It will contain three variables including sender, recipient and amount
        self.current_transactions.append(
            {
                'sender': sender,
                'recipient': recipient,
                'amount': amount,
            }
        )
        return self.last_block['index'] + 1

    @staticmethod
    def hash(block):
        # Used for hashing a block
        # The follow code will create a SHA - 256 block hash
        # and also ensure that the dictionary is ordered

        # convert this to a dictionary of strings
        new_block = dict()
        for key in block.keys():
            new_block[key] = str(block[key])

        block_string = json.dumps(new_block).encode()
        return sha256(block_string).hexdigest()

    @property
    def last_block(self):
        # Calls and returns the last block of the chain
        return self.chain[-1]
3. Get Everything Together with Flask Micro-web-framework
Create a file ‘main.py’ with the following contents:
Python
# main.py

from uuid import uuid4
from flask import Flask, request, jsonify
from blockchain import Blockchain

app = Flask(__name__)
node_identifier = str(uuid4()).replace('-', '')

# Initializing blockchain
blockchain = Blockchain()


@app.route('/mine', methods=['GET'])
def mine():
    # Here we make the proof of work algorithm work
    last_block = blockchain.last_block
    last_proof = last_block['proof']
    proof = blockchain.proof_of_work(last_proof)

    # rewarding the miner for his contribution. 0 specifies new coin has been mined
    blockchain.new_transaction(
        sender="0",
        recipient=node_identifier,
        amount=1,
    )

    # now create the new block and add it to the chain
    previous_hash = blockchain.hash(last_block)
    block = blockchain.new_block(proof, previous_hash)

    return jsonify({
        'message': 'The new block has been forged',
        'index': block['index'],
        'transactions': block['transactions'],
        'proof': block['proof'],
        'previous_hash': block['previous_hash']
    }), 200


@app.route('/transactions/new', methods=['POST'])
def new_transaction():
    values = request.get_json()
    # Checking if the required data is there or not
    required = ['sender', 'recipient', 'amount']
    if not all(k in values for k in required):
        return 'Missing values', 400

    # creating a new transaction
    index = blockchain.new_transaction(
        values['sender'], values['recipient'], values['amount'])
    return jsonify({
        'message': f'Transaction is scheduled to be added to Block No. {str(index)}'
    }), 201


@app.route('/chain', methods=['GET'])
def full_chain():
    return jsonify({
        'chain': str(blockchain.chain),
        'length': len(blockchain.chain)
    }), 200


if __name__ == '__main__':
    app.run(host="0.0.0.0", port=5000)
4. Verify the Dependencies
On running the command `pip freeze > requirements.txt`, a new `requirements.txt` file would be created with the following contents:
blinker==1.7.0
certifi==2024.2.2
charset-normalizer==3.3.2
click==8.1.7
Flask==3.0.2
idna==3.6
itsdangerous==2.1.2
Jinja2==3.1.3
MarkupSafe==2.1.5
requests==2.31.0
urllib3==2.2.1
Werkzeug==3.0.1
5. Start the Server
$ python3 main.py blockchain.py
The terminal would output something like this:

Starting the flask application
Verify the application by visiting the different URL endpoints defined in the flask server:

Currently, we have a single block with no transactions. Now we add some transactions by making a post request on the /transactions/new endpoint. After that, try to make get request on the /mine endpoint to check the mining process:
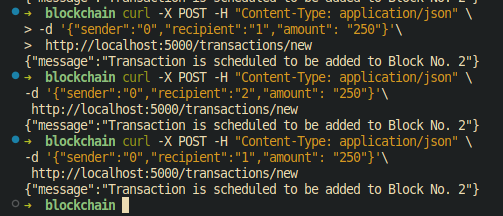
Creating some transactions
Share your thoughts in the comments
Please Login to comment...