Create a Phonebook and Call App using React-Native
Last Updated :
25 Dec, 2023
React-Native is an open-source framework used to develop cross-platform applications i.e., you can write code in React-Native and publish it as an Android or IOS app. In this article, we will build a basic Phonebook and call app using React-Native. The phonebook app will show all the contacts from the contact book. When you click any of the contacts, it will ask you to call that number. You can also search for a contact using the search bar.
Preview of final output: Let us have a look at how the final application will look like.
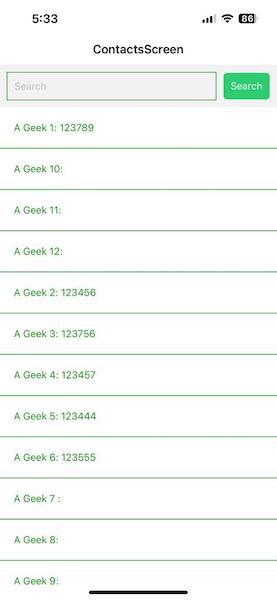
Phonebook App
Prerequisites:
Approach to create Phonebook and Call App:
The app screen will display the contacts list in sorted order. For illustration, I have created some dummy contacts. To call any number, you need to click on that contact. Also, you can use search bar to search the required contact. To fetch the contacts, we use expo-contacts package. To get permission for contacts, we use requestPermissionsAsync() function provided by expo-contacts package. Thus the app provides basic functionality for calling a number from your phonebook.
Steps to Create React-Native App:
Step 1: Create a React Native app by using this command:
npx create-expo-app CallingApp
Step 2: Navigate to our project through this command:
cd CallingApp
Step 3: Install the required dependencies using the following command
npm install @react-navigation/native @react-navigation/stack expo-contacts
Project Structure:
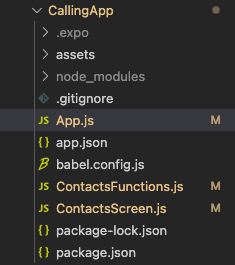
Project Structure
The updated dependencies in package.json file will look like:
"dependencies": {
    "expo-status-bar": "~1.6.0",
    "react-native-contacts": "^7.0.8",
    "react-native-permissions": "^4.0.0",
    "expo-permissions": "~14.2.1",
    "expo-contacts": "~12.2.0",
    "@react-navigation/native": "6.0.0",
    "@react-navigation/stack": "^6.3.20",
    "react-native-gesture-handler": "~2.12.0",
    "react-native-safe-area-context": "4.6.3",
    "react-native-screens": "~3.22.0"
}
Example: Write the code in respective files
- App.js: This file imports all the necessary components and renders them
- ContactsScreen.js: This file defines how the components will be displayed on screen
- ContactsFunctions.js: This file contains the dummy data to display on the screen.
Javascript
import React from 'react';
import { NavigationContainer }
from '@react-navigation/native';
import { createStackNavigator }
from '@react-navigation/stack';
import ContactsScreen
from './ContactsScreen';
const Stack = createStackNavigator();
const App = () => {
return (
<NavigationContainer>
<Stack.Navigator
initialRouteName="ContactsScreen">
<Stack.Screen
name="ContactsScreen"
component={ContactsScreen} />
</Stack.Navigator>
</NavigationContainer>
);
};
export default App;
|
Javascript
import React, { useEffect, useState } from 'react';
import {
View, Text, FlatList,
TouchableOpacity, TextInput,
Pressable
} from 'react-native';
import {
requestContactsPermission,
makeCall, filterContacts
} from './ContactsFunctions';
const ContactsScreen = () => {
const [contacts, setContacts] = useState([]);
const [filteredContacts, setFilteredContacts] = useState([]);
const [searchQuery, setSearchQuery] = useState('');
useEffect(() => {
requestContactsPermission(setContacts, setFilteredContacts);
}, []);
const handleSearch = () => {
filterContacts(contacts, searchQuery, setFilteredContacts);
};
const renderItem = ({ item }) => (
<TouchableOpacity
onPress={() => makeCall(item)}
style={{ borderBottomWidth: 1, borderColor: '#228B22' }}
>
<View
style={{
padding: 20,
backgroundColor: 'white',
}}
>
<Text style=
{
{ color: '#228B22' }}>
{item.name}: {item.phoneNumbers
&& item.phoneNumbers.length > 0 &&
item.phoneNumbers[0].number}
</Text>
</View>
</TouchableOpacity>
);
return (
<View>
<View style=
{
{
flexDirection: 'row',
alignItems: 'center',
margin: 10
}
}>
<TextInput
style=
{
{
flex: 1, height: 40,
borderColor: '#228B22',
borderWidth: 1, marginRight: 10,
paddingLeft: 10, color: '#228B22'
}
}
placeholder="Search"
value={searchQuery}
onChangeText={
(text) =>
setSearchQuery(text)
}
/>
<Pressable
style={({ pressed }) => [
{
backgroundColor: pressed ? '#1e8449' : '#2ecc71',
padding: 10,
borderRadius: 5,
},
]}
onPress={handleSearch}
>
<Text style=
{
{
color: 'white'
}
}>
Search
</Text>
</Pressable>
</View>
<FlatList
data={filteredContacts}
renderItem={renderItem}
keyExtractor={(item) => item.id}
/>
</View>
);
};
export default ContactsScreen;
|
Javascript
import * as Contacts from 'expo-contacts';
import { Linking, Alert } from 'react-native';
const dummyContacts = [
{
id: '1',
name: 'Geek 1',
phoneNumbers: [
{
number: '123-456-7890',
},
],
},
{
id: '2',
name: 'Geek 2',
phoneNumbers: [
{
number: '987-654-3210',
},
],
},
{
id: '3',
name: 'Geek 3',
phoneNumbers: [
],
},
];
export const requestContactsPermission =
async (setContacts, setFilteredContacts) => {
try {
const { status } =
await Contacts.requestPermissionsAsync();
setContacts(dummyContacts);
setFilteredContacts(dummyContacts);
if (status === 'granted') {
setContacts(sortedContacts);
setFilteredContacts(sortedContacts);
} else {
console.log('Contacts permission denied');
}
} catch (error) {
console
.error('Error requesting contacts permission:', error);
}
};
export const fetchContacts =
async (setContacts, setFilteredContacts) => {
try {
setContacts(dummyContacts);
setFilteredContacts(dummyContacts);
} catch (error) {
console.error('Error fetching contacts:', error);
}
};
export const makeCall = (contact) => {
const phoneNumber =
contact.phoneNumbers
&&
contact.phoneNumbers.length > 0
? contact.phoneNumbers[0].number
: null;
if (phoneNumber) {
const url = `tel:${phoneNumber}`;
Linking.openURL(url);
} else {
Alert.alert('No phone number available for this contact.');
}
};
export const filterContacts =
(contacts, searchQuery, setFilteredContacts) => {
const filtered = contacts.filter(
(contact) =>
contact.name.toLowerCase()
.includes(searchQuery.toLowerCase()) ||
(contact.phoneNumbers &&
contact.phoneNumbers.length > 0 &&
contact.phoneNumbers[0].number.includes(searchQuery))
);
setFilteredContacts(filtered);
};
|
You can use any of the below two methods to run the app
Method 1: Open the terminal and enter the following command to run the app
npx expo start
Method 2: You can use emulator or connect computer to your device using USB and run the below command
npx react-native run-android
npx react-native run-ios
Output:
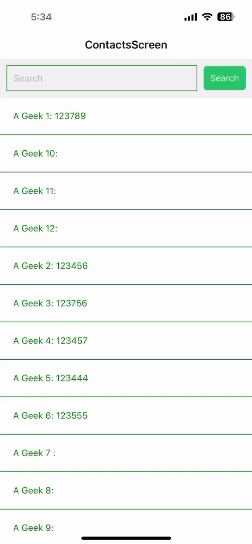
Calling App
Share your thoughts in the comments
Please Login to comment...