Build Text 2 Image with HuggingFace Diffusers
Last Updated :
04 Feb, 2024
This article will implement the Text 2 Image application using the Hugging Face Diffusers library. We will demonstrate two different pipelines with 2 different pre-trained Stable Diffusion models. Before we dive into code implementation, let us understand Stable Diffusion.
What is Stable Diffusion?
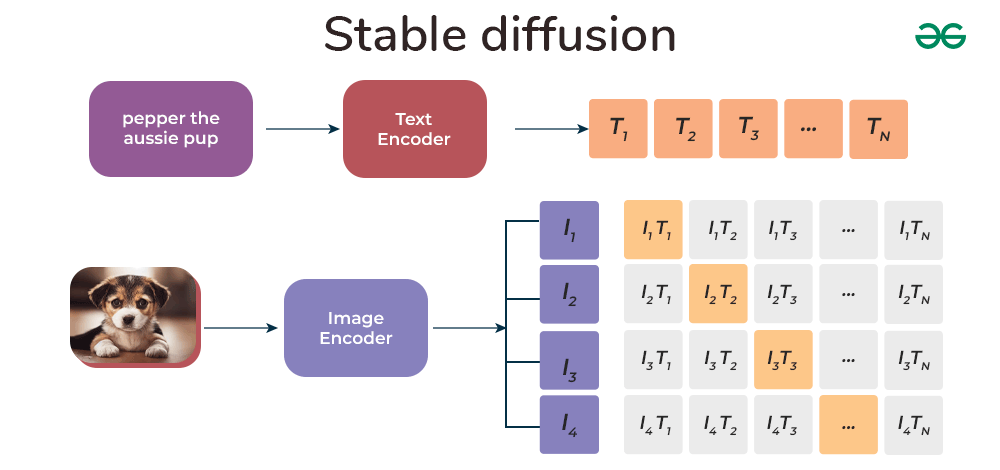
With the advancement of AI in the Image and Video domain, one might come across a word called Stable Diffusion that can perform tasks such as Text-to-Image, Text-to-Video, Image-to-Video, Image-to-Image and so on. To understand Stable Diffusion as a whole, it all started as a cutting-edge text-to-image latent diffusion model developed collaboratively by researchers and engineers associated with CompVis, Stability AI, and LAION. The model originated from the research paper “High-Resolution Image Synthesis with Latent Diffusion Models” written by Robin Rombach, Andreas Blattmann, Dominik Lorenz, Patrick Esser, and Björn Ommer. The fundamental idea behind latent diffusion revolves around implementing the diffusion process within a lower-dimensional latent space, effectively addressing the challenges posed by memory and computational demands in high-resolution image synthesis.
Working and Pre-trained Models
Stable Diffusion is trained on 512×512 images from a particular part of the LAION-5B dataset. Importantly, it uses a fixed OpenAI’s CLIP ViT-L/14 text encoder to guide the model with text instructions. Despite its impressive features, the model stays lightweight with an 860M UNet and a 123M text encoder, making it run smoothly on regular consumer GPUs.
Since training the model is not affordable by everyone, one relies on pre-trained models. Now that we know, we are supposed to use pre-trained models, but where do we get the access to this model weights?
Hugging Face comes to the rescue. Hugging Face Hub is a cool place with over 120K+ models, 75K+ datasets, and 150K+ spaces (demo apps), all free and open to everyone.
Hugging Face Diffusers
In order to implement Stable Diffusion model using GitHub repository is not beginner friendly. To make it more appealing to the user HuggingFace released Diffusers, an open-source repository for state-of-the-art pretrained diffusion models for generating images, audio, and even 3D structures of molecules. Further just like HuggingFace transformers, even diffusers support various pipelines which makes running state-of-art models run withing one-two lines of code.
Pipeline is the easiest way to use a pretrained diffusion system for running the inference. It is an end-to-end system containing the model and the scheduler. The pipeline works on cleaning up an image by introducing random noise matching the desired output size and running it through the model multiple times. In each step, the model anticipates the residual noise, and the scheduler utilizes this information to generate a less noisy image.
So, let’s go build now.
Installation
! pip install diffusers accelerate
Note:
We are dealing with high computation when we need to run the Stable Diffusion Pipeline using Diffusers. In order to run the notebook, you need to change the runtime to GPU.
- Click on Runtime in Colab Notebook.
- Select change runtime type.
- Choose T4 GPU from the Hardware accelerator options.
Approach-1 Using StableDiffusionPipeline
In approach-1 we will use simple Stable Diffusion pipeline using a pre-trained model open sourced by RunwayML.
Import required Libraries
Python3
import torch
from diffusers import StableDiffusionPipeline
|
Create Stable Diffusion Pipeline
In the StableDiffusionPipeline, the single-line process involves specifying the pre-trained model within the pipeline, where it internally loads both the model and scheduler. Additionally, to optimize computational efficiency, the inference is executed using floating-point 16-bit precision instead of 32-bit. Furthermore, the pipeline is converted to CUDA to ensure that the inference runs on the GPU.
Python3
pipe = StableDiffusionPipeline.from_pretrained("runwayml/stable-diffusion-v1-5", torch_dtype=torch.float16)
pipe = pipe.to("cuda")
|
Define prompt and run Pipeline
Now, users have the flexibility to define their custom prompts and directly pass the text to the pipeline. The outcome will generate a list object containing the generated images.
Python3
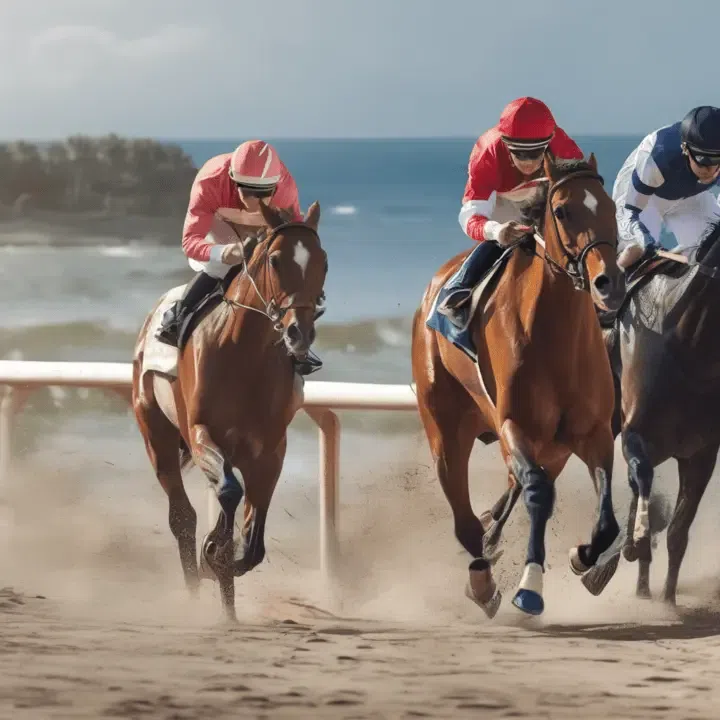
prompt = "a horse racing near beach, 8k, realistic photography"
image = pipe(prompt).images[0]
image
|
Output:
.webp)
Output from Stable-diffusion-v1
Great, I hope you got better results with your prompt. Let’s proceed with the final approach in this article.
Before you proceed to next approach, make sure to create a new notebook. Now again switch the runtime to GPU. If you run both the approaches in same notebook, it will hit memory and give you error.
Approach-2 Using AutoPipelineForText2Image
In order to use task-oriented pipeline, Diffusers also provide AutoPipeline, where we have more flexibility in running inference by enabling the use_safetensors to directly load weights. By automatically identifying the appropriate pipeline class, the AutoPipeline eliminates the need to know the exact class name, simplifying the process of loading a checkpoint for a given task.
Import required Libraries
Python3
import torch
from diffusers import AutoPipelineForText2Image
|
Create Auto Pipeline for Text to Image
The syntax is similar as approach-1, but here we also define use_safetensors to be True and variant to run on floating point 16-bit precision. Notice one change, here we are using the Stabel Diffusion XL pre-trained model, which is the most advanced model in the current date.
Python3
pipe = AutoPipelineForText2Image.from_pretrained(
"stabilityai/stable-diffusion-xl-base-1.0", torch_dtype=torch.float16, variant="fp16", use_safetensors=True
)
pipe = pipe.to("cuda")
|
Define prompt and run Pipeline
Use the same prompt and check the response quality between the base model (v1.5) and advanced model (xl).
Python3
prompt = "a horse racing near beach, 8k, realistic photography"
image = pipe(prompt=prompt).images[0]
image
|
Output:
Output from Stable-diffusion-XL
Stable Diffusion XL gives more accurate result compared to Stable Diffusion v1.5 as in prompt we mentioned beach, but v1.5 doesn’t have beach in its image. With this we conclude.
Conclusion
Finally, we conclude how you can get started with Text2Image application using HuggingFace Diffusers library. Using pipelines, it makes it super simple to implement Stable Diffusion applications. Similarity you can use different pipelines to implement ControlNet, Text2Video, Image2Image and so on. The only required thing is get the pre-trained model, write a good prompt, execute and run the pipeline.
Share your thoughts in the comments
Please Login to comment...