Birthday Wishing Android Application
Last Updated :
25 Apr, 2024
Java Android world is quite amazing and here we will be deep diving into creating a Simple Android Application that can act as both a friendly Android Project and a Nice Surprise for a friend. The Best Way to greet your best friend is to create an Android Application that will wish him “Happy Birthday” on your behalf, unlike other boring messages.
This is a beginner-friendly Android Application focusing on the initial stage when you just started to learn Android Studio, its components, Front-end XML, Java Backend, etc. We will learn the basic usage of MediaPlayer, and ImageView in Android Studio.
Prerequisites:
- Understanding of Java.
- Android Studio Installed.
- Basic knowledge of Android Studio with Java.
Creating Application in Android Studio
Step 1: Power up your Android studio and create a new project with empty Views activity.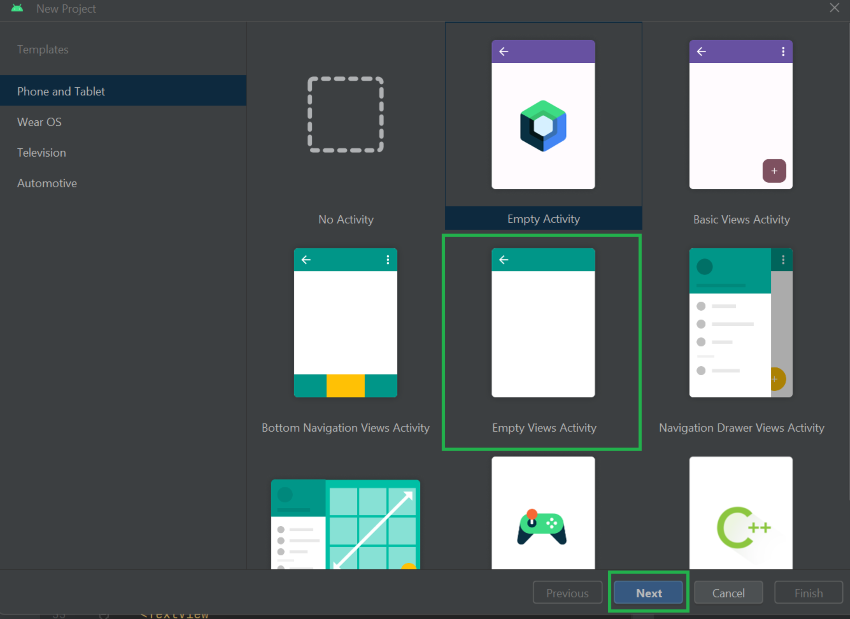
Step 2: Give your application any name you want, select language as Java and click Finish.
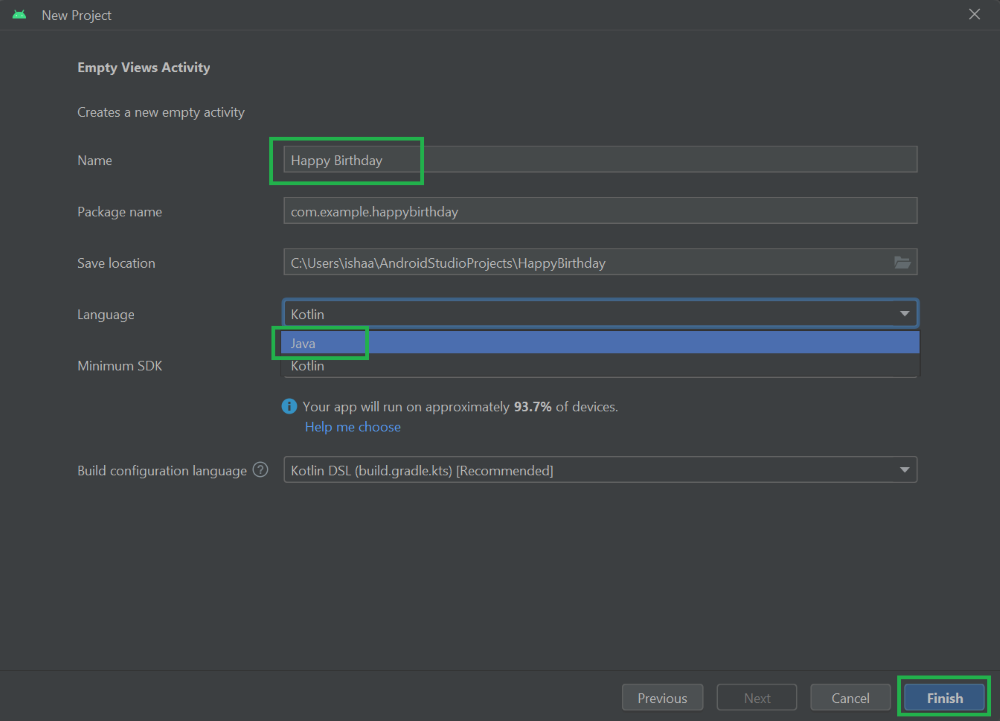
This will make a new android project for you. Please wait for some time for the IDE to fully process the newly made project.
Preparing and Adding the Resources to Application
Before making the frontend, please be ready with these resources which are available freely on the internet.
- A Birthday wishing GIF file.
- A birthday song .mp3 file.
- An image file for background.
- 5 images representing:
- A full cake on a plate
- 3/4th of the cake on the plate
- 1/2 of the cake on the plate
- 1/4th of cake on the plate
- An image representing the full cake eaten.
- 2 eating sound effect .mp3 file
After getting all these resources let’s see how we can add these into our project.
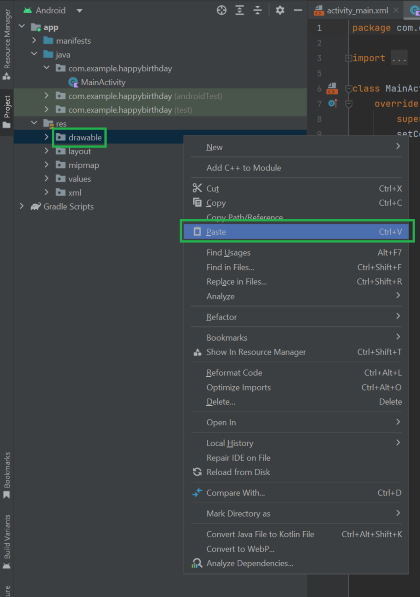
-> Image files
Step 1: Copy all the image files. After copying the files, open your android studio IDE and inside the ‘res’ folder, right-click on the drawable directory and select paste.
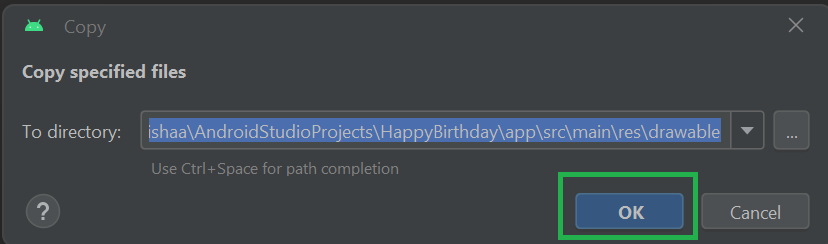
Step 2: Click OK.
This will add all your images into the project directory which you can use to display in the frontend. Your Drawable directory should look something like this.
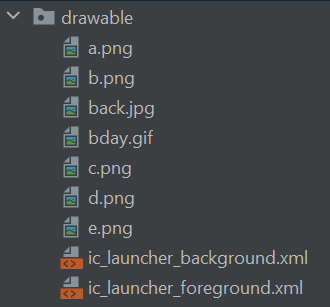
- The back.jpg is the background image.
- The bday.gif is the gif file
- Rest of the images, a.png, b.png, etc. are the 5 images representing the cakes as previously said.
-> Audio (.mp3) files.
To add the .mp3 files into the android Project, follow these steps.
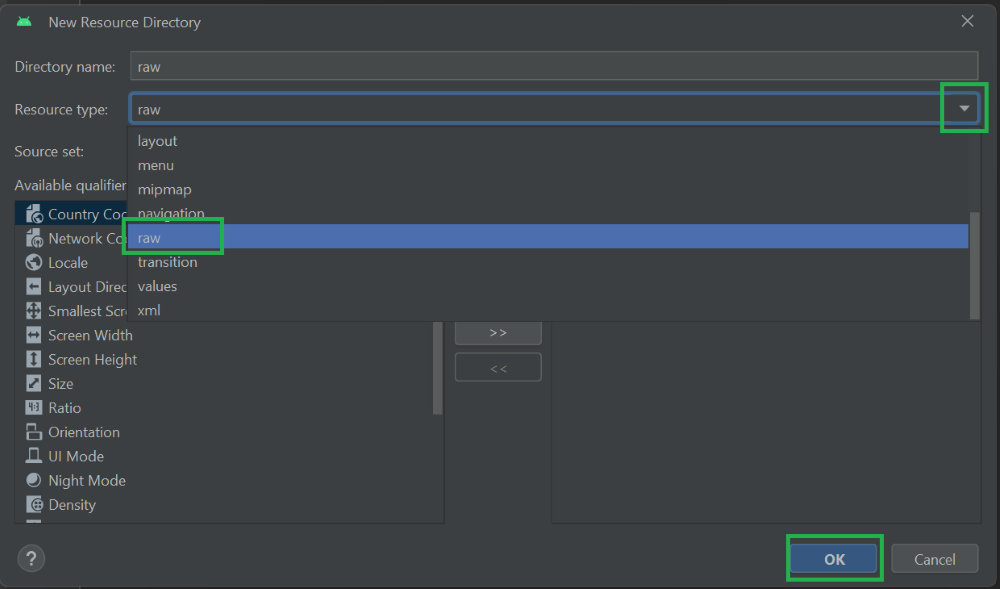
Step 1: Right-click on the res folder -> New -> Android Resource Directory.
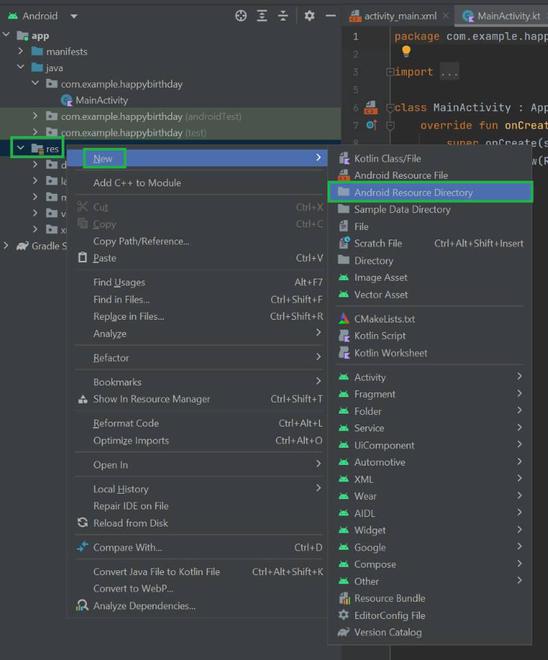
Step 2: A new window will open. You will have to choose the ‘raw’ option from the dropdown menu. This directory will contain the .mp3 files.
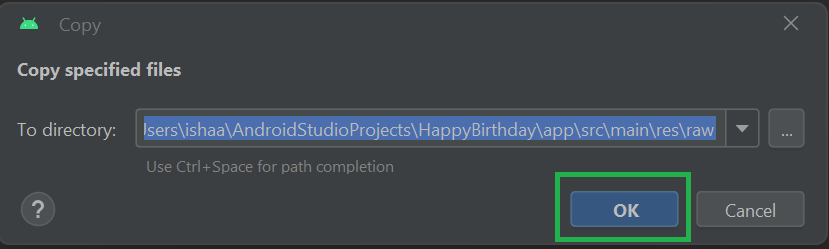
A new directory will be created inside the ‘res’ folder. In here you have to copy your .mp3 audio files.
Step 3: Copy all the .mp3 files and right-click on the ‘raw’ directory and select paste.

Step 4: Click ‘OK’
Your ‘raw’ directory should look something like this.
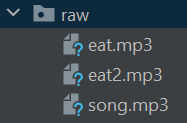
The above image is how my ‘raw’ directory looks like.
- The Birthday song is inside the song.mp3 file.
- I have downloaded 2 eating sound effects each of them of 2-3 seconds.
With this all the recourses have been successfully added into the project. Not its time to start the Front-End of the application.
Preparing Front-End of the Application
The Front-End of the application will be written in XML. It is the default language of front-end in android studio. We will integrate all the image files with text to make our frontend user friendly.
Step 1: Add Dependency in Application Files
To display a GIF inside the application, we need to add a dependency in the application files. To add the dependency:
-> Go to Gradle Scripts -> build.gradle.kts (module: app) and add the following line in the dependency block.
implementation("pl.droidsonroids.gif:android-gif-drawable:1.2.22")Now we will add all the GIF and images we collected in the frontend.
Step 2: Preparing XML File for Front End
– XML for the FrontEnd is mentioned below:
XML
<?xml version="1.0" encoding="utf-8"?>
<androidx.constraintlayout.widget.ConstraintLayout xmlns:android="http://schemas.android.com/apk/res/android"
    xmlns:app="http://schemas.android.com/apk/res-auto"
    xmlns:tools="http://schemas.android.com/tools"
    android:layout_width="match_parent"
    android:layout_height="match_parent"
    android:background="@drawable/back"
    tools:context=".MainActivity">


    <pl.droidsonroids.gif.GifImageView
        android:id="@+id/gifImageView"
        android:layout_width="352dp"
        android:layout_height="290dp"
        android:layout_gravity="center"
        android:src="@drawable/bday"
        app:layout_constraintBottom_toTopOf="@+id/linearLayout"
        app:layout_constraintEnd_toEndOf="parent"
        app:layout_constraintStart_toStartOf="parent"
        app:layout_constraintTop_toTopOf="parent" />

    <LinearLayout
        android:id="@+id/linearLayout"
        android:layout_width="332dp"
        android:layout_height="wrap_content"
        android:gravity="center"
        android:orientation="horizontal"
        android:padding="10dp"
        app:layout_constraintBottom_toTopOf="@+id/EatCake"
        app:layout_constraintEnd_toEndOf="parent"
        app:layout_constraintStart_toStartOf="parent"
        app:layout_constraintTop_toBottomOf="@+id/gifImageView">

        <Button
            android:id="@+id/SongStart"
            android:layout_width="147dp"
            android:layout_height="wrap_content"
            android:layout_marginEnd="20dp"
            android:onClick="songctrlStart"
            android:padding="10dp"
            android:text="Start song" />

        <Button
            android:id="@+id/SongStop"
            android:layout_width="wrap_content"
            android:layout_height="wrap_content"
            android:layout_weight="1"
            android:onClick="songctrlStop"
            android:text="Stop Song" />

    </LinearLayout>


    <Button
        android:id="@+id/EatCake"
        android:layout_width="319dp"
        android:layout_height="59dp"
        android:onClick="changeImg"
        android:padding="5dp"
        android:text="Click me to eat the cake"
        app:backgroundTint="#e86af6"
        app:layout_constraintBottom_toTopOf="@+id/cakeImage"
        app:layout_constraintEnd_toEndOf="parent"
        app:layout_constraintStart_toStartOf="parent"
        app:layout_constraintTop_toBottomOf="@+id/linearLayout" />

    <ImageView
        android:id="@+id/cakeImage"
        android:layout_width="258dp"
        android:layout_height="209dp"
        android:padding="5dp"
        app:layout_constraintBottom_toTopOf="@+id/textView"
        app:layout_constraintEnd_toEndOf="parent"
        app:layout_constraintStart_toStartOf="parent"
        app:layout_constraintTop_toBottomOf="@+id/EatCake"
        app:srcCompat="@drawable/a" />

    <TextView
        android:id="@+id/textView"
        android:layout_width="400dp"
        android:layout_height="67dp"
        android:fontFamily="cursive"
        android:gravity="center"
        android:textColor="#18055c"
        android:textSize="30sp"
        android:textStyle="bold"
        app:layout_constraintBottom_toBottomOf="parent"
        app:layout_constraintEnd_toEndOf="parent"
        app:layout_constraintStart_toStartOf="parent"
        app:layout_constraintTop_toBottomOf="@+id/cakeImage" />


</androidx.constraintlayout.widget.ConstraintLayout>
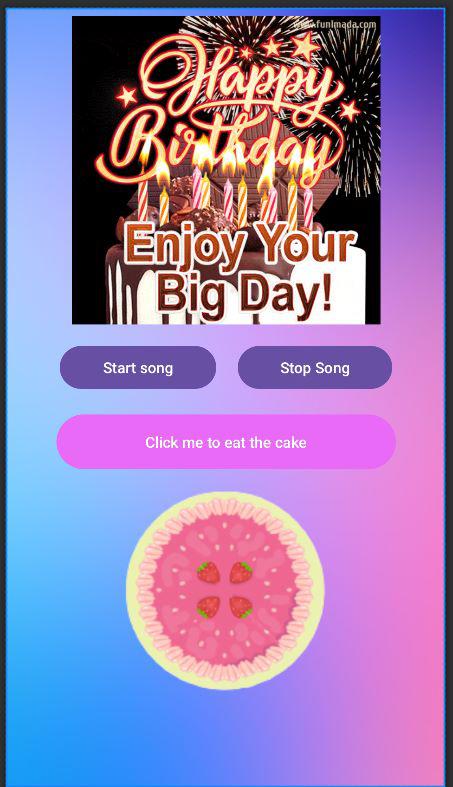
In the above XML code, we can see that we have added:
- A background Picture.
- The Birthday GIF.
- 2 Buttons to control the song.
- One button specifying ‘eat the cake’.
- The cake’s image.
- Lastly to add some more spice, we added a text view.
– All of these are bound together with constraint layout and vertical chains.
– The two song control buttons are specifically put inside a relative layout to give them a horizontal layout.
Here is what the Front-end may looks like:
Adding Back-End to the Application
It is pretty self-explanatory what each button is meant to do. So, let’s direct dive into the logic of how it would be implemented in MainActivity.java file. The MainActivity.java file is the backend code for the Front-End. It defined the behavior of the buttons when clicked and how the audio files will play.
Below is the Java Program to add functionality to the application:
Java
package com.example.happybirthday;

import android.media.MediaPlayer;
import android.os.Bundle;
import android.view.View;
import android.widget.Button;
import android.widget.ImageView;
import android.widget.TextView;
import androidx.appcompat.app.AppCompatActivity;

public class MainActivity extends AppCompatActivity {
  // Initializing all variables needed
    private Button EatCake;
    private int count=0;
    private String[] comments = {"YUMMY", "DELICIOUS", "MOUTH WATERING", "LUSCIOUS", "TASTY", "SWEET", "FLAVOURSOME", "APPETIZING", "DIVINE", "TEMPTING"};
    private MediaPlayer eatSound;
    private MediaPlayer eatSound2;
    private ImageView cake;
    private int[] images = {R.drawable.a, R.drawable.b, R.drawable.c, R.drawable.d, R.drawable.e};
    private MediaPlayer song;
    private Button songStartbtn;
    private Button songStopbtn;
    private TextView commentText;

    public void onCreate(Bundle savedInstanceState) {
        super.onCreate(savedInstanceState);
        setContentView(R.layout.activity_main);

      // Integrating the FrontEnd and BackEnd variables.
        cake = findViewById(R.id.cakeImage);
        EatCake = findViewById(R.id.EatCake);
        commentText = findViewById(R.id.textView);
        songStartbtn = findViewById(R.id.SongStart);
        songStopbtn = findViewById(R.id.SongStop);

      // Setting up the MediaPlayer Variables.
        eatSound = MediaPlayer.create(this, R.raw.eat);
        song = MediaPlayer.create(this, R.raw.song);
        eatSound2 = MediaPlayer.create(this, R.raw.eat2);

      // Starting to play the birthday song as soon as the  avtivity begins.
        song.start();
        song.setOnCompletionListener(new MediaPlayer.OnCompletionListener() {
            @Override
            public void onCompletion(MediaPlayer mediaPlayer) {
                song.release();
                song = null;
            }
        });

      // Starts the Song to play again
      // It first checks if the song is not already playing to prevent another instance to start playing together.
        songStartbtn.setOnClickListener(new View.OnClickListener() {
            @Override
            public void onClick(View view) {
                if (song == null) {
                    song = MediaPlayer.create(MainActivity.this, R.raw.song);
                    song.start();
                    song.setOnCompletionListener(new MediaPlayer.OnCompletionListener() {
                        @Override
                        public void onCompletion(MediaPlayer mediaPlayer) {
                            song.release();
                            song = null;
                        }
                    });
                }

            }
        });

      // Stops the birthday song and makes the song variable null.
        songStopbtn.setOnClickListener(new View.OnClickListener() {
            @Override
            public void onClick(View view) {
                song.stop();
                song = null;
            }
        });

      // Eating cake logic.
      // The count variable keeps the track of which immage to display next
      // If cake is finished display "BRING ME MORE".
      // The 2 sound effects play randomly.
      // The comments also display randomly when the cake is eaten.
        EatCake.setOnClickListener(new View.OnClickListener() {
            @Override
            public void onClick(View view) {
                count++;
                cake.setImageResource(images[count]);

              // Count == 0 means new cake just arrived!
              // So, no eating sound effect is needed.
              // We have to set the text on the button to it's original text.
                if(count == 0){
                      EatCake.setText("Click me to eat the cake");
                    return;
                }
                int randInt = (int)(Math.random()*2.0);
                int randInt2 = (int)(Math.random()*10.0);
                commentText.setText(comments[randInt2]);
                if(randInt == 0){
                    if(eatSound == null){
                        eatSound = MediaPlayer.create(MainActivity.this, R.raw.eat);
                    }
                    eatSound.start();
                }
                else{
                    if(eatSound2 == null){
                        eatSound2 = MediaPlayer.create(MainActivity.this, R.raw.eat2);
                    }
                    eatSound2.start();
                }

              // If cake is over, BRING ME MORE!
              // Setting count to -1 as it will start to display the cake images again by order.
                if(count==4){
                    EatCake.setText("BRING ME MORE!");
                    count = -1;
                }
            }
        });


    }

    // When activity is paused, release and set null the MediaPlayer variables.
    public void onPause() {
        super.onPause();
        if(eatSound != null){
            eatSound.release();
            eatSound = null;
        }
        if(song != null){
            song.release();
            song = null;
        }
        if(eatSound2 != null){
            eatSound2.release();
            eatSound2 = null;
        }
    }
}
Working Application:
Video is muted as to avoid any copyright issue.
Share your thoughts in the comments
Please Login to comment...