Basic Program in Hibernate
Last Updated :
09 Jan, 2024
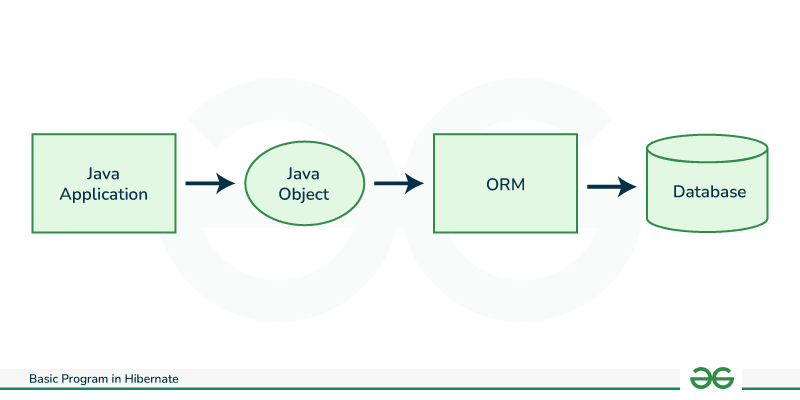
Hibernate is a Java ORM (Object Relational Mapping) framework, that makes it easy to save Java objects to databases. It internally uses JPA (Java Persistence API) to persist the state of the object in the database schema. It does this by creating a link between your objects and database tables, so you don’t have to write lots of code to manage the data.
It works with different databases, lets you do things like create, update, and delete data, and even builds the database structure for you automatically. It uses a hibernate session buffer which acts as an intermediate layer between the application and the database and caches the entities. It increases the performance significantly as the database is not hit each time an operation is performed. Inserts and updates are not made into the database immediately rather changes are saved into the session and the database is updated when the session is flushed.
Advantages of Hibernate
Given below are some advantages of using the hibernate framework:
- Hibernate framework is independent of the DBMS used by application. It uses its own query language HQL, Hibernate Query Language, which does not depend on any database.
- Hibernate framework supports lazy loading wherein it does not load complete object at once. Data is loaded as and when it is needed.
- It maps the objects into database schema automatically.
- It provides various annotations which ease out the mapping of many-to-many, one-to-many and many-to-one associations.
- It handles transaction management.
Components of Hibernate
A Basic Hibernate program consists of mainly five major components:
- Hibernate jar files: Hibernate jar files need to be included in the project. You can download jar files using the given link.
- Hibernate Configuration File: It consists of configurations required to run hibernate like database URL, username, password, etc.
- POJO (Plain Old Java Object) class: It defines the entity which is to be mapped into the database.
- Hibernate Mapping Class: It provides the structure for creating the schema in the database corresponding to the entity.
- Main Class: It defines the code to be executed.
Step by Step Implementation of Hibernate framework
Given program demonstrates creation of Employee table in the database and insertion of a record into it using Hibernate framework and MySQL database.
Step 1: Download the jar files and include in your project. You can download the files from given link.
https://jar-download.com/artifacts/org.hibernate/hibernate-core
Alternatively, you can add following dependency in pom.xml for maven projects:
<dependency>
   <groupId>org.hibernate</groupId>
   <artifactId>hibernate-core</artifactId>
   <version>6.4.1.Final</version>
   <type>pom</type>
</dependency>
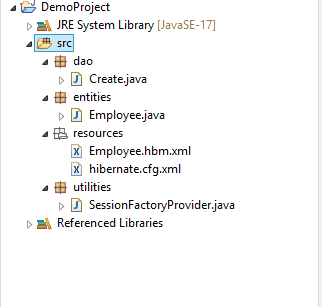
Employee.java:
Java
package entities;
public class Employee {
private int empId;
private String empName;
public Employee(int empId, String empName)
{
super();
this.empId = empId;
this.empName = empName;
}
public int getEmpId() { return empId; }
public void setEmpId(int empId) { this.empId = empId; }
public String getEmpName() { return empName; }
public void setEmpName(String empName)
{
this.empName = empName;
}
}
|
Step 3: Create resources folder and add hibernate mapping file for Employee in it.
Employee.hbm.xml:
XML
<?xml version="1.0" encoding="UTF-8"?>
<!DOCTYPE hibernate-mapping PUBLIC "-//Hibernate Mapping DTD 3.0//EN"
<hibernate-mapping>
<class name="entities.Employee" table="employee">
<id name="empId"></id>
<property name="empName"></property>
</class>
</hibernate-mapping>
|
This file is used by Hibernate while creating the database schema. It consists of following tags:
- class tag: It takes two attributes namely:
- name: It provides the POJO class which needs to be mapped into the database.
- table: It specifies the name of the table created in the database.
- Id tag: It defines the primary key for the table in the database, therefore, it must be provided.
- Property tag: It defines other attributes of the entity. It takes two attributes
- Name: This attribute of property tag specifies the property of the POJO class.
- Column: This attribute specifies name of the column in database for the given property.
Step 4: Create hibernate configuration file inside the resources folder.
hibernate.cfg.xml:
XML
<?xml version="1.0" encoding="UTF-8"?>
<!DOCTYPE hibernate-configuration PUBLIC "-//Hibernate Configuration DTD 3.0//EN"
<hibernate-configuration>
<session-factory>
<property name="hibernate.hbm2ddl.auto">create</property>
<property name="hibernate.dialect">org.hibernate.dialect.MySQL5Dialect</property>
<property name="hibernate.connection.driver_class">com.mysql.jdbc.Driver</property>
<property name="hibernate.connection.username">root</property>
<property name="hibernate.connection.password">root</property>
<mapping resource="resources/Employee.hbm.xml"></mapping>
</session-factory>
</hibernate-configuration>
|
This file is used to provide various Hibernate configurations like dialect, database driver, database url, database username, database password, hibernate mapping resources, etc.
Step 5: Now, to add a record into the database, follow given steps:
1. Create Configuration object.
Configuration config = new Configuration();
2. Provide hibernate configuration file to the Configuration object. By convention, hibernation configuration file is saved as ‘hibernate.cfg.xml’.
config.configure("resources/hibernate.cfg.xml");
3. Build session factory using configuration object.
SessionFactory sessionFactory = config.buildSessionFactory();
4. Open session and begin the transaction.
Session session=sessionFactory.openSession();
Transaction t=session.beginTransaction();
5. Create new Employee object and save it using session.
Employee emp = new Employee(101,"John");
session.save(emp);
6. Commit the transaction and close the session factory.
t.commit();
sessionFactory.close()
Complete implementation of above steps is given below.
SessionFactoryProvider.java:
Create utilities folder and create a session factory provider class inside it.
Java
package utilities;
import org.hibernate.SessionFactory;
import org.hibernate.cfg.Configuration;
public class SessionFactoryProvider {
public static SessionFactory provideSessionFactory()
{
Configuration config = new Configuration();
config.configure("resources/hibernate.cfg.xml");
return config.buildSessionFactory();
}
}
|
This class creates a configuration object and provides hibernate configuration file to it. It returns the sessionFactory object which can later be used in the main class. Now, create the main class.
Create.java:
Java
package dao;
import entities.Employee;
import org.hibernate.Session;
import org.hibernate.SessionFactory;
import org.hibernate.Transaction;
import utilities.SessionFactoryProvider;
public class Create {
public static void main(String[] args)
{
try {
SessionFactory sessionFactory
= SessionFactoryProvider
.provideSessionFactory();
Session session = sessionFactory.openSession();
Transaction t = session.beginTransaction();
Employee emp = new Employee(101, "John");
session.save(emp);
t.commit();
sessionFactory.close();
}
catch (Exception e) {
System.out.println(e);
}
}
}
|
Given class adds an entity in the employee table.
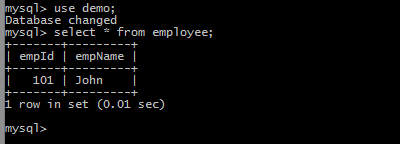
Output:
Run Create.java class. Open MySQL command line and view the inserted records. Use following queries to view the result:
use demo;
select * from employee;
Complete Compilation and Execution of Program
Share your thoughts in the comments
Please Login to comment...