Apache Camel File Component With SpringBoot
Last Updated :
28 Feb, 2024
Apache Camel File Component is one of the famous technologies handling File Systems to handle different kinds of files. Like CSV, JSON, and other format files. This Apache Camel File component is mostly used for Processing the Files based on our business logic. This File Component allows other components’ messages to be saved into disk.
Now, we will explore this using the Apache Camel File component. Take data from a CSV file and process the data. Then insert it into MongoDB in Spring Boot with a good real-time example. For this, we need to follow the below steps.
- Created one dedicated source file path for reading files by using the Apache File Component.
- Then check the CSV File data format, if it is okay apply the business logic otherwise show some error message to the end user.
- Once the file is successfully read then apply your required Business logic
- Once logic is processed on the data saved into MongoDB.
- Once Data is inserted into MongoDB, the processed file is moved to some dedicated destination folder.
Prerequisites:
- Good Knowledge in Spring Boot
- Apache File Component Working Functionality
- MongoDB
- File Management in Spring Boot
- Creation of Spring Stater Project
Note: The Apache File Component always poll the source folder path to check whether any new file is coming into that folder. If came, it process that.
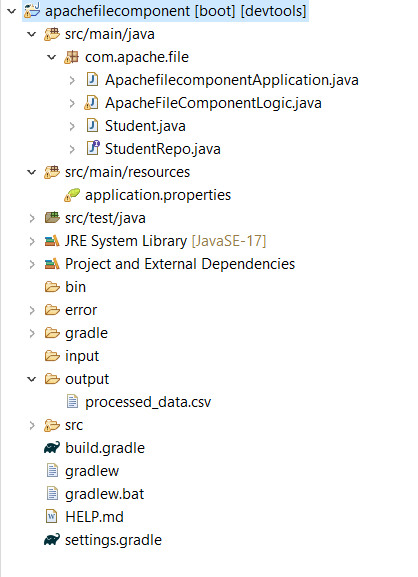
Project Folder Structure:
Project Dependencies:
dependencies {
    implementation("org.springframework.boot:spring-boot-starter-data-mongodb")
    implementation("org.apache.camel.springboot:camel-spring-boot-starter:4.3.0")
    implementation("org.apache.camel:camel-csv:4.3.0")
    implementation("org.apache.camel:camel-bindy:4.3.0")

    compileOnly("org.projectlombok:lombok")
    developmentOnly("org.springframework.boot:spring-boot-devtools")
    annotationProcessor("org.projectlombok:lombok")
    testImplementation("org.springframework.boot:spring-boot-starter-test")

}
- Here, we have used spring-boot-starter-data-mongodb for mongodb operation.
- For Handling Apache File Component, we have used camel-spring-boot-starter:4.3.0
- Then for file handling, we have used this org.apache.camel:camel-csv:4.3.0
- After that, for binding the CSV File with required data format we have used camel-bindy:4.3.0
- Spring Boot Dev Tools used for project running purpose and lombok is used for POJO class annotations.
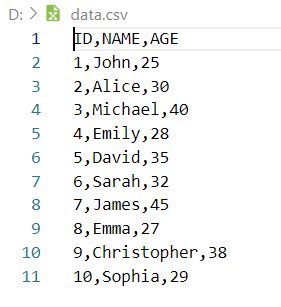
Data Format in CSV File
Below, we have provided the required Data format in CSV File then only Data inserted into MongoDB otherwise the Apache File component Gives an error message.
Here, we have taken one CSV File with ten rows of data.
Now we will provide entire project code for reference, and we will explain each and every class. We have already provided the project folder structure. We can see all created classes in that project folder image. For this Project first we need configure the Apache Camel File component in application properties file. This file available in Project resource folder, Below, we have provided that configuration code for handling Apache Camel File Component.
application.properties
In this File, we have provided configuration for MongoDB connection and handling Apache File component and enabled loggers. Also, we have provided the dedicated folder path also for polling files and once processed then move into another location..
spring.data.mongodb.host=localhost
spring.data.mongodb.port=27017
spring.data.mongodb.database=working
# folder properties for source,destination and error
camel.sourcefolder = input/
camel.destinationfolder = output/
camel.errorfolder = error/
spring.task.scheduling.pool.size=2
camel.springboot.main-run-controller=true
logging.level.org.apache.camel=debug
After this, in main package folder, we have created one Java class for Handling data format in CSV file as well as save the data into MongoDB by using Mongo Repository.
Student Class
This is called model in Java projects.
- In this class, we have defined the column names and provide setters and getters for those fields by using lombok Dependencies.
- After that for identify the data in CSV file, we have used one Spring Boot annotation that is @CsvRecord .
- In this annotation, we have used some properties like separator = “,”, skipField = true, skipFirstLine = true.
- And @DataField takes pos argument for providing the fields position from the CSV file.
Java
package com.apache.file;
import org.apache.camel.dataformat.bindy.annotation.CsvRecord;
import org.apache.camel.dataformat.bindy.annotation.DataField;
import org.springframework.data.annotation.Id;
import org.springframework.data.mongodb.core.mapping.Document;
import lombok.AllArgsConstructor;
import lombok.Data;
import lombok.NoArgsConstructor;
@Data
@AllArgsConstructor
@NoArgsConstructor
@Document(collection = "studentdata")
@CsvRecord(separator = ",", skipField = true, skipFirstLine = true)
public class Student {
@Id
@DataField(pos = 1)
private String id;
@DataField(pos = 2)
private String name;
@DataField(pos = 3)
private String age;
}
|
StudentRepo Interface
Here, we have created one interface for handling database related operation. In our case, we perform insert operation. This means we read data from CSV file then process it. After completion of process saved into database. This interface is created by using @Repository.
Java
package com.apache.file;
import org.springframework.data.mongodb.repository.MongoRepository;
import org.springframework.stereotype.Repository;
@Repository
public interface StudentRepo extends MongoRepository<Student, String> {
}
|
Apache File Component Logic
Here, we have created one more Java class for handling Apache File component.
- This Java class have logic for handling File Systems by using.
- It can be able to be polling for every 2 seconds the dedicated source folder.
- The check the CSV File data format with Student Class.
- Then Process by using the data then inserted into MongoDB.
Apache File component have some methods to handle like from, to. The from method is used for polling input folder, to method is used for moving the file into some other location after completion of the business logic.
Java
package com.apache.file;
import java.util.List;
import org.apache.camel.Exchange;
import org.apache.camel.builder.RouteBuilder;
import org.apache.camel.dataformat.bindy.csv.BindyCsvDataFormat;
import org.springframework.beans.factory.annotation.Autowired;
import org.springframework.core.env.Environment;
import org.springframework.dao.DataAccessException;
import org.springframework.stereotype.Component;
@Component
public class ApacheFileComponentLogic extends RouteBuilder {
@Autowired
private StudentRepo studentRepo;
@Autowired
private Environment env;
@Override
public void configure() throws Exception {
onException(Exception.class).log("Error processing CSV file: ${exception.message}\n${exception.stacktrace}")
.handled(true).log("Error raised, moving file to Error Folder")
.to("file://" + env.getProperty("camel.errorfolder")).log("File moved to Error Folder").end() .log("Attempting to move file back to source folder")
.to("file://" + env.getProperty("camel.sourcefolder")).log("File moved back to Source Folder").end();
from("file://" + env.getProperty("camel.sourcefolder")).routeId("fileRoute").log(" Process Started ") .unmarshal(new BindyCsvDataFormat(Student.class)).process(this::processBulkUserDetails).end()
.log("File processed successfully: ${file:name}").process(this::prepareAndSaveProcessedFile)
.to("file://" + env.getProperty("camel.destinationfolder")).onException(Exception.class).handled(true) .log("Error moving file: ${exception.message}").to("file://" + env.getProperty("camel.errorfolder")) .end();
}
private void processBulkUserDetails(Exchange exchange) {
List<Student> users = exchange.getIn().getBody(List.class);
for (Student userdata : users) {
try {
studentRepo.save(userdata);
} catch (DataAccessException e) {
e.getMessage();
}
}
}
private void prepareAndSaveProcessedFile(Exchange exchange) {
String processedFileName = "processed_" + exchange.getIn().getHeader(Exchange.FILE_NAME, String.class);
exchange.getIn().setHeader(Exchange.FILE_NAME, processedFileName);
List<Student> users = exchange.getIn().getBody(List.class);
StringBuilder processedContent = new StringBuilder();
for (Student user : users) {
processedContent.append(user.toString()).append("\n");
}
exchange.getIn().setBody(processedContent.toString().getBytes());
}
}
|
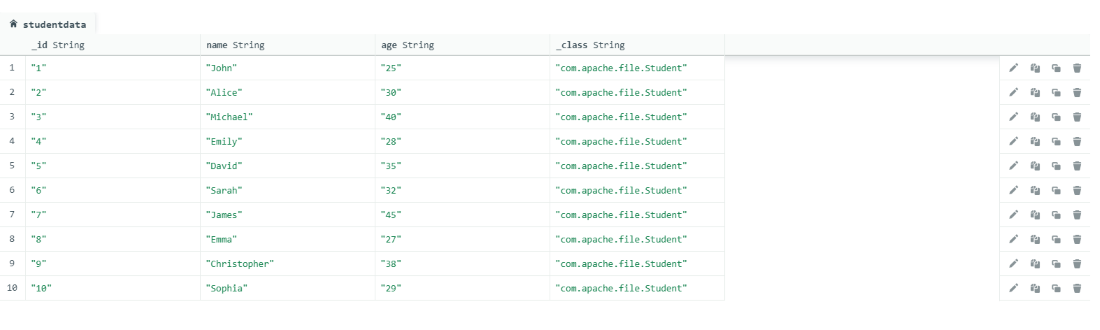
Output:
Below we can see the output in form of GIF.
After successfully run this project as Spring Boot app then the CSV File data is inserted into Mongo DB. Below, we can see the image for reference.
Share your thoughts in the comments
Please Login to comment...