Spring – Setter Injection vs Constructor Injection
Last Updated :
26 Nov, 2023
Spring Framework is built on top of servlets and one of its main features is ‘Dependency Injection’ (DI) it’s one of the most common principles of modern software development and it allows us to achieve the principle of Inversion Of Control (IoC) i.e, shifting the creation, management and the lifecycle of objects from the programmer to the framework. This approach helps relieve the programmer from the responsibility of managing and creating objects and allows them to focus mainly on the business logic thereby effectively managing the objects. It’s also one of the core features of the spring-core module and aids in promoting decoupling among the components of our system. There are various ways in which we can do this, however, in this article, we’ll focus on Constructor and Setter Injections.
Pre-requisites:
1. Inversion Of Control Principle : In simple words, it is simply externalizing the creation & management of objects.
2. Dependency Injection : Dependency injection is basically wiring various objects altogether to support a single cause.
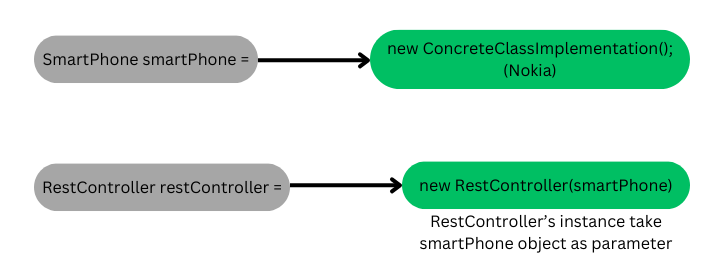
The below image briefly explains the principle of IoC, that we only need to ask for what object we want, and our spring container will return an instance of it.

Inversion Of Control
To summarize, the whole idea of saying – “hey, give me a smart phone object” is that if the object has any helper components or other dependencies, then assemble them ahead of time and provide me the object whenever I ask on demand or when another dependent object is created. There are 3 types of configuration mainly used :
1. XML Based Configuration (Legacy)
2. Java-Based Configuration (Modern)
3. Annotation Based Configuration (Modern)
In this article, we’ll be using Annotation based configuration.
Step-by-Step Procedure
1. Go to Spring Initializr tool
2. Create a package with following details – ( See image – you can modify accordingly)

Spring Initializr Settings
3. Download the file and open it in your preferred IDE.
4. And then finally starts the coding procedure:
Constructor Injection
In this method, dependencies are passed as a parameter to the class’s constructor. This ensures that all the dependencies are injected upon the instantiation of an object. We utilise the @Autowired Annotation on top of the constructors to achieve this.
Let’s understand with code example:
We’ll have following components in the code : Interface, concrete class that provide its implementation. And a REST Controller.
1. Interface SmartPhone
Java
package com.geeksforgeeks.ConstructorInjectionDemo;
public interface SmartPhone {
String getSmartPhoneName();
}
|
Code explanation:
We’ve simply created an interface – ‘SmartPhone’ having a single method inside it.
2. Concrete Class – Nokia
Java
package com.geeksforgeeks.ConstructorInjectionDemo;
import org.springframework.stereotype.Component;
@Component
public class Nokia implements SmartPhone {
@Override public String getSmartPhoneName()
{
return "This is NOKIA Smart Phone";
}
}
|
Code Explanation:
- This is a concrete class that implements the interface – ‘SmartPhone’ and Overrides the method defined in the interface
- @Component annotations, this indicates to the spring framework that this is a Java-Bean and it should be registered for component scanning so that it can be injected into other beans when required.
3. REST Controller
Java
package com.geeksforgeeks.ConstructorInjectionDemo;
import org.springframework.beans.factory.annotation.Autowired;
import org.springframework.web.bind.annotation.GetMapping;
import org.springframework.web.bind.annotation.RequestMapping;
import org.springframework.web.bind.annotation.RestController;
@RestController
@RequestMapping("/api")
public class RESTController {
private final SmartPhone mySmartPhone;
@Autowired
public RESTController(SmartPhone theSmartPhone)
{
this.mySmartPhone = theSmartPhone;
}
@GetMapping("/smartphone/name")
public String getSmartPhoneName()
{
return mySmartPhone.getName();
}
}
|
Code Explanation:
- This is a rest controller containing API calls.
- The @RestController Annotation is a specialised version of @Controller and it signifies that this class is a CONTROLLER and inside it, end-points are defined and these end-points return data either in JSON or XML Format.
- SmartPhone interface Reference is here, to hold an object of concrete implementation.
- @Autowired Annotation – This is the real hero here which injects dependency. The constructor will receive the object of SmartPhone upon instantiation and the @Autowired annotation will inject it into current Rest controller’s instance.
Here’s how the @Autowired injects dependencies behind the scenes !
@Autowired Behind the Scenes
@Autowired working in layman’s term : Spring will scan for @Component, and ask – Hey, is there any concrete class implementing the interface? In our case the interface is ‘SmartPhone’. If there exists one (or more), then inject it. And finally, our @SpringBootApplication class.
4. Application class :
Java
package com.geeksforgeeks.ConstructorInjectionDemo;
import org.springframework.boot.SpringApplication;
import org.springframework.boot.autoconfigure.SpringBootApplication;
@SpringBootApplication
public class ConstructorInjectionDemoApplication {
public static void main(String[] args)
{
SpringApplication.run(ConstructorInjectionDemoApplication.class,args);
}
}
|
After creating all the classes and interfaces, our package structure will look something like this :

Package-Structure
And when we run our application, the output will be :

A key point to note here is that, if we have more than 1 concrete implementation for our interface then our application won’t RUN!

Multiple Concrete Implementations
In the above case, we can utilise both of these Annotations – @Qualifier or @Primary.
Setter Injections
This is another way to inject dependencies and its done by using a setter or getter methods to do so. We can do so by annotating a setter method with @Autowired and it’ll do the work. A key point here is that, dependencies will only be injecting when the setter/getter methods are called.
Assume that all the code will remain same we previously wrote for constructor injections except, I’ve provided a new concrete implementation Vivo & the REST Controller. There are only subtle modifications required in the REST Controller which I’ve made in below code:
Java
package com.geeksforgeeks.SetterInjectionDemo;
import org.springframework.beans.factory.annotation.Autowired;
import org.springframework.web.bind.annotation.GetMapping;
import org.springframework.web.bind.annotation.RequestMapping;
import org.springframework.web.bind.annotation.RestController;
@RestController
@RequestMapping("/api")
public class RESTController {
private SmartPhone mySmartPhone;
@Autowired
public void setSmartPhone(SmartPhone theSmartPhone)
{
this.mySmartPhone = theSmartPhone;
}
@GetMapping("/smartphone/name")
public String getSmartPhoneName()
{
return mySmartPhone.getNameOfSmartPhone();
}
}
|
Code Explanation:
- Instead of having a constructor, here we have a setter method that injects the dependency because its annotated with @Autowired.
- Breaking down how @Autowired is working here:

Working of @Autowired using setter injection
Code Explanation:
- Firstly, the target class object is created
- Secondly, the dependent class object is created
- And finally, the dependencies are injected through setter method.
Output:

Output after calling the method
Note: Its not neccessary that we can only use setter method to inject dependencies instead, we can annotate any method with @Autowired and it’ll work as a dependency injection
3. Any method as the dependency injection
Any method name will work as long as the method that’s injecting dependencies is annotated with @Autowired
Java
@Autowired
public void doSomething(SmartPhone theSmartPhone){
this.mySmartPhone = theSmartPhone;
}
|
Now you maybe wondering which one should you choose while injecting dependencies ? So, here we’ve discussed below some parameter based differences between them :
Setter Injections v/s Constructor Injections
|
Recommended to use when we have some optional dependency. Else our application can provided default business logic code.
|
Recommended to use when Mandatory/required dependencies are there
|
|
Through methods
|
Through Constructors
|
|
IoC Container first creates the dependent object then the Target Class Object
|
IoC Container first create the target class object then the dependent object
|
|
Slow – because dependencies are injected after object of target class is created
|
Fast – because Dependencies are injected as soon as the object of target class is created
|
|
Not recommended as the first choice
|
Recommended by spring.io team as your first choice
|
Use cases when to use which one?
1. Constructor Injections
They are most useful when we need an object along with all its dependencies like for example – CAR can have various dependencies like engine, gear, steering and other relevant components without which a CAR is Use-Less. So, we need all those components wired together in the object of a car.
2. Setter Injections
They are preferred when we have some optional dependencies that are not mandatorily required but can assist in some ways. For example, let’s say we have a new user in our application and they have the freedom to set their profile picture, update personal info and other information whenever they want. Its completely optional.
Share your thoughts in the comments
Please Login to comment...