Spring – MVC Form Radio Button
Last Updated :
24 Feb, 2022
Here, we will learn about the Spring MVC radiobutton and radiobuttons tags. We will create a basic Spring MVC project in the Spring tool suite(STS) to create radiobuttons using form:radiobutton and form:radiobuttons tags.
‘spring-form.tld’ tag library
- In Spring Framework, we can use Java Server Pages (JSPs) as a view component. From version 2.0, Spring provides a comprehensive set of data binding-aware tags for handling form elements when using JSP and Spring Web MVC.
- Each tag in the spring tag library provides support for the set of attributes of its corresponding HTML tag counterpart, making the tags familiar and intuitive to use.
- Spring’s form tag library namely ‘spring-form.tld‘ is integrated with Spring Web MVC, giving the tag’s access to the command object and reference data your controller deals with.
- The form tags make JSPs easier to develop, read and maintain.
- For example: to evaluate errors, setting themes, formatting the fields for inputting and outputting internationalized messages, etc.
- To use the tags from this library, we need to add the following directive at the top of the JSP page:
here the form is the tag name prefix that is used for the tags from this library.
‘radiobutton’ tag
The ‘radiobutton’ is one of the tag provided by the spring-form.tld library. It renders an HTML ‘input’ tag with type ‘radio’.
HTML
<form:radiobutton path=" " value=" " label=" " />
|
‘radiobuttons’ tag
The ‘radiobuttons’ is one of the tag provided by the spring-form.tld library. It renders multiple HTML ‘input’ tags with type ‘radio’.
- It will involve multiple tag instances bound to the same property but with different values by passing in the available options as a runtime variable.
- We can pass values as an Array, a List or a Map containing the available options in the “items” property.
- If you are using a Map, the map entry key will be used as the value and the map entry’s value will be used as the label to be displayed.
HTML
<form:radiobuttons path=" " items=" " />
|
Spring MVC Application
We will create the below Spring MVC application to learn how to use radiobutton tags.
Spring MVC – radiobutton example
Steps to Create Application
- Create a Spring MVC project in Spring Tool Suite.
- In STS, while creating the project based on the developer selection, it will download all the required maven dependencies, *.jar, lib files and it will provide an embedded server.
- Below is the final project structure of the Spring MVC project after creating *.java and *.jsp files also.
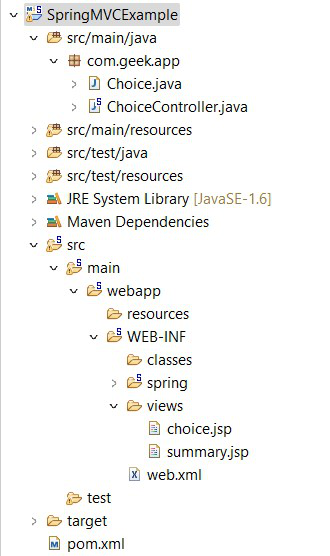
Project Structure
Implementation: Files to be created are as follows:
- Choice.java – Bean class – To define the properties and getter/setter methods of the properties.
- ChoiceController.java – Controller class – To process the user request and generate the output.
- choice.jsp – Jsp file to interact with the user for the input.
- summary.jsp – Jsp file to display the output after processing to the user.
A. File: choice.jsp
HTML
<%@ page language="java" contentType="text/html; charset=ISO-8859-1"
pageEncoding="ISO-8859-1"%>
<!DOCTYPE html>
<html>
<head>
<meta charset="ISO-8859-1">
<title>Welcome page</title>
</head>
<body>
<h1>Welcome to GeeksforGeeks!</h1>
<form:form action="submit" method="post" modelAttribute="choice">
<table>
<tr>
<td><form:label path="name">Enter your name: </form:label></td>
<td><form:input path="name" /></td>
</tr>
<tr>
<td><form:label path="job">Are you looking for a job now?: </form:label></td>
<td><form:radiobutton path="job" value="Yes" label="Yes" /> <form:radiobutton
path="job" value="No" label="No" /></td>
</tr>
<tr>
<td><form:label path="experience">Do you have work experience?: </form:label></td>
<td><form:radiobutton path="experience" value="Yes" label="Yes"
onclick="enable()" /> <form:radiobutton path="experience"
value="No" label="No" onclick="disable()" /></td>
</tr>
<tr>
<td><form:label path="years">How many years of experience you have?: </form:label></td>
<td><form:radiobuttons id="experienceYears" path="years"
items="${experienceYears}" delimiter="|" /></td>
</tr>
<tr>
<td><form:button>Submit</form:button></td>
</tr>
</table>
</form:form>
<script type="text/javascript">
function enable() {
document.getElementById("experienceYears1").disabled = false;
document.getElementById("experienceYears2").disabled = false;
document.getElementById("experienceYears3").disabled = false;
}
function disable() {
document.getElementById("experienceYears1").disabled = true;
document.getElementById("experienceYears2").disabled = true;
document.getElementById("experienceYears3").disabled = true;
}
</script>
</body>
</html>
|
This is the welcome page displayed to the user when the application starts. As we discussed above, we need to include the directive – “http://www.springframework.org/tags/form” in the JSP page to use Spring form tags. In the form tag-action, method attributes are used to map the controller method that has to be executed when JSP page submits. The radiobutton and radiobuttons tags have many attributes like id, path, cssStyle, dir, value, items, etc. We can include any number of attributes based on our project requirement.
In this example, we are using the below attributes as follows:
- path: To specify the path to the property that needs to be bind with the data. In this example, we have used path=”experience” so that the both values – yes, no will bind to that path.
- id: To provide a unique id for the property. Here, we have given the value id=”experienceYears”, so that all the items that are displayed under the radiobuttons tag have this unique id. As there are 3 items in the list, the id will be provided as experienceYears1, experienceYears2, experienceYears3 for the respective item values at runtime.
- value: To specify the value to the particular radiobutton.
- label: To display the name of the value for the radiobutton.
- disabled: It is a boolean attribute to make the radiobutton disabled when the value is true. By default, the value will be false.
- items: To display the radiobutton names from the list.
- delimiter: To specify a delimiter to use between each ‘input’ tag with type ‘radiobutton’. Here we are using ‘|’ symbol as a delimiter.
- onclick: It is the event attribute, where the function specified will be executed when the user clicks on the radiobutton. Here, when the user clicks on Yes, enable() function will be executed and when the user clicks on the No, disable() function will be executed.
JavaScript Functions
We are calling the javascript functions to enable/disable the radiobuttons.
- Finally, when the form is submitted, the container will check the method in the controller class having the URL – “/submit” with method – “post” and it will execute it to process the request.
B. File: Choice.java
Java
package com.geek.app;
public class Choice {
private String name;
private String job;
private String experience;
private String years;
public String getName() { return name; }
public void setName(String name) { this.name = name; }
public String getJob() { return job; }
public void setJob(String job) { this.job = job; }
public String getExperience() { return experience; }
public void setExperience(String experience)
{
this.experience = experience;
}
public String getYears() { return years; }
public void setYears(String years)
{
this.years = years;
}
}
|
- This is the java bean class to define the required parameters.
- Here, we are defining name, job, experience, and years as parameters and their getter/setter methods to get and set the values to the respective properties.
C. File: ChoiceController.java
Java
package com.geek.app;
import java.util.Arrays;
import java.util.List;
import org.springframework.stereotype.Controller;
import org.springframework.ui.Model;
import org.springframework.web.bind.annotation.ModelAttribute;
import org.springframework.web.bind.annotation.RequestMapping;
import org.springframework.web.bind.annotation.RequestMethod;
@Controller
public class ChoiceController {
@RequestMapping(value = "/")
public String viewPage(Model model)
{
Choice choice = new Choice();
model.addAttribute("choice", choice);
return "choice";
}
@ModelAttribute("experienceYears")
public List<String> experienceYears()
{
List<String> years = Arrays.asList(
"1-3 Years", "3-5 years", "Above 5 Years");
return years;
}
@RequestMapping(value = "/submit",
method = RequestMethod.POST)
public String
submit(@ModelAttribute("choice") Choice choice)
{
return "summary";
}
}
|
- This is the controller class where it executes the methods based on the mapping of the request URLs.
- The annotation, @Controller, conveys to the container that this class is the spring controller class. To use this annotation we need to import org.springframework.stereotype.Controller package.
- The annotation, @RequestMapping, maps the request URL’s to the specified method based on the value provided. To use this annotation, we need to import org.springframework.web.bind.annotation.RequestMapping package.
- So, when the URL request comes with the value=”/submit”, the container will execute the submit method of this class.
- The annotation @ModelAttribute, used to bind a method parameter or method return value to the named model attribute. We need to import org.springframework.web.bind.annotation.ModelAttribute package.
- The @ModelAttribute with the value “experienceYears”, executes the method experienceYears to create list of items to be displayed in the radiobuttons tag.
- The RequestMethod specifies the type of the request from the user whether it is a get request or post request.
D. File: summary.jsp
HTML
<%@ page language="java" contentType="text/html; charset=ISO-8859-1"
pageEncoding="ISO-8859-1"%>
<!DOCTYPE html>
<html>
<head>
<meta charset="ISO-8859-1">
<title>Summary page</title>
</head>
<body>
<h3>Hello ${choice.name}!!</h3>
<span>Looking for a job: </span>
<span>${choice.job}</span>
<br>
<span>Work experience: </span>
<span>${choice.experience}</span>
<br>
<span>Years of experience: </span>
<span>${choice.years}</span>
</body>
</html>
|
This is the output Jsp page to display the user-selected values in the browser after the processing of the request.
Execution/Output:
- After creating all the required .java and .jsp files, run the project on the embedded server.
- Right on the Project, Run as -> Run on Server.
- Select the server in the localhost to run the application.
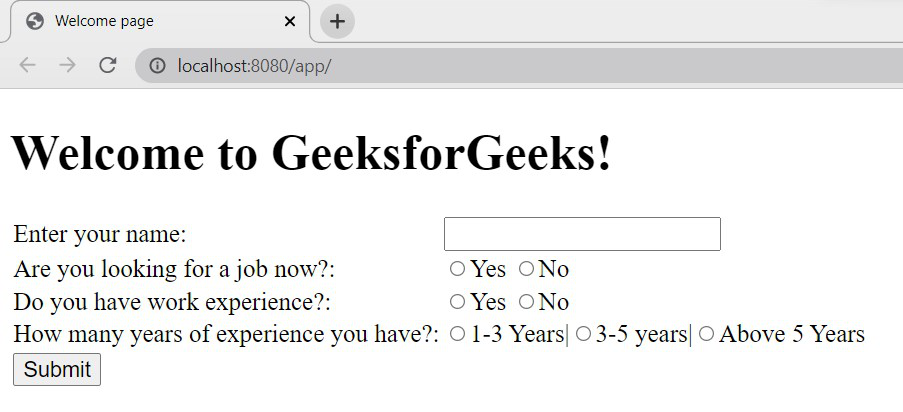
- Open the URL: http://localhost:8080/app/ in the browser to get the below screen.

Welcome page – choice.jsp
Scenario 1: Enter the name, select the option No for Do you have work experience? field as below,
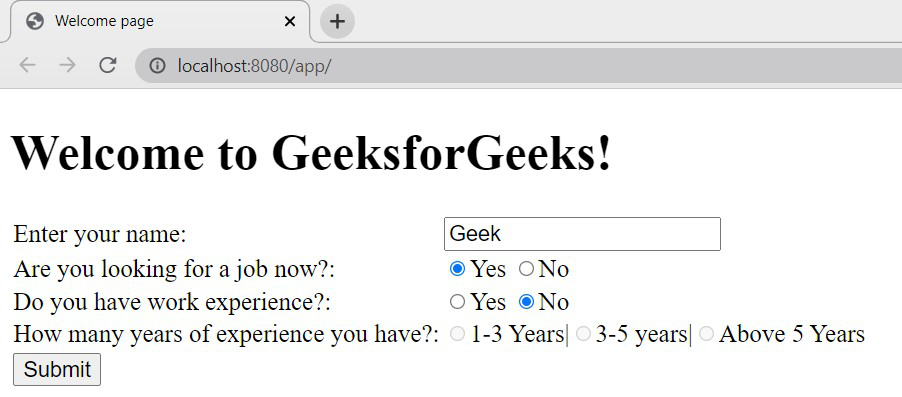
Scenario 1: Input
- As we selected option No for Do you have work experience? field, all the radiobuttons of How many years of experience you have? the field is disabled.
- Now, click on submit button to get the output.
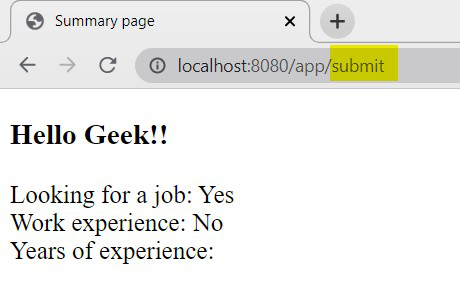
Scenario 1: Output
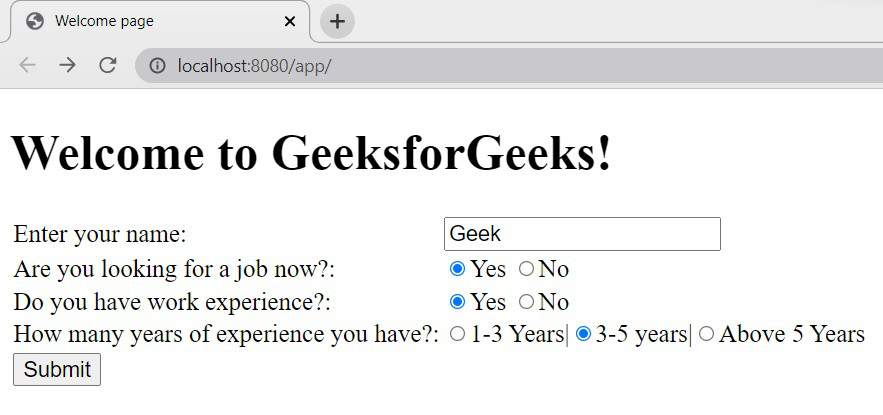
Scenario 2: Now, select option yes for Do you have work experience? field.
Scenario 2: Input
- As we selected option Yes for Do you have work experience? field, all the radiobuttons of How many years of experience you have? field is enabled. Select the desired option.
- Click on submit button to get the output.
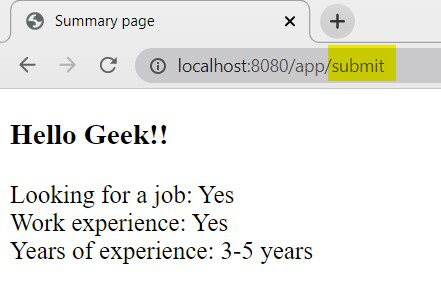
Scenario 2: Output
This way we can use the tags radiobutton and radiobuttons in the application where the user needs to choose an option and we can include different attributes based on the project requirement.
Share your thoughts in the comments
Please Login to comment...