Spring Bean Validation – JSR-303 Annotations
Last Updated :
17 Dec, 2023
In this article, we’ll explore practical examples of how to apply JSR-303 annotations to your domain objects from basic annotations to advanced. So basically annotations provide a declarative way to configure Spring beans, manage dependencies, and define behaviors, reducing the need for boilerplate code and making your code more concise and expressive.
What is Bean Validation?
Bean validation in Spring Boot is the most important tool for ensuring that data entering your application is valid and meets your specific requirements. It is based on the JSR-303 Bean Validation specification, which standardizes how beans can be validated in Java. The main use-case of bean validation in spring boot is to allow defining data integrity rules for Java objects. This ensures objects meet requirements before usage.
Benefits of Using Spring Bean Validation and JSR-303 Annotations for Data Validation
- Improved Data Integrity: Ensures that data entering your application is valid and consistent, reducing errors and inconsistencies.
- Improved Code Readability and Maintainability: Declarative annotations and automatic validation make code more readable and easier to manage.
- Reduced Development Time: Simplifies data validation tasks, allowing developers to focus on core application logic.
- Standardized Approach to Data Validation: Standardized approach across all Java EE platforms via JSR-303. Validations are portable and can be reused.
Understanding JSR-303 Annotations
The JSR 303 bean validation annotations are defined as part of the javax.validation package. Some important Validation Annotations are defined below:
1. @NotNull: Ensures the annotated element is not null.
Example:
public class Student {
    @NotNull(message = "Student name cannot be null")
    private String name;
}
2. @NotEmpty: Checks if a String, Collection, Map, or array is not empty.
Example:
public class Student {
    @NotEmpty(message = "List of marks cannot be empty")
   private List<String> marks;
}
It is also applied to strings, collections, and arrays.
3. @Size Checks if the size is between the specified boundaries.
Example:
public class Student {
    @Size(min = 18, message = "age cannot be less than ")
    private String age;
}
4. @Min and @Max: Limits the value of a numerical property, specifying the minimum or maximum allowed value.
Example:
public class Student {
  @Min(value = 1, message = "Student should have enrolled in at least one subject")
  @Max(value = 4, message = "Student cannot be enrolled more than four subjects")
    private double subject;
}
5. @Pattern: Checks if a String matches the given regular expression.
Example:
public class Student {
    @Pattern(regexp = "\\d{3}-\\d{3}-\\d{4}", message = "Kindly Provide a Valid phone number")
    private String phoneNumber;
}
6. @Email: Checks if a String is a valid email address.
Example:
public class Student {
    @NotNull
    @Email(message = "Please provide a valid email address")
    private String email;
}
7. @URL: Checks if a String is a valid URL.
Example:
public class Student {
    @URL(message = "Please enter a valid Website")
    private String website;
}
8. @Past: Checks if a date/time is in the past.
Example:
public class Student {
    @Past(message ="Please enter a valid Date")
    private LocalDate dateOfBirth;
}
9. @Future: Checks if a date/time is in the future.
Example:
public class Admin {
    @Future(message = "Due date must be in the future")
    private Date admissionDueDate;
}
10. @DecimalMin and @DecimalMax: Checks decimal number ranges.
Example:
public class Admin {
  @DecimalMin("100000.50")
  @DecimalMax("200000.00")
  private BigDecimal fees;
}
11. @Digits: Checks the number of digits of an integer or decimal number.
Example:
public class Student {
  @Digits(integer = 5, fraction = 2)
  private double percentage;
}
12. @AssertTrue/False: Checks if a boolean expression is true/false.
Example:
Java
public class Student {
private int age;
private boolean passedExam;
@AssertTrue
public boolean isEligibleForScholarship() {
return age < 21 && passedExam;
}
|
JSR-303 Dependency
Maven:
XML
<dependency>
<groupId>javax.validation</groupId>
<artifactId>validation-api</artifactId>
<version>2.0.1.Final</version>
</dependency>
|
Note: For dependency use this, URL Maven Repository: https://mvnrepository.com/artifact/javax.validation/validation-api
Gradle:
XML
dependencies {
compile 'javax.validation:validation-api:1.1.0.Final'
runtime 'org.hibernate:hibernate-validator:6.0.1.Final'
}
|
Example of Spring Bean Validation – JSR-303 Annotations
Step 1: Set up a new Spring MVC project
- Create a new Maven project in your preferred IDE (e.g., IntelliJ or Eclipse or Spring Tool Suite) and add the following dependencies.
- Spring Web
- Lombok
- spring-boot-starter-validation
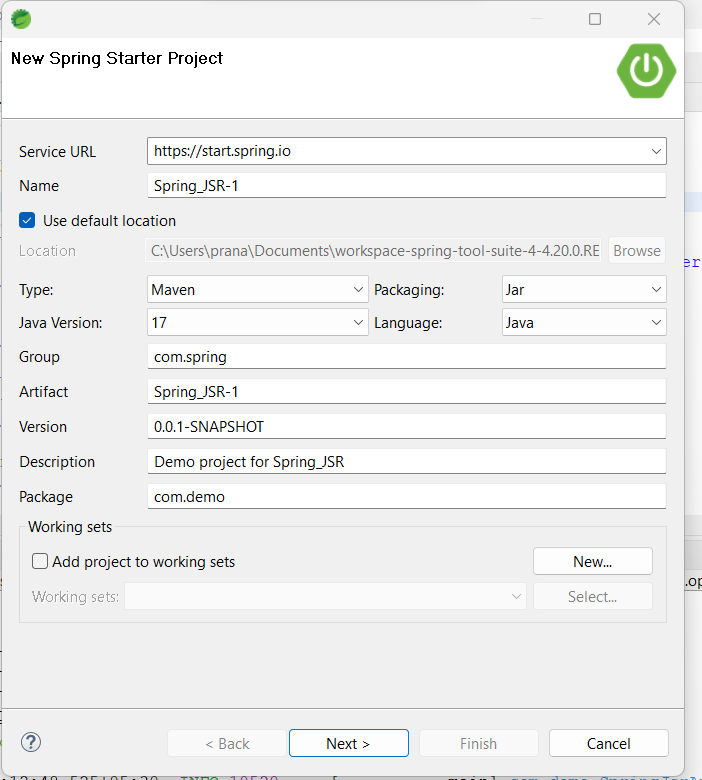
XML configuration in pom.xml file as shown below:
XML
<?xml version="1.0" encoding="UTF-8"?>
<modelVersion>4.0.0</modelVersion>
<parent>
<groupId>org.springframework.boot</groupId>
<artifactId>spring-boot-starter-parent</artifactId>
<version>3.2.0</version>
<relativePath/>
</parent>
<groupId>com.spring</groupId>
<artifactId>Spring_JSR</artifactId>
<version>0.0.1-SNAPSHOT</version>
<name>Spring_JSR</name>
<description>Demo project for Spring_JSR</description>
<properties>
<java.version>17</java.version>
</properties>
<dependencies>
<dependency>
<groupId>org.springframework.boot</groupId>
<artifactId>spring-boot-starter-web</artifactId>
</dependency>
<dependency>
<groupId>org.springframework.boot</groupId>
<artifactId>spring-boot-starter-validation</artifactId>
</dependency>
<dependency>
<groupId>org.projectlombok</groupId>
<artifactId>lombok</artifactId>
<optional>true</optional>
</dependency>
<dependency>
<groupId>org.springframework.boot</groupId>
<artifactId>spring-boot-starter-test</artifactId>
<scope>test</scope>
</dependency>
</dependencies>
<build>
<plugins>
<plugin>
<groupId>org.springframework.boot</groupId>
<artifactId>spring-boot-maven-plugin</artifactId>
<configuration>
<excludes>
<exclude>
<groupId>org.projectlombok</groupId>
<artifactId>lombok</artifactId>
</exclude>
</excludes>
</configuration>
</plugin>
</plugins>
</build>
</project>
|
Project Structure:

Step 2: Create a Pojo class with JSR Annotations [Student]
Java
package com.demo.model;
import jakarta.validation.constraints.AssertTrue;
import jakarta.validation.constraints.Digits;
import jakarta.validation.constraints.Email;
import jakarta.validation.constraints.Min;
import jakarta.validation.constraints.NotBlank;
import jakarta.validation.constraints.NotEmpty;
import jakarta.validation.constraints.NotNull;
import jakarta.validation.constraints.Pattern;
import jakarta.validation.constraints.Size;
import lombok.Data;
import org.hibernate.validator.constraints.URL;
@Data
public class Student {
@NotNull
@Size(min = 3, max = 50,
message
= "Name must be between three to fifty characters")
private String name;
@Email(message = "Invalid email format")
private String email;
@NotNull(message = "Age cannot be null")
@Min(value = 18,
message
= "Age must be greater than or equal to eighteen")
private Integer age;
@NotEmpty(message = "Address cannot be empty")
private String address;
@Pattern(regexp = "\\d{10}",
message = "Phone number must be ten digits")
private String phoneNumber;
public Student(
@NotNull
@Size(min = 3, max = 50,
message
= "Name must be between three to fifty characters")
String name,
@Email(message
= "Invalid email format") String email,
@NotNull(message = "Age cannot be null")
@Min(value = 18,
message
= "Age must be greater than or equal to eighteen")
Integer age,
@NotEmpty(message = "Address cannot be empty")
String address,
@Pattern(regexp = "\\d{10}",
message = "Phone number must be 10 digits")
String phoneNumber)
{
super();
this.name = name;
this.email = email;
this.age = age;
this.address = address;
this.phoneNumber = phoneNumber;
}
}
|
Step 3: Create a Controller that handles all validations [StudentController]
Java
package com.demo.controller;
import com.demo.model.Student;
import jakarta.validation.Valid;
import java.util.List;
import org.springframework.validation.BindingResult;
import org.springframework.web.bind.annotation.GetMapping;
import org.springframework.web.bind.annotation.PostMapping;
import org.springframework.web.bind.annotation.RequestBody;
import org.springframework.web.bind.annotation.RequestMapping;
import org.springframework.web.bind.annotation.RestController;
@RestController
public class StudentController {
@PostMapping("/student")
public String
createUser(@RequestBody @Valid Student student,
BindingResult bindingResult)
{
if (bindingResult.hasErrors()) {
return "Validation errors: "
+ bindingResult.getAllErrors();
}
return "Student created successfully: "
+ student.toString();
}
}
|
Step 4: Run the Application
- Now you can run the spring boot application from IDE or command line.
mvn spring-boot:run
- Visit http://localhost:8080/students in tools like curl, Postman,, and you should see the courses page.
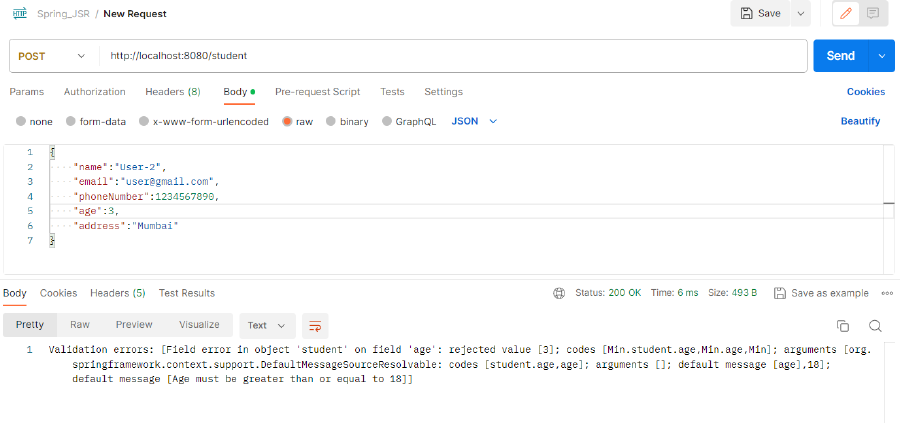
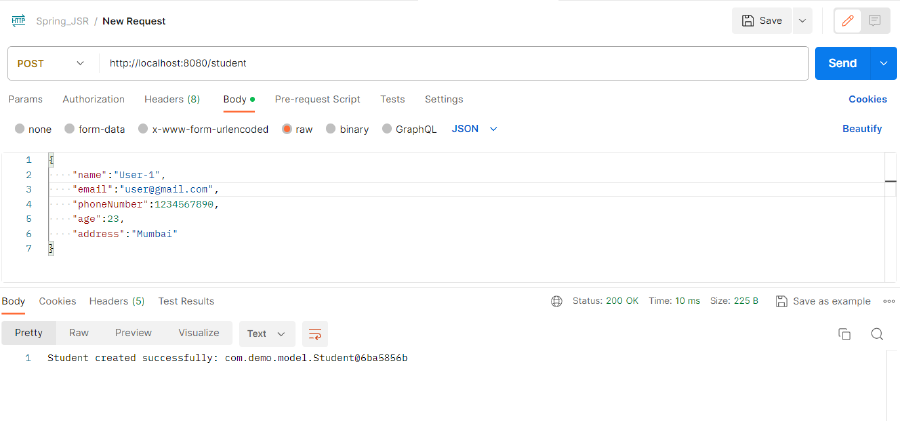
Here , we are using POSTMAN for Testing the application.
Output 1: Age is less than 18
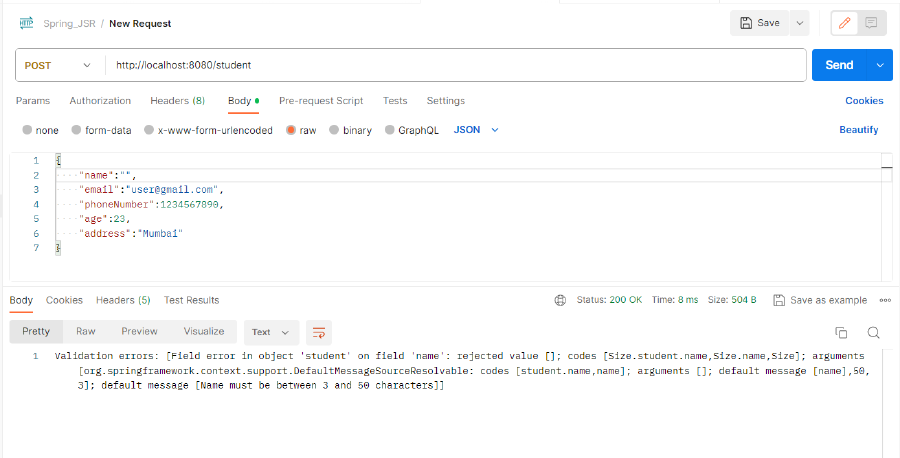
Output 2: Name is NotNull and Size of name is between 3 and 50 characters
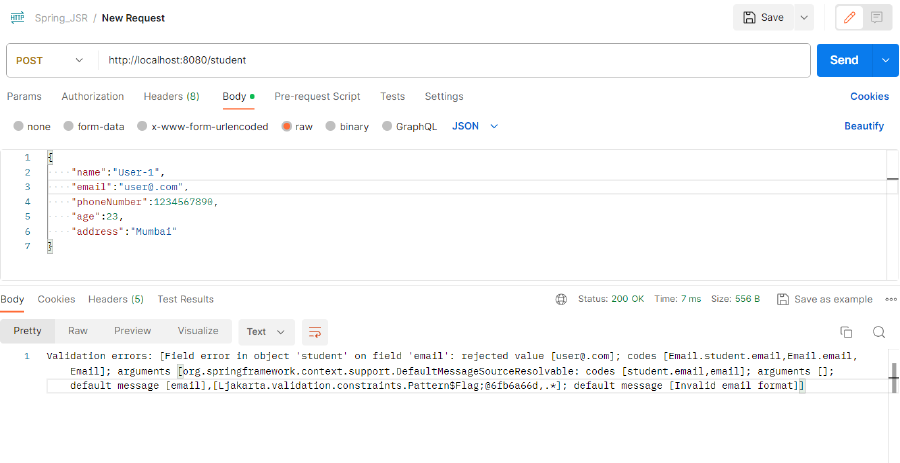
Output 3: Email is Incorrect
Output 4: If the all fields are in correct format and passed the all requirement
Share your thoughts in the comments
Please Login to comment...