Model, ModelMap, ModelAndView in Spring MVC
Last Updated :
08 Dec, 2023
Spring is one of the most used Java-based frameworks for creating enterprise-grade applications in Java. In that Spring MVC was one of the popular projects under the Spring family of Java projects. In this article, we will explore how Model, ModelMap, and ModelAndView work in Spring MVC.
Spring MVC follows the Model-View-Controller (MVC) pattern to break down the application into three individual components called MVC. Model, ModelMap, and ModelAndView create a flow of data from the Model and View in the MVC pattern.
To reduce the configuration works we will be using Spring Boot to bootstrap the Spring project.
Prerequisite:
To continue with this article you should be comfortable with the following topics to easily understand and go through the article.
- Java – Core and Advanced Java
- Servlets & JSP’s
- Spring & Spring MVC
- Maven & Eclipse or IDE which supports Java
Initial Setup:
- Go to the Spring Starter set webpage to create a simple spring boot app.
- Enter your required group and artifactId for the project.
- Add the below dependencies.
- Spring Web for creating the MVC application
- Spring Devtools to automatically reload the app after changes.
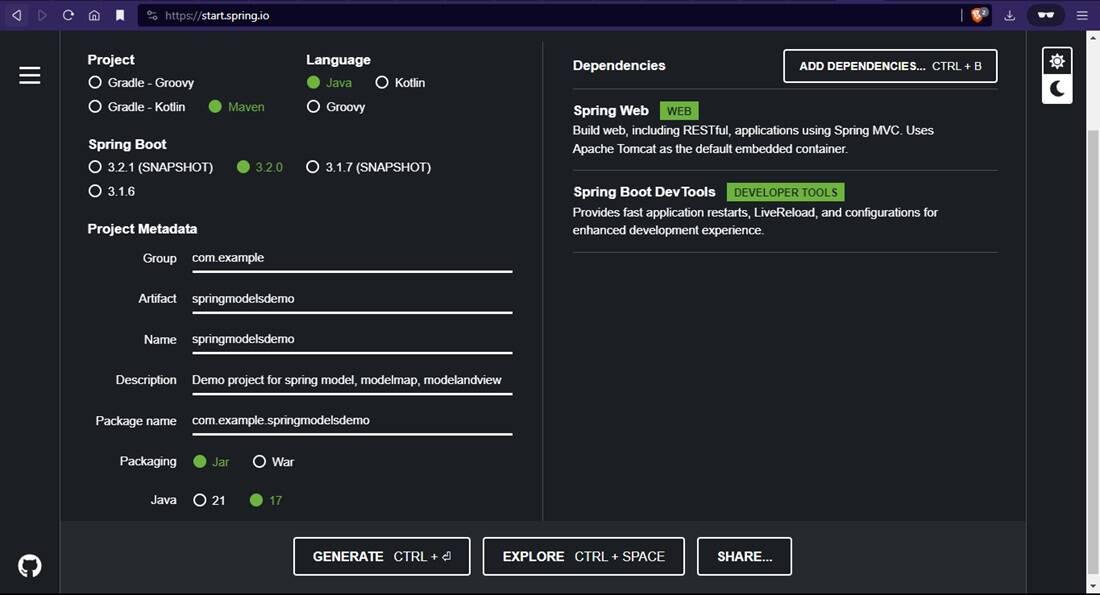
spring starter
Download the zip, extract it, and open the project in your favorite IDE.
- Open the pom.xml to add the tomcat-jasper library to the dependency of your project
- spring mvc can work with .jsp files as a response.
XML
<?xml version="1.0" encoding="UTF-8"?>
<modelVersion>4.0.0</modelVersion>
<parent>
<groupId>org.springframework.boot</groupId>
<artifactId>spring-boot-starter-parent</artifactId>
<version>3.2.0</version>
<relativePath />
</parent>
<groupId>com.example</groupId>
<artifactId>springmodelsdemo</artifactId>
<version>0.0.1-SNAPSHOT</version>
<name>springmodelsdemo</name>
<description>Demo project for spring model, modelmap, modelandview</description>
<properties>
<java.version>17</java.version>
</properties>
<dependencies>
<dependency>
<groupId>org.springframework.boot</groupId>
<artifactId>spring-boot-starter-web</artifactId>
</dependency>
<dependency>
<groupId>org.apache.tomcat</groupId>
<artifactId>tomcat-jasper</artifactId>
<version>10.1.16</version>
</dependency>
<dependency>
<groupId>org.springframework.boot</groupId>
<artifactId>spring-boot-devtools</artifactId>
<scope>runtime</scope>
<optional>true</optional>
</dependency>
<dependency>
<groupId>org.springframework.boot</groupId>
<artifactId>spring-boot-starter-test</artifactId>
<scope>test</scope>
</dependency>
</dependencies>
<build>
<plugins>
<plugin>
<groupId>org.springframework.boot</groupId>
<artifactId>spring-boot-maven-plugin</artifactId>
</plugin>
</plugins>
</build>
</project>
|
- Create a web app folder under the src/main parent directory to store the .jsp and static resources for the project.
- Add the below styles under the resources/static/css/ with the file name style.css
This file contains all the style related to web design to make the center-aligned.
CSS
* {
font-size: 20px;
font-family: Verdana;
}
.container {
min-height: 100vh;
display: flex;
justify-content: center;
align-items: center;
flex-direction: column;
display: flex;
}
.row {
margin: 1rem;
}
.btn {
padding: 8px;
border-radius: 5px;
}
|
- Create a login.jsp file under the web app folder to host a form to pass some data to the Spring MVC, add the below code.
This HTML file contains the frontend form with two input fields i.e. username, password
HTML
<%@ page language="java" contentType="text/html"%>
<!DOCTYPE html>
<head>
<title>Welcome</title>
<link rel="stylesheet" href="/css/style.css">
</head>
<body>
<div class="container">
<form action="login">
<div class="row">
<label for="name">Enter your username:</label> <input type="text"
id="name" name="name">
</div>
<div class="row">
<label for="pass">Enter your Password:</label> <input
type="password" id="pass" name="password">
</div>
<div class="row">
<button class="btn">Submit</button>
</div>
</form>
</div>
</body>
</html>
|
- After that create a result.jsp file under the web app folder to show the view of the resultant data from Spring MVC.
This HTML code contains frontend display of username and password stored in the previous page.
HTML
<%@ page language="java" contentType="text/html"%>
<!DOCTYPE html>
<head>
<title>Welcome</title>
<link rel="stylesheet" href="/css/style.css" />
</head>
<body>
<div class="container">
<div class="row">Your Username is: ${userName}</div>
<div class="row">Your Password is: ${password}</div>
</div>
</body>
</html>
|
- Now we have configured our project for the initial setup and can continue with the Model, ModelMap, and ModelAndView explanation.
Model:
Model is an Interface in the spring core package under com.springframework.ui is used for transferring the data or attributes from our business logic to the rendering view pages. Its primary use is to add attributes to the model and can be simply viewed and accessed similar to the java.util.Map Interface.
Spring allows us to use a Model object as an argument directly in the method that accepts the request and the framework will inject the Model model from the request object for us.
- Create a simple Controller named LoginController under the package src/main/java/com/example/springmodelsdemo/controller using the @Controller Annotation
- Create a method to map it for login requests and pass a Model object to it, so Spring will provide it for us.
- addAttribute(String name, Object obj) is used to add the objects to the Model object.
- return the view so that the view will have access to this Model object while rendering, as we have added the attributes the rendering view can use it to display the data from this model.
Java
package com.example.springmodelsdemo.controller;
import org.springframework.stereotype.Controller;
import org.springframework.ui.Model;
import org.springframework.ui.ModelMap;
import org.springframework.web.bind.annotation.GetMapping;
import org.springframework.web.bind.annotation.RequestParam;
import org.springframework.web.servlet.ModelAndView;
@Controller
public class LoginController {
@GetMapping("/")
public String home(){
return "login.jsp";
}
@GetMapping("/login")
public String loginActionUsingModel(
@RequestParam("name") String name,
@RequestParam("password") String pass, Model model
){
model.addAttribute("userName", name);
model.addAttribute("password", pass);
return "result.jsp";
}
}
|
Output:
output gif
ModelMap
Model is a class in the spring core package under com.springframework.ui and is used for transferring the data or attributes from our business logic to the rendering view pages. It is an extension of the Model interface, as it also implements the java.util.Map to provide a Map-like structure to access the attributed with the Key-Value pair fashion.
It is fully compatible with the Model objects and also has additional methods implemented from the Map interface.
- Create a simple Controller named LoginController under the package src/main/java/com/example/springmodelsdemo/controller using the @Controller Annotation
- Create a method to map it for login requests and pass a ModelMap object to it, so Spring will provide it for us.
- addAttribute(String name, Object obj) is used to add the objects to the Model object.
- Use the put(String name, Object obj) method to easily add attributes with the key-value pair fashion.
- return the view so that the view will have access to this ModelMap object while rendering, as we have added the attributes the rendering view can use it to display the data from this model.
Java
package com.example.springmodelsdemo.controller;
import org.springframework.stereotype.Controller;
import org.springframework.ui.Model;
import org.springframework.ui.ModelMap;
import org.springframework.web.bind.annotation.GetMapping;
import org.springframework.web.bind.annotation.RequestParam;
import org.springframework.web.servlet.ModelAndView;
@Controller
public class LoginController {
@GetMapping("/")
public String home(){
return "login.jsp";
}
@GetMapping("/login")
public String loginActionUsingModelMap(
@RequestParam("name") String name,
@RequestParam("password") String pass,
ModelMap model
){
model.addAttribute("userName", name);
model.put("password", pass);
return "result.jsp";
}
}
|
Output:
output gif
ModelAndView:
In the above classes, we have the model object and return the view name separately in the methods but, the ModelAndView class does it slightly differently. In this, we will combine the view and data in a single object either with the help of the constructor or set by the setViewName() method of this class. So that with ModelAndView we can return the view and model in a single object.
- Create a simple Controller named LoginController under the package src/main/java/com/example/springmodelsdemo/controller using the @Controller Annotation
- Create a method to map it for login requests and pass a ModelAndView object to it, so Spring will provide it for us.
- Either pass the view name in the constructor or set it by setViewName();
- addObject(String name, Object obj) is used to add the objects to the Model object.
- return the ModelAndView object to render the mentioned view in that object.
Java
package com.example.springmodelsdemo.controller;
import org.springframework.stereotype.Controller;
import org.springframework.ui.Model;
import org.springframework.ui.ModelMap;
import org.springframework.web.bind.annotation.GetMapping;
import org.springframework.web.bind.annotation.RequestParam;
import org.springframework.web.servlet.ModelAndView;
@Controller
public class LoginController {
@GetMapping("/")
public String home(){
return "login.jsp";
}
@GetMapping("/login")
public ModelAndView loginActionUsingModelAndView(
@RequestParam("name") String name,
@RequestParam("password") String pass,
ModelAndView model
){
model.addObject("userName", name);
model.addObject("password", pass);
model.setViewName("result.jsp");
return model;
}
}
|
Output:
output gif
Conclusion
We have discussed all the methods of Model data representation using Model, ModelMap, ModelAndView in Spring MVC and every method will help us to transfer the data to the view easily, every method accomplishes the same task but differently, choose it according to your needs and make your application’s code more readable and easy to maintain.
Share your thoughts in the comments
Please Login to comment...