Microsoft Azure – Blazor and Azure Functions for Serverless Websites
Last Updated :
30 Mar, 2023
Pre-requisite: Azure, Visual studio code
With the help of the open-source web framework Blazor, programmers can create single-page applications (SPAs) in C# rather than JavaScript. Because it supports both server-side and client-side rendering, Blazor is a great framework for creating serverless websites. According to their needs, developers can create websites that are totally browser-based or that operate in a serverless environment. Additionally, Blazor supports a large number of .NET libraries, which makes it simple for programmers to include pre-existing code into their applications.
What is Azure Function
Azure Functions is a serverless computing service that allows developers to run code on demand without having to manage the underlying infrastructure. It supports a wide range of programming languages, such as Python, JavaScript, and C#. Smaller chunks of code referred to as functions, can be written by developers to react to events and run only when necessary. As a result, prices are lower, and the service is easier to scale because it does so on its own.
Blazor and Azure Functions for Serverless Websites
- Make sure you have an azure account.
- Make sure you have VS Code installed.
- Vs Code Extensions required- Azure Function, Azure Storage, and C#.
- Make sure you have node.js installed on your PC.
- Make sure you have .NET Core 3.1 SDK installed on your pc.
In this article, we will Create and deploy a simple Blazor WebAssembly app that calls an Azure Function
Step 1: Create a folder and navigate to it. Make sure this is where you want to create your blazor app.
Open it in vs Code.
Open the terminal and type: Replace project name with your project.
dotnet new blazorwasm -o projectname
.
You will notice some files are added to your folder.
Open a terminal in Visual Studio Code and enter the below command to test the Blazor application. The URL that the Blazor app is listening on will be displayed in the terminal. You can access the app by visiting that URL in a browser.
dotnet run
Step 2: The Azure Function that will return the current date and time should be created and deployed. That will be done in VS Code. Open VS Code. In the menu on the left, select Azure.
Click Create New project under Functions.
Put in the path where the new Function should be created.
Choose C# as your function language.
For the trigger type, select HttpTrigger.
Type a namespace for the Function and enter a name in it.
Select Anonymous under Security Settings.
Select Open in the current window to finish. In VS Code, the Function will now be created and opened.
The Function will come with some boilerplate code by default when it is created. Substitute the code below for the code in the Function’s body, which only returns the current date and time when the Function is invoked.
Run the Function by choosing Run > Run without debugging to test it. This will execute the Function and display the URL at which it is currently running. See the current date and time that the Function returns by opening that URL in a browser.
Step 3: Finally, we currently have an Azure Function and a Blazor WebAssembly app. Let’s connect them by deploying them to Azure. Deploying the Function to Azure will be our first step.
- Click Deploy to Function App in the Azure Functions extension area of Visual Studio Code.
- Select Create new Function App in Azure
- Give the new Function App a name.
- Choose a location
- And, the function will be deployed to the newly constructed Azure Function App.
- The Function App will appear in the list of Function Apps in VS Code once it has been created and deployed. Navigate to the function, then choose Copy Function URL from the context menu. This Url must be called from the Blazor app.
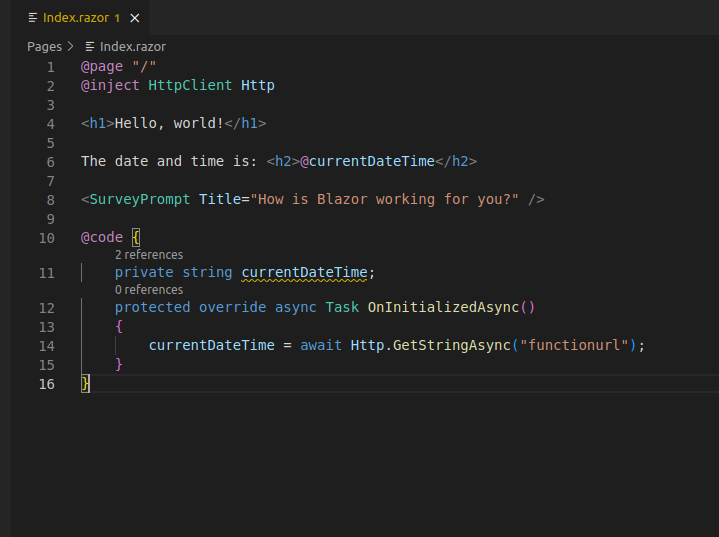
- Go back to the Blazor WebAssembly app in VS Code and navigate to Index. razor
- Replace the function URL with the URL of the Function in Azure, and change the code from Index. razor to the code below.
- The Blazor app needs to be hosted somewhere in Azure, therefore we must first do that. Locate the Azure Storage area by clicking the Azure icon in the menu on the left.
- Click the button labeled Create a storage account.
- Hit enter after entering the new account’s name. The Static Website functionality will be activated for the newly established Storage Account, resulting in the creation of a Blob container with the name $web. This will be the server for our Blazor app.
- The Blazor app will now be built and a folder containing all the files we need to launch it will be created, so open a terminal in Visual Studio Code and issue the commands below
dotnet build
dotnet publish
- Now, a folder named Bin\Debug\netstandard2.1\publish contains the Blazor WebAssembly app. Go to this folder and use the right-click menu to choose to Deploy to Static Website from the www-root folder.
- VS Code will display the URL to use when the Blazor WebAssembly app is uploaded to Azure Storage. See the app in action, which displays the current date and time that it obtains from the Azure Function, by opening that URL in a browser.
In conclusion, Creating an Azure Functions app, writing your Azure Functions, testing them, building your Blazor app, developing your Blazor UI, integrating your Azure Functions with Blazor, testing your Blazor app, and deploying your Blazor app to Azure are all steps in the process of creating a serverless web application with Blazor and Azure Functions. You may make a web application that is affordable, scalable, and extremely effective by following these steps.
Share your thoughts in the comments
Please Login to comment...