Making a Github Bot
Last Updated :
26 Nov, 2022
Github bots are basically bots that augment the software development process on Github and are formally known as Github Apps. These apps are first-class actors, which means that they can do pretty much anything on Github(one can say that they are at par with a user). The code can be found here. Usually, the GitHub apps are built using Node or Python because of the community support, the availability of tools, and other factors. In this article, we will use a framework for building Github bots called Probot, which utilizes Node.js. Applications:
- Made with Probot:
- Stale – A github app to close stale issues and PRs.
- Welcome – A github app to welcome new contributors
- Reminders – Set reminder on issues and PRs
- Github Marketplace:
- imgbot – An app to optimize images on github
- circleci – An app for continuous integration
Setting up Basic App
- Step 1: Go to console.
- Step 2: Create a new folder and name it of your choice.
- Step 3: Go to the newly made folder.
- Step 4: Type ‘npx create-probot-app app_name’ in the console to start setting up the basic app.
- Step 5: Now answer the prompts that appear during the setup. This setup is fairly simple.
Examining the Project Directory
The basic set up gives us a project directory that contains all the relevant things needed to start developing the app. 
- node_modules: This folder stores all the project dependencies.
- test: This folder contains a folder called ‘fixtures’ and a file of the form ‘index.text.js’. The file ‘index.test.js’ helps to test the code in ‘index.js’. The test file naming convention is consumed by our testing module ‘jest’ which relates ‘nameoffile.test.js’ to ‘nameoffile.js’. The fixtures folder contains the json object that is consumed for testing purposes. One can look here for more information on testing the app by simulating the same event multiple times.
- .env: This file stores the environment variables needed to run the project. It has :
- WEBHOOK_PROXY_URL
- APP_ID
- PRIVATE_KEY
- WEBHOOK_SECRET
- .env.example: Contains .env file structure to help build the main .env file.
- .gitignore: Contains the file names that are not to be tracked by git.
- app.yml: This is a GitHub App Manifest file. Initially, there are two subsections to it, ‘default_permissions’ and ‘default_events’.
- index.js: This is the entry point of the app. This name is set during the app initialization via command line.
- package.json: This is the Node project Manifest file.
Making the GitHub App(Bot)
Architecture

Working of Bot
As can be seen from the image above, the events on GitHub are connected to webhooks. These webhooks can be listened to by the app server. The probot framework provides a way to connect to these webhooks and fire event handlers every time the webhook is activated. Using probot, the developer can capture important information called ‘context‘ about the event(that happened on GitHub) and then make the GitHub app(or bot) do something in response to that event. What’s our bot going to do?
- Greet the issue opener with a ‘thanks for opening this issue’ message.
- Greet new contributors on their first issue.
- Give appreciation to the pull-request opener.
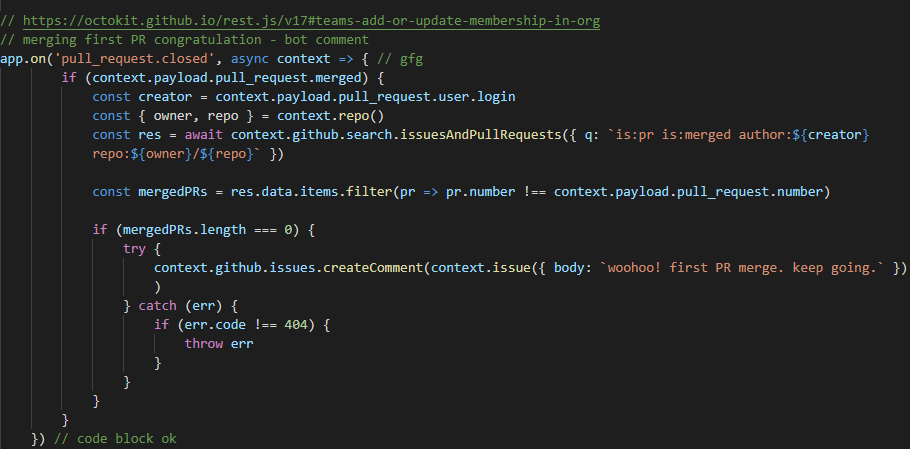
- Give appreciation to ‘first PR’ openers.
- Add labels to issue using ‘issue_comment’ event.
Giving app the right permissions
- For the app/bot to function properly, i.e, to respond to events that happened on GitHub, the app must have appropriate permissions given to it by the owner of the repo.
- To grant permissions to the app, go to https://github.com/settings/apps//permissions, configure the permissions, then save them. Every time the permissions are updated, the repository owner needs to review these permissions because the owner needs to be cognizant of these permission changes.
- To review the updated permissions, one should visit https://github.com///settings/installations and review them. Note that it needs to be replaced by in case the app is installed on a user’s repo and not on a repo in an organization.
- After every permission update, it is recommended to restart the local dev environment by using npm run dev command.
Note:: Sometimes, you might get an error which essentially means that the GitHub app is not configured to operate on certain GitHub webhook events. Example :  In this scenario, the permissions need to be checked. To do that, just follow the steps 1 to 4 above. Tip: If you’re just making an app to learn and explore the scope of what a GitHub app can do, you may give the highest level of permission(s) to the app.
Code Behind the Bot
Before looking at the code, go ahead, and ‘set up the basic app’ by following the steps in the mentioned section. Initial code setup: Start your app using ‘npm run dev’ on the terminal. You should’ve got a basic codebase listening to ‘issues.opened’ event because of the initial probot app setup. The bot responds with a comment on the issue thread via that code. Note: If the app halts(one of the reasons could be the absence of a return statement in a function), you may restart the app, thanks to the nodemon module that come packed as a devDependency. Tip: To check the recent events on Github that have been fired, you can go to your app’s ‘Advanced’ settings. A sample link to the app’s Advanced settings is: https://github.com/settings/apps//advanced.
Simulate receiving WebHooks from GitHub
During the development of the app, you may want to simulate the same event to debug code, so you can also ‘redeliver‘ the same event(which essentially means that GitHub is performing the event and then you can receive it and debug your app). 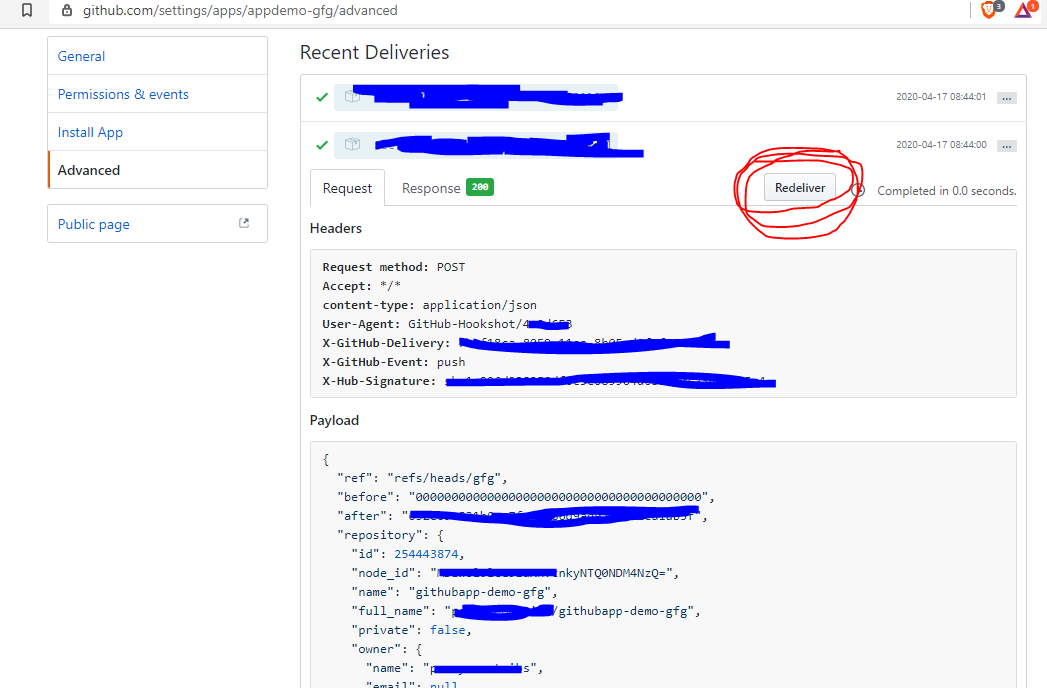
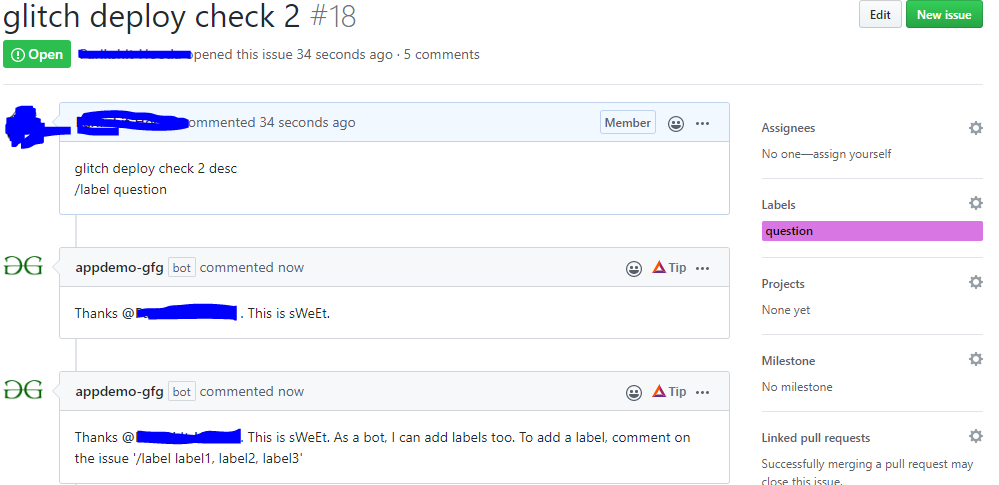
Welcome Comment on the new Issues
Let’s look at the code to implement a ‘welcome message comment on the new issue’ thread and adding labels to issues based on the issue comment using a ‘slash command‘. 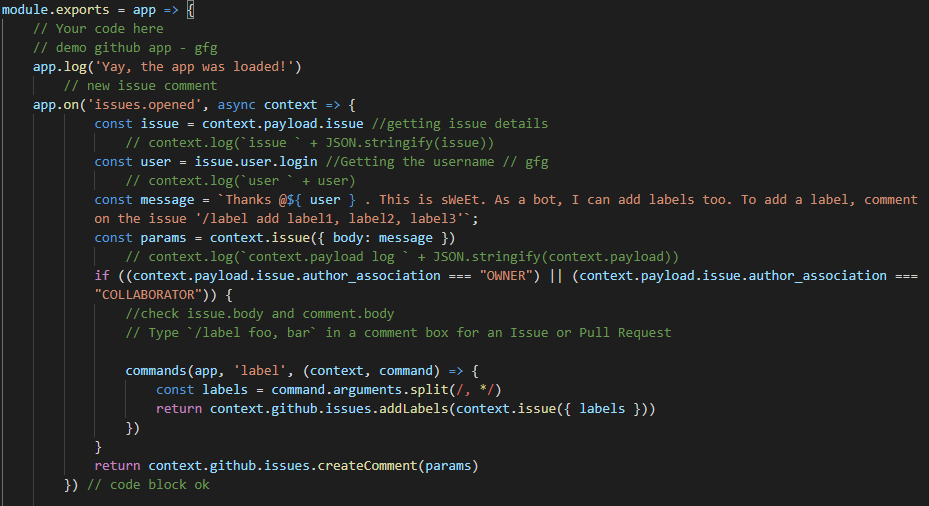 Explanation:
- Grab the issue details from the fired event in const issue.(the event fired is a ‘new issue opened’)
- Grabbing issue opener’s username in const user
- Generating the ‘welcome comment on the issue’ (>const message).
- Generating the const params which will be used to create the comment(in the last return statement).
- If the issue opener is a ‘COLLABORATOR’ or a ‘OWNER’, read the issue description for a line ‘/label label1, label2, label3’ to assign labels to issues. If the issue is not created for the repo, a new label is created and assigned to the issue.
Welcome message to first Issue by new contributor
 Explanation:
- Gather all issues for a issue opener’s username in a const res.
- const number_Issues will gather the number of issues. Note: The reason for applying the filter ‘!data.pull_request’ is because the pull_requests are treated as ‘issues’ only. So, !data.pull_request gets us only the number of ‘issues‘, and not the ‘issues + pull_requests‘.
- If number_Issues === 1, the send the ‘welcome on creating your first issue in the repo, contributor’

Bot’s comment on a new Pull Request
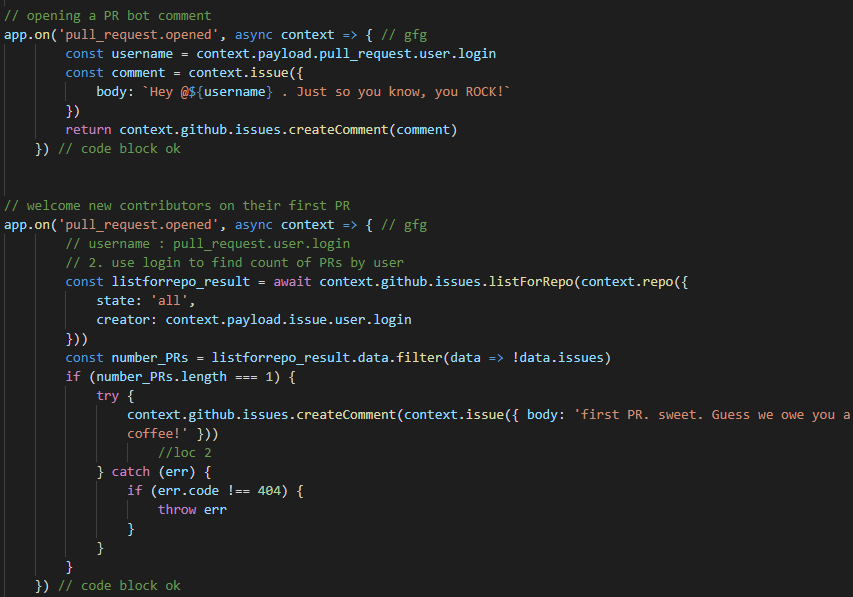 The above code block sends a comment on the PR thread whenever a new PR is opened. It also welcomes new contributor on opening their first PR. These 2 blocks of code is fairly similar to the above code blocks of comments on issue thread.
Pull Request Closed – First PR closed comment
 Issue_comment created. If /label command exits, assign labels. If the comment is made by a bot, ignore the /label comment
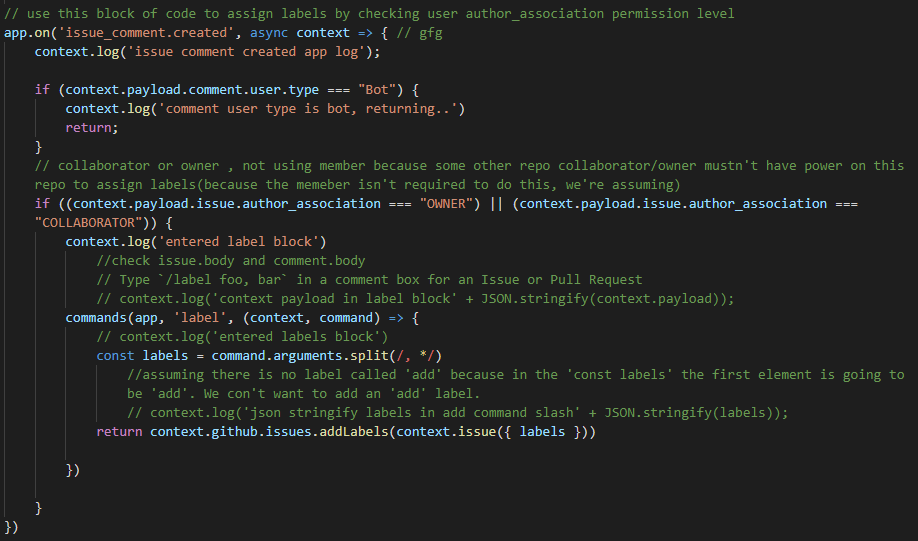
 Note: While developing the GitHub app, always make sure that the event author has appropriate access to the repository/organization. If you see here, if you(or the bot) try to author an event but the GitHub doesn’t approve you to make such an event, it will not trigger its functionality. For example, if your author association is ‘contributor’ but you try to try to label an issue using the comments, it will not happen.
Deploying the App
Till now, we have been developing the app on the local terminal. Currently, during local development, the webhook payloads(on GitHub) are connected to a ‘smee channel‘ and this channel then sends the payload to the local machine. To deploy the app on a remote continuously running service, its a two-step process. First, the environment variables have to be set. Second, the app needs to be deployed. Let’s look at these steps one by one in a logical order.
Setting environment variables
For official documentation, visit here To set the env variables for this app, the following steps/actions were performed: 
- Step 1: Make a ‘.env’ file, if it doesn’t already exist.
- Step 2: In the .env file, set APP_ID to what you get from this page : https://github.com/settings/apps/

- Step 3: The WEBHOOK_PROXY_URL is a ‘smee channel’ link which will receive payload from github
- Step 4: The WEBHOOK_SECRET is what the github app needs to verify the sender(github). The payloads received are validated by matching them with the WEBHOOK_SECRET value.
- Step 5: PRIVATE_KEY is required to verify the app.
- Step 6: One can optionally set the LOG_LEVEL too. Its good to set it to ‘json’ to get the structured logging.To learn more about this, one can visit probot logging page.
Deploying the app on Glitch
We’ll deploy the app on Glitch. To explore more ways, one can go to probot deploy docs
- Step 1: Deploy a readymade probot app on Glitch.
- Step 2: After spinning up the readymade app, go to the ‘tools’ button in bottom-left corner of the Glitch interface. Click on ‘import and export’, and then ‘import from github’. Do make sure that the import is proper.

- Step 3: Populate the .env file with proper values.

- Step 4: Check for correct deployment of the app by making the bot respond on github.

Share your thoughts in the comments
Please Login to comment...