JSP – Client Request
Last Updated :
02 Apr, 2024
In web development, a Client Request refers to a connection sent from a client to a server to edit data, and objects, or to perform or receive operations. In the case of JavaServer Pages (JSP), client requests can be processed using JSP files and servlets running on the web server.
In this article, we will learn how to create a Client Request Form in JSP.
Client Request in JSP
We can develop a simple client request form that can be handled with the servlet for processing after response to the client. Below are the steps to develop a client request form in JSP.
Step 1: Create the dynamic web project using Eclipse named RegistrationJSP. Open the project into the eclipse.
Once the project is created, then the file structure looks like the below image.

Step 2: Create the new Java class and it named as the ServerServet.java and its servlet can handle the client requests.
Go to src > java > default package > ServerServlet.java and put the below code.
Java
import java.io.IOException;
import java.io.PrintWriter;

import jakarta.servlet.ServletException;
import jakarta.servlet.annotation.WebServlet;
import jakarta.servlet.http.HttpServlet;
import jakarta.servlet.http.HttpServletRequest;
import jakarta.servlet.http.HttpServletResponse;

@WebServlet("/server")
public class ServerServlet extends HttpServlet {
    protected void doPost(HttpServletRequest request, HttpServletResponse response) throws ServletException, IOException {
        // Retrieve input parameters
        String name = request.getParameter("name");
        String email = request.getParameter("email");
        int age = Integer.parseInt(request.getParameter("age"));
        String country = request.getParameter("country");

        // Prepare response
        response.setContentType("text/html");
        PrintWriter out = response.getWriter();
        out.println("<html><head><title>Server Response</title></head><body>");
        out.println("<div style=\"max-width: 400px; margin: 20px auto; padding: 20px; background-color: #f9f9f9; border-radius: 5px; box-shadow: 0 0 10px rgba(0, 0, 0, 0.1);\">");
        out.println("<h2 style=\"color: #333;\">Server Response</h2>");
        out.println("<p><strong>Name:</strong> " + name + "</p>");
        out.println("<p><strong>Email:</strong> " + email + "</p>");
        out.println("<p><strong>Age:</strong> " + age + "</p>");
        out.println("<p><strong>Country:</strong> " + country + "</p>");
        out.println("</div>");
        out.println("</body></html>");
    }
}
Step 3: Create the new JSP file and it named as the Index.html and its servlet can handle the client requests.
Go to src > java > webapps > Index.html and put the below code.
HTML
<!-- index.jsp -->
<%@ page language="java" contentType="text/html; charset=UTF-8"
    pageEncoding="UTF-8"%>
<!DOCTYPE html>
<html>
<head>
    <meta charset="UTF-8">
    <title>Client Request Handling</title>
    <style>
        body {
            font-family: Arial, sans-serif;
            background-color: #f2f2f2;
            margin: 0;
            padding: 0;
        }
        h1 {
            text-align: center;
            color: #333;
        }
        form {
            max-width: 400px;
            margin: 20px auto;
            padding: 20px;
            background-color: #fff;
            border-radius: 5px;
            box-shadow: 0 0 10px rgba(0, 0, 0, 0.1);
        }
        label {
            display: block;
            margin-bottom: 10px;
            color: #333;
        }
        input[type="text"],
        input[type="email"],
        input[type="number"],
        select {
            width: 100%;
            padding: 10px;
            margin-bottom: 20px;
            border: 1px solid #ccc;
            border-radius: 5px;
            box-sizing: border-box;
        }
        input[type="submit"] {
            width: 100%;
            padding: 10px;
            background-color: #007bff;
            color: #fff;
            border: none;
            border-radius: 5px;
            cursor: pointer;
        }
        input[type="submit"]:hover {
            background-color: #0056b3;
        }
        .submitted-data {
            max-width: 400px;
            margin: 20px auto;
            padding: 20px;
            background-color: #f9f9f9;
            border-radius: 5px;
            box-shadow: 0 0 10px rgba(0, 0, 0, 0.1);
        }
        .submitted-data p {
            margin-bottom: 10px;
        }
    </style>
</head>
<body>
    <h1>Welcome to Client Request Handling</h1>
    <form method="post" action="server">
        <label for="name">Enter your name:</label>
        <input type="text" name="name" id="name" required><br>
        <label for="email">Enter your email:</label>
        <input type="email" name="email" id="email" required><br>
        <label for="age">Enter your age:</label>
        <input type="number" name="age" id="age" required><br>
        <label for="country">Select your country:</label>
        <select name="country" id="country" required>
            <option value="USA">USA</option>
            <option value="UK">UK</option>
            <option value="Canada">Canada</option>
            <option value="Australia">Australia</option>
            <!-- Add more options as needed -->
        </select><br>
        <input type="submit" value="Submit">
    </form>

    <%-- Display submitted data --%>
    <div >

        <%
            String name = request.getParameter("name");
            String email = request.getParameter("email");
            String ageParam = request.getParameter("age");
            int age = 0; // Default age value if parameter is missing or invalid
            if (ageParam != null && !ageParam.isEmpty()) {
                try {
                    age = Integer.parseInt(ageParam);
                } catch (NumberFormatException e) {
                    // Handle invalid age parameter
                    out.println("<p>Invalid age value</p>");
                }
            }
            String country = request.getParameter("country");

            if (name != null && email != null && country != null) {
                out.println("<p><strong>Name:</strong> " + name + "</p>");
                out.println("<p><strong>Email:</strong> " + email + "</p>");
                out.println("<p><strong>Age:</strong> " + age + "</p>");
                out.println("<p><strong>Country:</strong> " + country + "</p>");
            }
        %>
    </div>
</body>
</html>
Step 4: Open the web.xml file and put the below code.
XML
<?xml version="1.0" encoding="UTF-8"?>
<web-app xmlns:xsi="http://www.w3.org/2001/XMLSchema-instance" xmlns="https://jakarta.ee/xml/ns/jakartaee" xsi:schemaLocation="https://jakarta.ee/xml/ns/jakartaee https://jakarta.ee/xml/ns/jakartaee/web-app_6_0.xsd" id="WebApp_ID" version="6.0">
  <display-name>client-request-demo</display-name>
  <welcome-file-list>
    <welcome-file>index.html</welcome-file>
    <welcome-file>index.jsp</welcome-file>
    <welcome-file>index.htm</welcome-file>
    <welcome-file>default.html</welcome-file>
    <welcome-file>default.jsp</welcome-file>
    <welcome-file>default.htm</welcome-file>
  </welcome-file-list>

   <servlet>
        <servlet-name>ServerServlet</servlet-name>
        <servlet-class>ServerServlet</servlet-class>
    </servlet>

    <servlet-mapping>
        <servlet-name>ServerServlet</servlet-name>
        <url-pattern>/server</url-pattern>
    </servlet-mapping>
</web-app>
Step 5: Once the project completed and it run into the tomcat server then it will run the project on the port 8082.
Output:
Client Request Page:

Server response Page:
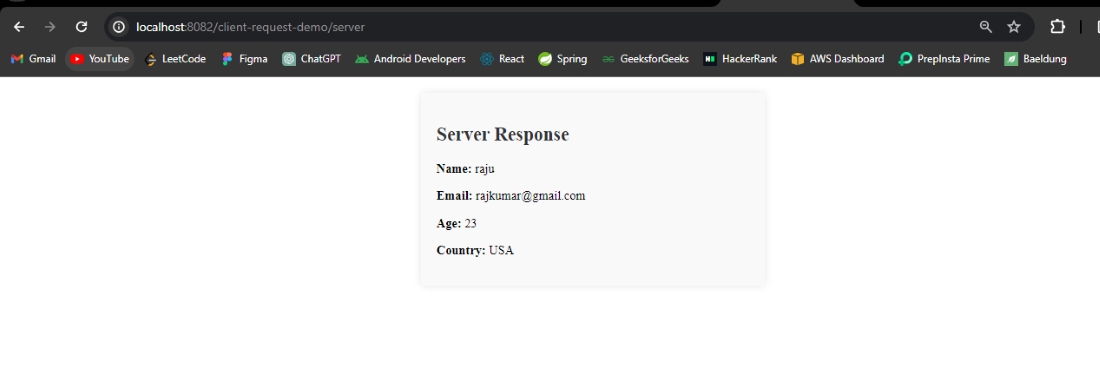
If we are following the above steps, then we can successfully develop the JSP Client Request and server response to the client with display the user data as a result of the server.
Share your thoughts in the comments
Please Login to comment...