React is a JavaScript library created by Facebook. It is a tool for building a UI (User Interface) component. It is widely used for making SPA(Single Page Application) and it has a large developer community.
Django is a Python-based web framework that encourages rapid development and clean, pragmatic design. Due to its ready-made and stack full of wonderful features, from authentication to session management, all these make it ridiculously fast.
Reason to choose React with Django:
- Both React and Django are the most popular library and frameworks and are splendid in their respective domains.
- React’s wonderful SPA optimization and Django’s powerful features make it even better.
- They have large community support and provide immediate assistance.
Advantages of connecting React with Django: As both the parts will be handled separately i.e. React and Django. Here is the list of advantages of using them separately.
- Cleaner and Clear interface between front-end and back-end logic and functions.
- Easy to deploy either the front-end part or the back-end part without redeploying the other.
- Smoothing User Experience, with less loading times and less perceived transitions-data is fetched in the background and only a part of the whole component will be reloaded.
- If there are separate teams working in front-end and back-end respectively they need not worry about another part as both can work independently.
- Can create scalable and multiple client (web, mobile) apps. All the clients will have to consume the same API provided by the back-end side.
The above advantages will eventually result in only a single task left i.e. connection.
Prerequisites:
- A development machine with any OS (Linux/Windows/Mac).
- Python 3 installed.
- Node.js installed (version 12+).
- npm installed (version 6+).
- Basic understanding of both the frameworks (Django and React).
Connect front-end with back-end: This usually happens because we start learning either front-end part (HTML, CSS, Bootstrap, or React, Angular, or Vue if using the framework) or back-end part (Node.js, Django, etc. or any other framework). Anyways that’s the way of learning.
Let’s understand the basic workflow of the connection. These 2 key points are building blocks of Web Technologies.
- In the back-end, we will create API using Django- rest (having methods like GET, POST).
- In front-end, we will consume the API made in Django by hitting it using React.
About the Project: This project is a simple application in which you can write a quote and the name of the author. Basically based on CRUD(Create Read Update and Delete) operation.
Setting Up the back-end: Create a project folder for Django by creating a virtual environment. You must have installed virtualenv package.
Step 1: If not installed install it by typing a command on terminal.
python3 -m pip install --user virtualenv
Step 2: Create a virtual environment.
python3 -m venv env
cd env
source bin/activate
Step 3: Install below packages by using pip
pip install django
pip install djangorestframework
python -m pip install django-cors-headers
Step 4: Create a project name of your choice.
django-admin startproject quotes
cd quotes
django-admin startapp core
Step 5:
- models.py: Now let’s create a database model for our project. As the project is a very simple and model is sufficient to illustrate. Here is models.py file of core app. Name and detail are two fields that are used to store the name of the author and the quote submitted by the author respectively.
from django.db import models
# Create your models here. class React(models.Model):
name = models.CharField(max_length=30)
detail = models.CharField(max_length=500)
|
- serializer.py: Create serializer.py inside the core folder. Here is the serializer for model React. Serializers are basically used to convert complex data to native Python datatypes that can then be easily rendered into JSON(Which we are going to use in React i.e. Client side).
from rest_framework import serializers
from . models import *
class ReactSerializer(serializers.ModelSerializer):
class Meta:
model = React
fields = ['name', 'detail']
|
- views.py: Here is views.py in which we can create our method like GET, PUT, POST, DELETE. I have created GET and POST using class-based views of Django. In GET method we are returning data from the model by calling React.objects.all() and then using list comprehension to convert the author and their quotes in python’s dictionary. In the POST method, we are simply saving the data bypassing the data to ReactSerializer(). It’s time to define the endpoint of the API. The end-point of an API is the URL where our client will hit to consume data from the server. It is generally the place where our resources (database and other programmed functions) live.
from django.shortcuts import render
from rest_framework.views import APIView
from . models import *
from rest_framework.response import Response
from . serializer import *
# Create your views here. class ReactView(APIView):
serializer_class = ReactSerializer
def get(self, request):
detail = [ {"name": detail.name,"detail": detail.detail}
for detail in React.objects.all()]
return Response(detail)
def post(self, request):
serializer = ReactSerializer(data=request.data)
if serializer.is_valid(raise_exception=True):
serializer.save()
return Response(serializer.data)
|
Step 6:
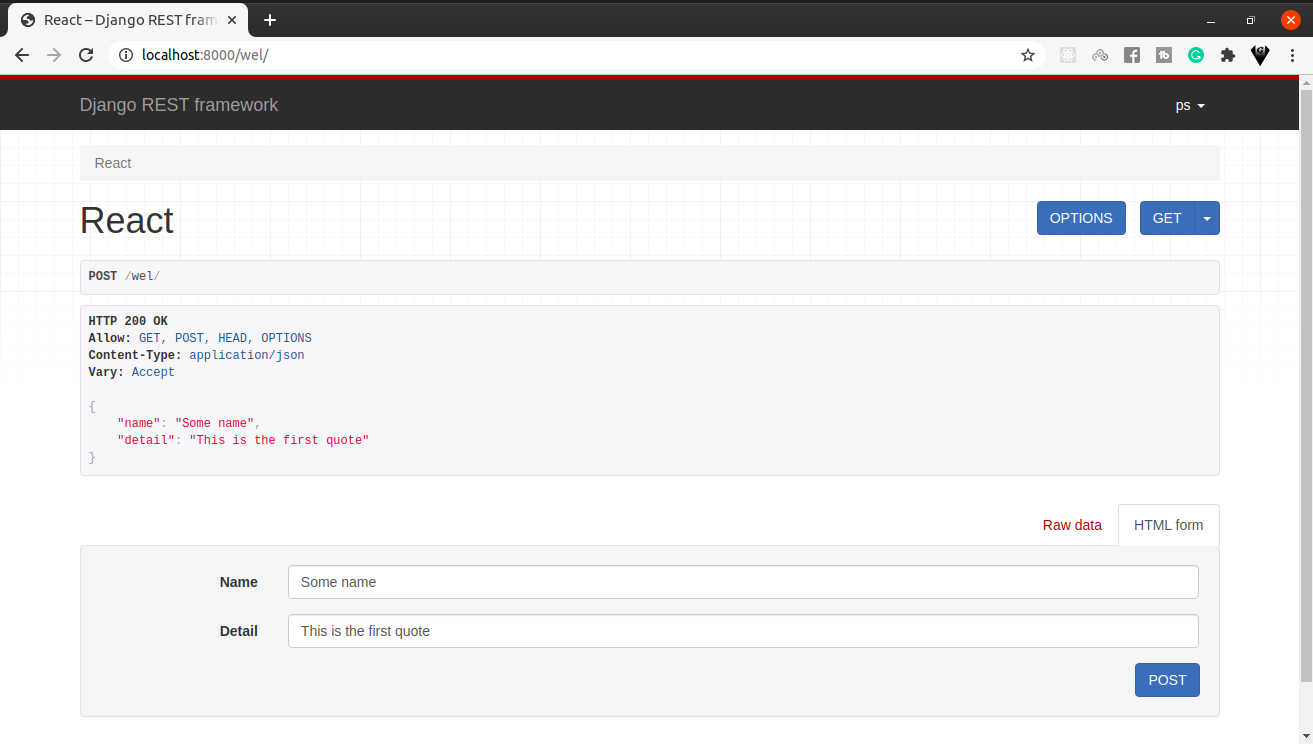
- urls.py: Here is the main urls.py from the project quote. The localhost:8000/wel/ is the end-point of our ReactView.
from django.contrib import admin
from django.urls import path, include
from django.conf.urls import url
from core.views import *
urlpatterns = [
path('admin/', admin.site.urls),
path('wel/', ReactView.as_view(), name="something"),
] |
Step 7: There are few changes in settings.py file which are listed below
- Add rest_framework , core, corsheaders to INSTALLED APPS
- Add corsheaders.middleware.CorsMiddleware to MIDDLEWARE list.
- Create a dictionary assigned to REST_FRAMEWORK variable in which insert ‘DEFAULT_PERMISSION_CLASSES’: [ ‘rest_framework.permissions.AllowAny’ ]
- Assign variable CORS_ORIGIN_ALLOW_ALL = True
You might be thinking about the corsheaders package. Actually, the cors headers package is used to tell the browser that web application running at one origin, access to selected resources from a different origin.
Now let’s get back to the final part of our back-end. Run the following commands on the terminal.
- This command is used to detect changes made in the database.
python manage.py makemigrations
- This command applies those changes to the database.
python manage.py migrate
- For creating a superuser who will be the admin of the whole app.
python manage.py createsuperuser --email admin@example.com --username admin
- This command will run the server and the server should always be in running state.
python manage.py runserver
OR
Open the web browser of your choice (Chrome recommended) and search for localhost:8000/wel/
Setting Up the front-end: There is no boundation to make the front-end folder in the same directory where the back-end folder lives. Also, there is no need of making a virtual environment for React. Use the following commands to get ready for React Application. Using Bootstrap for styling and better look and feel, jQuery is for the dependencies with bootstrap.
npx create-react-app our-quote
cd our-quote
npm install bootstrap jquery axios
Axios is the main tool for connecting back-end with front-end. All the requests will be sent to the server (back-end) with the help of Axios.
Inside our-quote/src/App.js:
import React from 'react';
class App extends React.Component { render() {
return(
<div>
<div>
<div>
<h1>Quote is going to be written here</h1>
<footer>--- by
<cite title="Source Title">
written by meeeee
</cite>
</footer>
</div>
</div>
</div>);
}
} export default App;
|
Output: After running npm start development server of React will start and by default can view at localhost:3000
App.js: Now we have to fetch data from the server by using Axios. The componentDidMount method is called when the component is rendered. This is the right time to request a server for the data. We have used Axios in this method to store the data in a state obtained from the server and later on rendered by the help of a map in JavaScript.
import React from 'react';
import axios from 'axios';
class App extends React.Component { state = {
details : [],
}
componentDidMount() {
let data ;
.then(res => {
data = res.data;
this.setState({
details : data
});
})
.catch(err => {})
}
render() {
return(
<div>
{this.state.details.map((detail, id) => (
<div key={id}>
<div >
<div >
<h1>{detail.detail} </h1>
<footer >--- by
<cite title="Source Title">
{detail.name}</cite>
</footer>
</div>
</div>
</div>
)
)}
</div>
);
}
} export default App;
|
Output: As there is no data to display so fill some data in the database from the server-side.
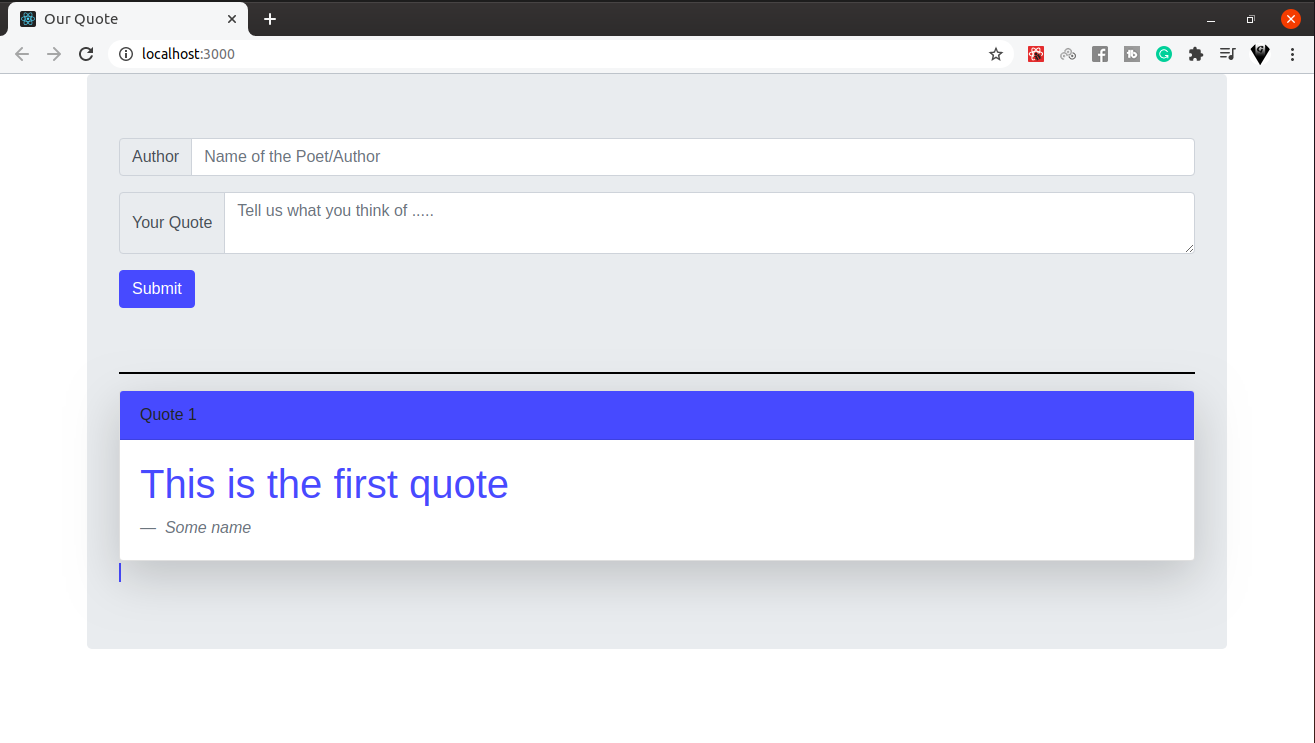
App.js: Now the only part left with this project is to create a form so that the user can fill the data from Client-side which is the correct way to do so. Here is the form submitting a response from Client-side along with bootstrap.
import React from "react";
import axios from "axios";
class App extends React.Component { state = {
details: [],
user: "",
quote: "",
};
componentDidMount() {
let data;
axios
.then((res) => {
data = res.data;
this.setState({
details: data,
});
})
.catch((err) => {});
}
renderSwitch = (param) => {
switch (param + 1) {
case 1:
return "primary ";
case 2:
return "secondary";
case 3:
return "success";
case 4:
return "danger";
case 5:
return "warning";
case 6:
return "info";
default:
return "yellow";
}
};
handleInput = (e) => {
this.setState({
[e.target.name]: e.target.value,
});
};
handleSubmit = (e) => {
e.preventDefault();
axios
name: this.state.user,
detail: this.state.quote,
})
.then((res) => {
this.setState({
user: "",
quote: "",
});
})
.catch((err) => {});
};
render() {
return (
<div className="container jumbotron ">
<form onSubmit={this.handleSubmit}>
<div className="input-group mb-3">
<div className="input-group-prepend">
<span className="input-group-text"
id="basic-addon1">
{" "}
Author{" "}
</span>
</div>
<input type="text" className="form-control" placeholder="Name of the Poet/Author"
aria-label="Username"
aria-describedby="basic-addon1"
value={this.state.user} name="user"
onChange={this.handleInput} />
</div>
<div className="input-group mb-3">
<div className="input-group-prepend">
<span className="input-group-text">
Your Quote
</span>
</div>
<textarea className="form-control " aria-label="With textarea"
placeholder="Tell us what you think of ....." value={this.state.quote} name="quote" onChange={this.handleInput}>
</textarea>
</div>
<button type="submit" className="btn btn-primary mb-5">
Submit
</button>
</form>
<hr
style={{
color: "#000000",
backgroundColor: "#000000",
height: 0.5,
borderColor: "#000000",
}}
/>
{this.state.details.map((detail, id) => (
<div key={id}>
<div className="card shadow-lg">
<div className={"bg-" + this.renderSwitch(id % 6) +
" card-header"}>Quote {id + 1}</div>
<div className="card-body">
<blockquote className={"text-" + this.renderSwitch(id % 6) +
" blockquote mb-0"}>
<h1> {detail.detail} </h1>
<footer className="blockquote-footer">
{" "}
<cite title="Source Title">{detail.name}</cite>
</footer>
</blockquote>
</div>
</div>
<span className="border border-primary "></span>
</div>
))}
</div>
);
}
} export default App;
|
Output: The form will call handleSubmit which in return is using the POST method and submitting the response at end-point http://localhost:8000/wel/. The renderSwitch() is used for passing the index of the array which in return the color of bootstrap className.