In this tutorial, we'll walk through the process of building an image gallery application using Vue.js. We'll explore different approaches to displaying images and provide the complete executable code for each one of them.
Using Vue components to create the gallery
In this approach, we'll display a set of static images directly in the template using img tag with the help of vue components.
Step to create the application using Vue CLI:
Before we begin, make sure we have Node.js and npm installed on your system. Then, we'll use Vue CLI to create our project.
- Step 1: Install Vue CLI globally:
npm install -g @vue/cli- Step 2: Create a new Vue project:
vue create image-gallery-app- Step 3: Navigate into the project directory:
cd image-gallery-app- Step 4: Run the application using below command.
npm run serveProject Structure:
Example: The below code implements the vue component to create an image gallery app.
<template>
<div>
<h1>
Image Gallery App
</h1>
<div class="image-container">
<img v-for="(image, index) in images"
:key="index" :src="image" alt="Image"
@click="showPreview(image)">
</div>
<div class="modal" v-if="previewImage">
<span class="close"
@click="closePreview">
×
</span>
<img :src="previewImage" alt="Preview">
</div>
</div>
</template>
<script>
export default {
data() {
return {
images: [
'https://media.geeksforgeeks.org/wp-content/cdn-uploads/20190718150152/Java-tutorials-by-GeeksForGeeks.png',
'https://media.geeksforgeeks.org/wp-content/cdn-uploads/20210713211702/System-Design-Tutorial.png',
'https://media.geeksforgeeks.org/wp-content/uploads/20240304152903/python-tutorial-2.webp'
],
previewImage: ''
};
},
methods: {
showPreview(image) {
this.previewImage = image;
},
closePreview() {
this.previewImage = '';
}
}
};
</script>
<style>
.image-container {
display: flex;
flex-wrap: wrap;
}
.image-container img {
width: 200px;
height: 200px;
margin: 10px;
cursor: pointer;
}
.modal {
display: block;
position: fixed;
z-index: 1000;
left: 0;
top: 0;
width: 100%;
height: 100%;
overflow: auto;
background-color: rgba(0, 0, 0, 0.8);
}
.modal img {
margin: auto;
display: block;
max-width: 80%;
max-height: 80%;
}
.close {
color: #fff;
position: absolute;
top: 15px;
right: 35px;
font-size: 30px;
cursor: pointer;
}
.close:hover,
.close:focus {
color: #ccc;
text-decoration: none;
cursor: pointer;
}
</style>
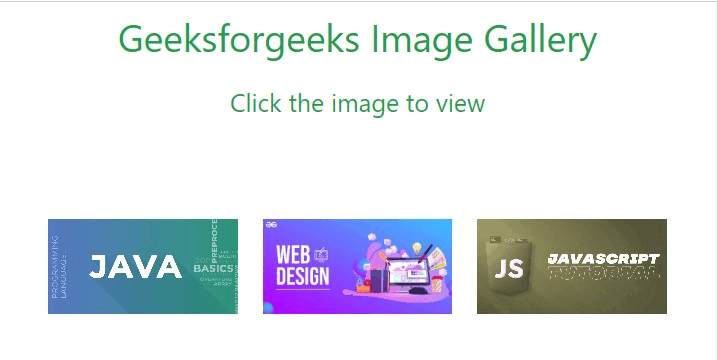
Output:

Using Vue CDN to create image gallery
In this approach, we will include the VueJS to our project using the Vue CDN inside out HTML document.
Steps to use Vue CDN to create image gallery:
- Step 1: Create a project folder with project name and a HTML file into it.
- Step 2: Include the below CDN link into your HTML file to include VueJS into you project.
<script src="https://cdn.jsdelivr.net/npm/vue@2"></script>- Step 3: Add Tailwind CSS to your project using below CDN.
<script src="https://cdn.tailwindcss.com"></script>- Step 4: Now, write the logic for the image gallery app.
Example: The below code uses CDN links to create the image gallery using VueJS.
<!DOCTYPE html>
<html>

<head>
    <meta charset="UTF-8">
    <meta name="viewport" content=
"width=device-width, initial-scale=1.0">
    <title>
        The Geeksforgeeks Image Gallery
    </title>
    <script src=
"https://cdn.jsdelivr.net/npm/vue@2">
    </script>
    <script src=
"https://cdn.tailwindcss.com">
    </script>
</head>

<body>
    <div id="app" class="text-center">
        <h1 class="mt-10 mb-5 text-3xl
            text-green-600">
            Geeksforgeeks Image Gallery
        </h1>
        <h3 class="mb-10 text-xl
            text-green-600">
            Click the image to view
        </h3>
        <div class="p-10 grid grid-cols-3 gap-5">
            <img v-for="(image, index) in images"
                :key="index" class="w-full h-full
                    object-cover cursor-pointer"
                :src="image.src" :alt="image.alt"
                @click="showModal(image.src)" />
        </div>
        <div v-if="isModalOpen" id="modal"
            class="fixed top-0 left-0 z-80 w-screen
                h-screen bg-black/70 flex
                justify-center items-center">
            <a class="fixed z-90 top-6 right-8
                text-white text-5xl font-bold"
                href="javascript:void(0)"
                @click="closeModal">×</a>
            <img id="modal-img" class="max-w-[800px]
                max-h-[600px] object-cover"
                :src="modalImage" />
        </div>
    </div>
    <script>
        new Vue({
            el: '#app',
            data: {
                images: [{
                    src:
'https://media.geeksforgeeks.org/wp-content/uploads/20240215121528/javare15.png',
                    alt: 'Img 1'
                },
                {
                    src:
'https://media.geeksforgeeks.org/wp-content/uploads/20240215121204/15re.webp',
                    alt: 'Img 2'
                },
                {
                    src:
'https://media.geeksforgeeks.org/wp-content/uploads/20240215121356/jsre15.jpg',
                    alt: 'Img 3'
                }
                ],
                isModalOpen: false,
                modalImage: ''
            },
            methods: {
                showModal(src) {
                    this.isModalOpen = true;
                    this.modalImage = src;
                },
                closeModal() {
                    this.isModalOpen = false;
                }
            }
        });
    </script>
</body>

</html>
Output: