Angular 17 introduced a new feature called Standalone Components, which allows you to create self-contained components that can be used independently without being tied to a specific module. This feature can make your code more modular and easier to maintain. However, when working with Standalone Components, you might need to nest components within each other. In this article, we'll explore how to use nested components in Angular 17 with Standalone Components.
Prerequisites
What are nested components?
Nested components refer to the practice of including one component inside another component's template. This approach promotes code organization, reusability, and separation of concerns by breaking down complex user interfaces into smaller, modular components.
What are standalone components?
Standalone Components is a new feature in Angular 17 that allows you to create self-contained components that can be used independently without being tied to a specific module. They promote code modularity and reusability by encapsulating the component's logic, styles, and dependencies within a single unit.
Approach
To use nested components with Standalone Components in Angular 17, follow these steps:
- Create a Parent Standalone Component
- Create a Child Standalone Component
- Import the Child Component in the Parent Component
- Add the Child Component to the imports array in the Parent Component's metadata
- Use the Parent Component in your application
- Import and use the Parent Component in your root component or any other component that needs to render the parent-child hierarchy
Steps to use Nested Components
Step 1: Create an angular application
ng new nested-components
cd nested-components
Step 2: Create a parent component
We will create a component settings which be our parent component. To create settings component we can use the angular cli,
ng g c settingsThis will create a component named settings in the app directory.
Step 3: Create child components
In order to have nested component, we must first create child components. We will create general, user and advance component which will act as child components.
ng g c settings/general
ng g c settings/user
ng g c settings/advance
This will create child components general, user and advance in app/settings directory.
Folder Structure

Dependencies
  "dependencies": {
    "@angular/animations": "^17.3.0",
    "@angular/common": "^17.3.0",
    "@angular/compiler": "^17.3.0",
    "@angular/core": "^17.3.0",
    "@angular/forms": "^17.3.0",
    "@angular/platform-browser": "^17.3.0",
    "@angular/platform-browser-dynamic": "^17.3.0",
    "@angular/router": "^17.3.0",
    "rxjs": "~7.8.0",
    "tslib": "^2.3.0",
    "zone.js": "~0.14.3"
  },
Step 4: Using the child components in parent component
In order to use these components as child, we will need to import them in our settings component.
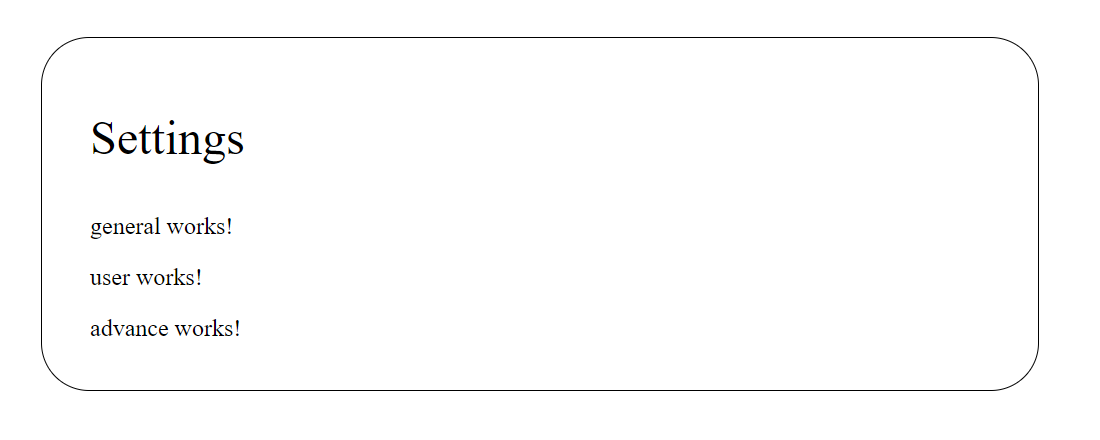
<!-- settings.component.html -->

<div>
    <p>Settings</p>
    <app-general></app-general>
    <app-user></app-user>
    <app-advance></app-advance>
</div>
<!-- app.component.html -->

<app-settings></app-settings>
/* settings.component.scss */

div {
    width: 600px;
    border: 1px solid black;
    border-radius: 32px;
    margin: 32px auto;
    padding: 16px 32px;

    p {
        font-size: 32px;
    }
}
// settings.component.ts

import { UserComponent } from './user/user.component';
import { Component } from '@angular/core';
import { GeneralComponent } from './general/general.component';
import { AdvanceComponent } from './advance/advance.component';

@Component({
    selector: 'app-settings',
    standalone: true,
    imports: [GeneralComponent, UserComponent, AdvanceComponent],
    templateUrl: './settings.component.html',
    styleUrl: './settings.component.scss',
})
export class SettingsComponent { }
// app.component.ts

import { Component } from '@angular/core';
import { RouterOutlet } from '@angular/router';
import { SettingsComponent } from './settings/settings.component';

@Component({
    selector: 'app-root',
    standalone: true,
    imports: [RouterOutlet, SettingsComponent],
    templateUrl: './app.component.html',
    styleUrl: './app.component.scss'
})
export class AppComponent {
    title = 'nested-components';
}
Output: