The Spring Boot framework is one of the most famous in web application development, It can provide a lot of features to make development easy like dependency management, Spring Security, Spring Autoconfiguration, and other features provided by the Spring Framework. In this article, we will learn how a 404 error occurs while accessing the REST Controller on localhost. There are a lot of reasons for this error. We will get to know why this error is and what are the best solutions for this.
A 404 error when trying to access a RestController in Spring Boot can caused by various issues. The Rest Controller is created by using @RestController Annotation in Spring. Here are some reasons and troubleshooting steps to resolve the problem.
Reasons for 404 error in Spring Boot
- Endpoint URL or HTTP Method Mismatch: We should check that the URL we're trying to access matches the endpoint URL defined in the controller. Additionally, we need to verify the HTTP methods used for API URLs such as POST, GET, PUT, DELETE, and other methods.
- Controller Mapping Issue: We need to confirm that our controller class is annotated with @RestController or @Controller.
- Spring Boot Configuration Issue: We need to check if our application is running and if there are no other applications running on the same port number. Also, we should verify if we are using a custom server port.
- Path Variable or Request Parameter Mismatch: If we have defined a path variable in the controller, we should ensure it is referenced properly in the API URL.
- Typographical Errors: We need to check for typos in the endpoint mapping and the URL used to access the endpoint.
- Cross-Origin Resource Sharing Issue: If we are accessing the endpoint from a different domain, we should check if CORS is configured appropriately using @CrossOrigin.
Troubleshooting Ways:
- Check Endpoint Definitions
- Verify Application Status
- Examine Logs
- Test with API URLs with Postman tool you want to use other tools also.
- Check Spring Boot Configuration
Steps to Solve 404 Error while Accessing REST Controller on localhost
To solve the 404 error when accessing the REST Controller API endpoints on localhost, we can utilize the troubleshooting approaches provided above. Now, let's create a Spring Boot project using Spring Initializr.
Step 1:
Create the spring project using spring initializer on creating the project add the below dependencies into the project.
Dependencies:
- Spring Web
- DevTools
- Lombok
Once Create the spring project then the file structure looks like the below image.

Step 2:
Now, let's create a Rest Controller class in the main package of the Spring Project using the @RestController Spring Annotations. After this, we will create some API endpoints in that Rest Controller class. In this project, we have created example API endpoints. Below, we provide the example code.
package com.app;

import org.springframework.web.bind.annotation.GetMapping;
import org.springframework.web.bind.annotation.RestController;

@RestController
public class ParentController {

    @GetMapping("/api/example")
    public String displayData() {
        String message = "Welcome to GeeksForGeeks";
        return message;
    }
}
Here, an API endpoint with a Get Mapping and a method named displayData() is created. We can observe this in the above Java code, where a message of String type is being returned.
Step 3:
Now, let's run this project as a Spring Boot project. The project will run on the Apache Tomcat server with port number 8080, which is the default port number.

Step 4:
Now open any favorite browser or Postman tool to test this API endpoint. Below is the API end point for reference.
http://localhost:8080/api/exampleOutput:
We can see the message in Browser below:

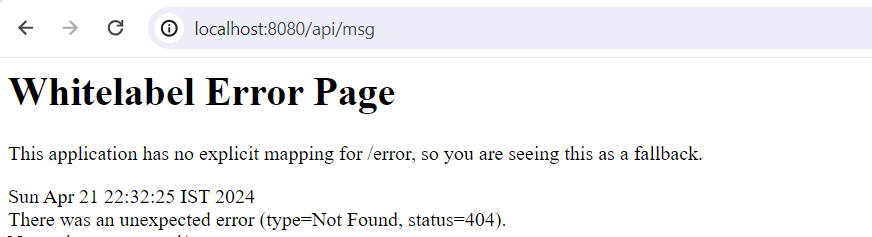
Now, we will hit wrong API URL in browser. Here, we are using chrome browser to test this API URL. After hitting the wrong URL, we will get the 404 error like below.
Wrong API URL:
http://localhost:8080/api/msgOutput:
After hitting the wrong URL, we get the below Whitelabel Error Page in Browser.