In Angular applications, it is often necessary to validate form inputs to ensure that users provide the required information correctly. Checkbox inputs are commonly used to allow users to select one or more options from a list. This article will cover different approaches to validating checkbox inputs in an Angular 17 form.
Prerequisites
Table of Content
Steps to validate the checkbox form in Angular
Step 1: Create an angular application
Once you have NodeJS and angular cli installed on your system, you can use the below commands to create your angular application.
ng new sample-app
cd sample-app
This will create an angular application named sample-app in the directory with and same name, then we can use the cd command to navigate to that directory.
Folder Structure:
Dependencies:
"dependencies": {
    "@angular/animations": "^17.3.0",
    "@angular/common": "^17.3.0",
    "@angular/compiler": "^17.3.0",
    "@angular/core": "^17.3.0",
    "@angular/forms": "^17.3.0",
    "@angular/platform-browser": "^17.3.0",
    "@angular/platform-browser-dynamic": "^17.3.0",
    "@angular/router": "^17.3.0",
    "rxjs": "~7.8.0",
    "tslib": "^2.3.0",
    "zone.js": "~0.14.3"
  }
Approach 1: using Template Driven forms
This approach focuses on html first approach, user can define all their validator in the html and by using the power of NgForm we can convert the html form into angular NgForm object. To start using it we must first import FormsModule in our app.component.ts.
<!-- app.component.html -->

<form #myForm="ngForm" (ngSubmit)="submit(myForm)">
    <label>
        <input type="checkbox" name="terms_and_cond" ngModel required>
        By checking this, I agree to your terms and conditions.
    </label>
    <br>
    <label>
        <input type="checkbox" name="news_letter" ngModel>
        Sign me up for the newsletter.
    </label>
    <br>
    <button type="submit" [disabled]="myForm.invalid">Submit</button>
</form>
/* app.component.scss */

form {
    width: 400px;
    border: 1px solid #ccc;
    border-radius: 8px;
    margin: 64px auto;

    display: flex;
    flex-direction: column;
    gap: 4px;

    padding: 16px;
    font-size: 16px;

    p,
    input {
        font-size: 20px;
    }

    button {
        height: 40px;
        font-size: 16px;
        border-radius: 20px;
    }
}
// app.component.ts

import { Component } from '@angular/core';
import { FormsModule, NgForm } from '@angular/forms';
import { RouterOutlet } from '@angular/router';

@Component({
    selector: 'app-root',
    standalone: true,
    imports: [RouterOutlet, FormsModule],
    templateUrl: './app.component.html',
    styleUrl: './app.component.scss'
})
export class AppComponent {
    title = 'sample-app';

    submit(ngForm: NgForm) {
        console.log(`valid: ${ngForm.form.valid}`);
        console.log(`value: `, ngForm.form.value);
    }
}
You can observe here that all the validators (here required) are defined in the html itself, while in our ts file we get the final NgForm object.
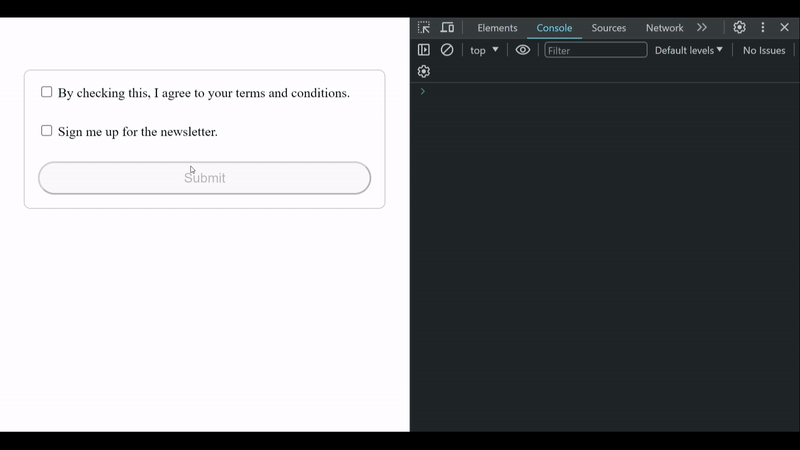
Output
This is a much simple approach to start with, but it has its limitation.
- Limited Control: With template-driven forms, Angular does a lot of the work behind the scenes, based on the HTML template you provide. This means you have less control over how the form behaves, especially if you need something more complex.
- Testing Difficulties: Testing template-driven forms can be tricky because a lot of the form logic is tied to the HTML template. It's harder to test individual parts of the form separately.
- Less Flexibility: Template-driven forms work well for simple forms, but they might not be the best choice if you need a more complex form with changing requirements. Reactive forms give you more flexibility to handle complex scenarios.
- Readability Concerns: When you have a large form or a lot of form logic in the HTML template, it can become cluttered and harder to read. This can make it more difficult to maintain or troubleshoot the form over time.
- Limited Validation: While template-driven forms provide basic validation features, they might not cover all the validation scenarios you need. Reactive forms offer more extensive validation capabilities, including custom validators and asynchronous validation.
Approach 2: using Reactive Forms
This focuses on logic first approach, that is all the thing related to the form is defined in the ts file rather than the html file. For this to work we need to import the ReactiveFormsModule.
<!-- app.component.html -->

<form [formGroup]="myForm" (ngSubmit)="submit()">
    <label>
        <input type="checkbox" name="terms_and_cond" formControlName="terms_and_cond">
        By checking this, I agree to your terms and conditions.
    </label>
    <br>
    <label>
        <input type="checkbox" name="news_letter" formControlName="news_letter">
        Sign me up for the newsletter.
    </label>
    <br>
    <button type="submit" [disabled]="myForm.invalid">Submit</button>
</form>
/* app.component.scss */

form {
    width: 400px;
    border: 1px solid #ccc;
    border-radius: 8px;
    margin: 64px auto;

    display: flex;
    flex-direction: column;
    gap: 4px;

    padding: 16px;
    font-size: 16px;

    p,
    input {
        font-size: 20px;
    }

    button {
        height: 40px;
        font-size: 16px;
        border-radius: 20px;
    }
}
// app.component.ts

import { Component } from '@angular/core';
import { FormControl, FormGroup, ReactiveFormsModule, Validators } from '@angular/forms';
import { RouterOutlet } from '@angular/router';

@Component({
    selector: 'app-root',
    standalone: true,
    imports: [ReactiveFormsModule],
    templateUrl: './app.component.html',
    styleUrl: './app.component.scss',
})
export class AppComponent {
    title = 'sample-app';

    myForm = new FormGroup({
        terms_and_cond: new FormControl(false, [Validators.required]),
        news_letter: new FormControl(false),
    });

    submit() {
        console.log(`valid: ${this.myForm.valid}`);
        console.log(`value: `, this.myForm.value);
    }
}
You'll see that we're using something called a Validator here, which we import from the @angular/forms module. Angular comes with some handy pre-built validators for us to use, but we also have the option to create our own custom validators if we need something more specific.
Output for this code is same as that of the template driven approach.
Here is why you should use this approach.
- More Control: Reactive Forms offer more control over form validation and data handling compared to template-driven forms. Developers have finer-grained control over form validation, error handling, and data manipulation.
- Complex Form Handling: Reactive Forms are better suited for complex forms with dynamic form controls, conditional validation, and cross-field validation. They provide a more flexible and scalable solution for handling such scenarios.
- Immutable Data Model: Reactive Forms work with immutable data structures, which ensures data integrity and makes it easier to track changes over time. This is particularly useful in applications with complex data flows.
- Testability: Reactive Forms are highly testable since form controls and their validation logic are defined programmatically. Unit testing becomes more straightforward as developers can easily mock form controls and test various scenarios.
- Better Performance: Reactive Forms tend to offer better performance compared to template-driven forms, especially in applications with a large number of form controls or complex data bindings. This is because Reactive Forms leverage Angular's change detection mechanism more efficiently.
Output: