Keycloak is an open-source identity and access management solution that provides authentication and authorization services for applications. Integrating Keycloak authentication into a React application ensures secure access control and user management capabilities.
Table of Content
Installing the KeyLock Server:
The initial step entails installing the KeyLock server. Ensure that you have the requisite dependencies installed and follow the instructions provided in the KeyLock documentation for a smooth installation process. The KeyLock server is fundamental for managing authentication and authorization processes within your application.
Installation Steps:
- Make sure you have administrative privileges to install and configure software on your system.
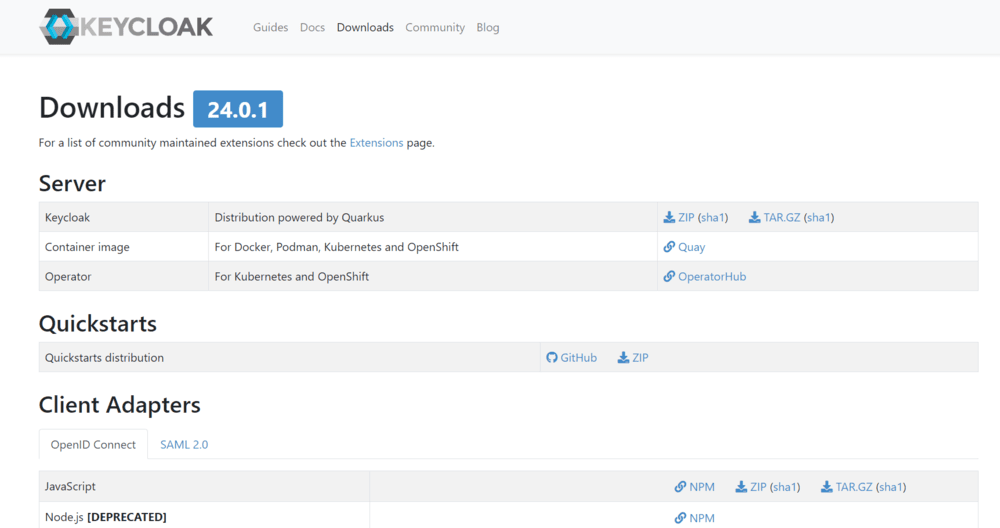
- Visit the Keycloak website (https://www.keycloak.org/downloads.html) and download the latest version of the Keycloak server distribution suitable for your operating system. Keycloak provides distribution packages for various platforms, including Windows, Linux, and macOS.
- Locate the standalone/configuration/ directory within the Keycloak directory structure.
- Inside the configuration directory, you'll find several configuration files, including standalone.xml. This file contains configuration settings for the Keycloak server.
- Open a terminal or command prompt and navigate to the directory where you extracted the Keycloak distribution package.
- Execute the startup script appropriate for your operating system:
On Windows: Run bin\standalone.bat.
On Linux/macOS: Run bin/standalone.sh.
Setting up a Keycloak Realm:
- Open a web browser and navigate to the Keycloak admin console. The default URL is usually http://localhost:8080/auth/admin.
- Log in using your administrator credentials.
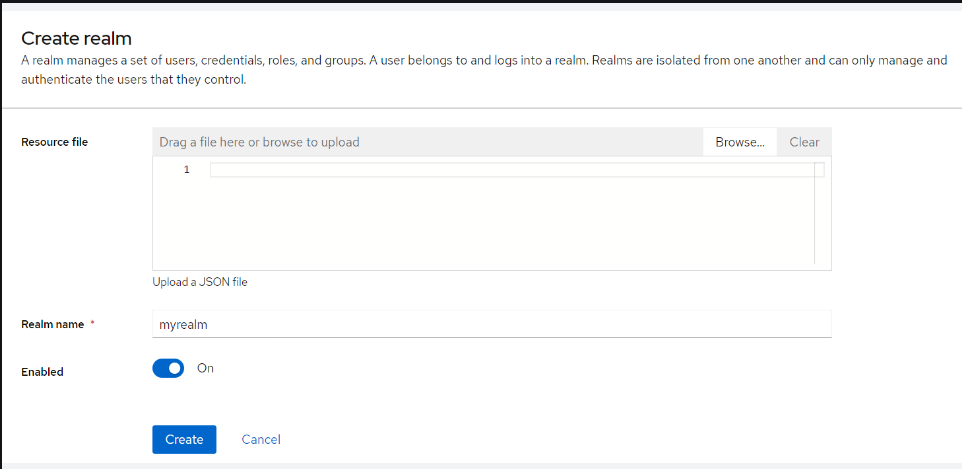
- Once logged in, you'll be on the "Master" realm by default. To create a new realm, click on the dropdown menu in the top left corner of the admin console. It usually displays "Master."
- From the dropdown, select "Add realm."
- In the "Add Realm" form, enter the following details:
- Name: Provide a name for your realm. Choose a meaningful name that represents your application or organization.
- Enabled: Ensure the "Enabled" checkbox is checked to enable the realm.
- SSL Required: Choose the appropriate SSL policy based on your security requirements. Options include "none," "external requests," or "all requests."
- Default Signature Algorithm: Select the default signature algorithm for tokens issued by the realm.
- Click on the "Create" button to create the realm.
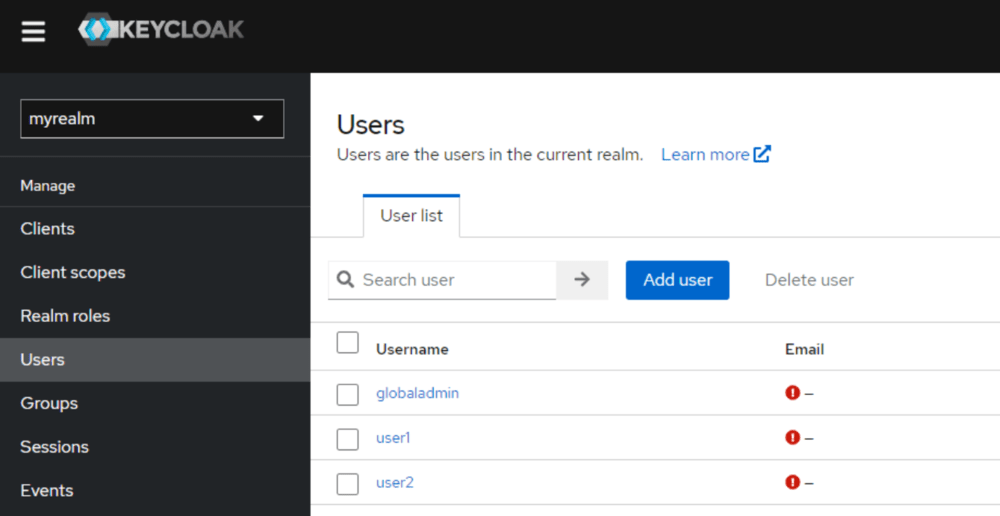
Setting up Keycloak Users:
Within your Keycloak realm, add users and define their roles and permissions. Users are essential entities within Keycloak, representing individuals who interact with your application. Define roles to assign specific privileges to users, ensuring precise access control. By setting up users and roles, you establish a structured framework for managing authentication and authorization within your application.
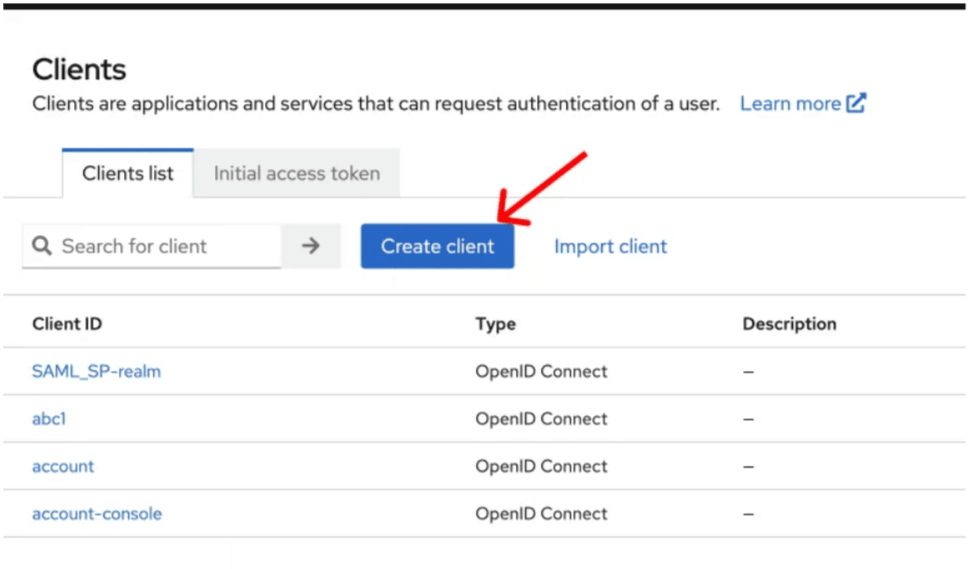
Adding Your React App to Keycloak:
Register your React application as a client within the Keycloak realm. This involves obtaining the client ID and configuring the necessary settings to enable authentication and authorization for your React app. As a client application, your React app interacts with Keycloak to authenticate users and manage access to protected resources. Configuring your app within Keycloak establishes a secure connection between the two entities, enabling seamless authentication processes.
Setting up Keycloak in React:
Proceed to set up your React frontend application. Ensure that you have installed the required dependencies for Keycloak integration using npm or yarn. Setting up the React frontend involves configuring components, routes, and UI elements according to your application's design and functionality requirements. Integrate Keycloak authentication seamlessly into your React components to enforce secure access control mechanisms.
There are two primary approaches to integrating Keycloak authentication into your React app:
- Using the Keycloak JavaScript adapter directly.
- Utilizing a third-party library like react-keycloak.
Approach 1: Using the Keycloak JavaScript Adapter:
This approach involves directly integrating the Keycloak JavaScript adapter into your React application.
Syntax:
import Keycloak from 'keycloak-js';

const keycloak = Keycloak({
    realm: 'your-realm',
    url: 'your-keycloak-url',
    clientId: 'your-client-id'
});

keycloak.init({ onLoad: 'login-required' }).then((authenticated) => {
    if (authenticated) {
        console.log('User is authenticated');
    } else {
        console.log('User is not authenticated');
    }
});
Approach 2: Using react-keycloak:
This approach involves using the react-keycloak library, which provides a wrapper around the Keycloak JavaScript adapter for easier integration with React applications.
Syntax:
import React from 'react';
import { KeycloakProvider, useKeycloak } from '@react-keycloak/web';

const App = () => {
    const { keycloak, initialized } = useKeycloak();

    if (!initialized) {
        return <div>Loading...</div>;
    }

    if (!keycloak.authenticated) {
        return <div>Not authenticated</div>;
    }

    return (
        <div>
            <p>Welcome, {keycloak.tokenParsed.name}</p>
            <button onClick={() => keycloak.logout()}>Logout</button>
        </div>
    );
};

const keycloakConfig = {
    realm: 'your-realm',
    url: 'your-keycloak-url',
    clientId: 'your-client-id'
};

const WrappedApp = () => (
    <KeycloakProvider keycloakConfig={keycloakConfig}>
        <App />
    </KeycloakProvider>
);

export default WrappedApp;
Steps to Implement KeyCloak Authentication
To create a React application with Keycloak authentication, follow these steps:
- Step 1: Install the required modules:
npm install keycloak-js @react-keycloak/web
- Step 2: Run the app using:
npm start
The updated Dependencies in package.json File will look like:
"dependencies": {
    "keycloak-js": "^x.x.x",
    "@react-keycloak/web": "^x.x.x"
}
Example: Here's an example of a simple React component using the react-keycloak library:
import React from 'react';
import { KeycloakProvider, useKeycloak } from '@react-keycloak/web';

const App = () => {
    const { keycloak, initialized } = useKeycloak();

    if (!initialized) {
        return <div>Loading...</div>;
    }

    if (!keycloak.authenticated) {
        return <div>Not authenticated</div>;
    }

    return (
        <div>
            <p>Welcome, {keycloak.tokenParsed.name}</p>
            <button onClick={() => keycloak.logout()}>Logout</button>
        </div>
    );
};

const keycloakConfig = {
    realm: 'your-realm',
    url: 'your-keycloak-url',
    clientId: 'your-client-id'
};

const WrappedApp = () => (
    <KeycloakProvider keycloakConfig={keycloakConfig}>
        <App />
    </KeycloakProvider>
);

export default WrappedApp;
The keycloakConfig object contains configuration details specific to your Keycloak instance. You can find these details in your Keycloak administration console. Here's where you can find the values for realm, url, and clientId:
- Realm: In the Keycloak administration console, navigate to the "Realm Settings" tab. The name of the realm you want to use should be displayed there. It's often called "Master" by default, but you can create custom realms as well.
- URL: The URL of your Keycloak instance can usually be found in the address bar of your web browser when you are logged into the Keycloak administration console. It's the base URL where your Keycloak instance is hosted. It typically looks like http://localhost:8080/auth or https://your-domain.com/auth.
- Client ID: In the Keycloak administration console, navigate to the "Clients" tab within your realm. You should see a list of clients registered with your realm. Choose the client for which you want to configure authentication. The "Client ID" field contains the value you need.