OpenCV, developed by Intel in the early 2000s, is a popular open-source computer vision library used for real-time tasks. It offers various features like image processing, face detection, object detection, and more. In this article, we explore object-tracking algorithms and how to implement them using OpenCV and Python to track objects in videos.
Getting Started With Object Tracking Using OpenCV
Below are the concepts that we are going to cover for Getting Started With Object Tracking Using OpenCV in Python:
Table of Content
What is Object Tracking?
Object tracking in computer vision is following and keeping a record of the position of any object upon its change in movement in the video. Multiple objects can also be tracked simultaneously. The main goal of object tracking is to maintain the identity and positioning of the object as it moves through the video, despite variations in appearance, size, orientation, and lighting, and releasing the object tracking once the object goes out of the video frame.
Applications of Object Tracking
Below are the applications of object tracking using OpenCV:
- Tracking Enemy Military's Movements
- Precision Aiming in Military Weapons (e.g. headshot aiming)
- Surveillance Sameras
- Keeping Count of People/Vehicles/Animals/Objects
- Measuring Speed of Automobile
- Analyzing Sportsman's Movement
- Robotics and Moving IoT Devices
Object Detection vs Object Tracking
Object detection and object tracking are distinct processes.
Object Detection
Object detection locates objects within an image, achieved through training models on datasets to recognize specific objects. It typically involves drawing bounding boxes or labels around detected objects. This can be applied to both images and videos.
Object Tracking
Object tracking, however, is more intricate, involving following a specific object's movement across continuous video frames. Tracking algorithms maintain the object's identity despite changes in appearance or position. Challenges like dynamic video conditions and obstacles are addressed using mathematical and deep learning algorithms to ensure accuracy and effectivenes
Object Tracking Using OpenCV
Object Tracking involves analyzing individual frames of a video, comparing them to previous frames to detect and monitor objects. Initially, objects are identified, assigned unique IDs if multiple, and their trajectories are monitored and updated in subsequent frames. OpenCV offers built-in and external tracker libraries like GOTURN, MIL, Nano, Vit, mean shift, and camshift, each with varying speed and accuracy. Here, we'll focus on implementing mean shift, known for its ease of use, for object tracking.
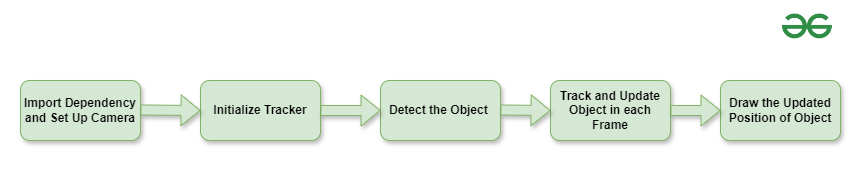
Steps of Object Tracking with OpenCV
Below, are the steps of Object Tracking with OpenCV.
- Prepare the camera and set up the necessary software.
- Choose the region of interest (ROI) to track from the camera feed. You can pre-trained object detection models for specific object recognition.
- Initialize the tracking mechanism.
- Continuously identify instances of the target object within subsequent frames.
- Update the object's location in each frame.
- Provide visual indicators, such as bounding boxes or labels, to confirm successful tracking of the object.
Visual Implementation
Steps of Object Tracking with OpenCV
Object Tracking Using OpenCV
Below, are the code of Object Tracking Using OpenCV:
Install Necessary Library
First, we need to install the numpy and cv2 libraries, which help us with object tracking. To install them, use the following command:
pip install numpy opencv-pythonComplete Code
Below, code starts by capturing video and picking a specific area to focus on from the initial frame. Then, it analyzes that area to create a histogram and sets rules for when to stop tracking. Inside a loop, it continuously reads frames, figures out where the focused area is in each frame, and draws a rectangle around it. This loop keeps going until you press the escape key. Lastly, it stops capturing video and closes all open windows.
import numpy as np
import cv2 as cv

cap = cv.VideoCapture(0)

ret, frame = cap.read()
bbox = cv.selectROI('select', frame, False)

x, y, w, h = bbox

roi = frame[y:y+h, x:x+w]
hsv_roi = cv.cvtColor(roi, cv.COLOR_BGR2HSV)
mask = cv.inRange(hsv_roi, np.array((0., 60., 32.)),
                  np.array((180., 255., 255.)))
roi_hist = cv.calcHist([hsv_roi], [0], mask, [180], [0, 180])
cv.normalize(roi_hist, roi_hist, 0, 255, cv.NORM_MINMAX)

term_crit = (cv.TERM_CRITERIA_EPS | cv.TERM_CRITERIA_COUNT, 10, 1)

while(1):
    ret, frame = cap.read()

    if ret == True:
        hsv = cv.cvtColor(frame, cv.COLOR_BGR2HSV)
        dst = cv.calcBackProject([hsv], [0], roi_hist, [0, 180], 1)

        ret, track_window = cv.meanShift(dst, bbox, term_crit)

        x, y, w, h = track_window
        img2 = cv.rectangle(frame, (x, y), (x+w, y+h), 255, 2)
        cv.imshow('gfg', img2)

        k = cv.waitKey(30) & 0xff
        if k == 27:
            break
    else:
        break
cap.release()
cv.destroyAllWindows()
Output: