Custom banners in Spring Boot allow us to add a creative touch to the startup of our Spring Boot application. By default, Spring Boot displays a simple banner on the console when the application starts. We can also replace this with a custom banner.
To create a custom banner in Spring Boot, we can simply add a text file named "banner.txt" in the "src/main/resources" directory of our project. This file should contain the ASCII art or text that we want to display as the banner. The banner file is located in the root directory of the "resources" directory.
Step-by-step Implementation to Create Custom Banner in Spring Boot
Below are the steps to create a custom banner in Spring Boot using a "banner.txt" file.
Step 1: Create a Java project with Maven
The very initial step is to create a simple Java Maven project using Spring Tool Suite IDE (STS). Go to File > New > Spring Starter Project > Select Create a simple project. Now give the name of the project in the project name field using the wizard window given below.
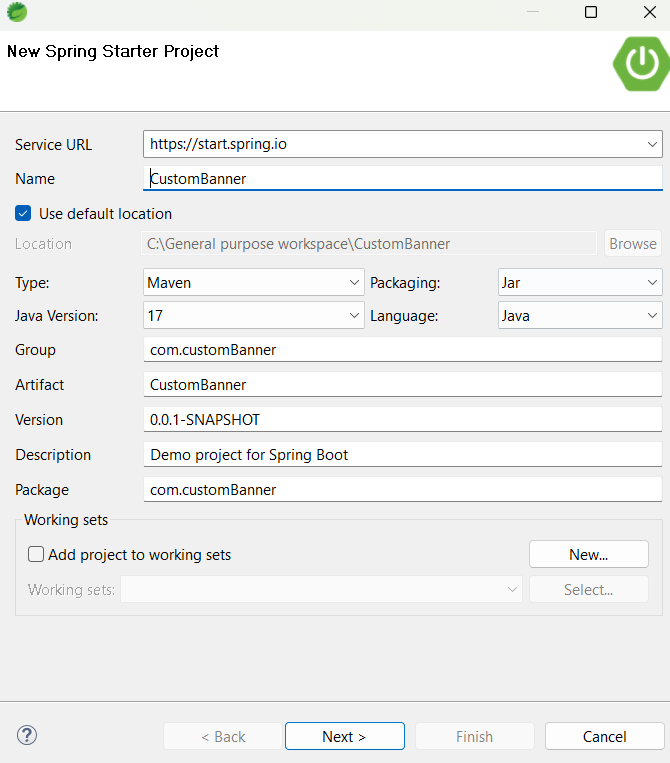
In the above image we can see the Group and Artifact field. Group refers the package name where as Artifact refers the project name.
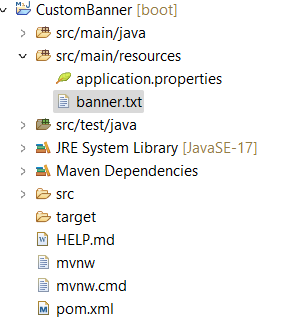
Project Structure:
After successful creation of project we can see the below folder structure:

Step 2: Add Spring Dependency
In the second step, let us add the following Spring Dependencies in the pom.xml file.
// Here automatically given dependencies when we are creating new project.
// There is no need added extra dependencies
<?xml version="1.0" encoding="UTF-8"?>
<project xmlns="http://maven.apache.org/POM/4.0.0" xmlns:xsi="http://www.w3.org/2001/XMLSchema-instance"
    xsi:schemaLocation="http://maven.apache.org/POM/4.0.0 https://maven.apache.org/xsd/maven-4.0.0.xsd">
    <modelVersion>4.0.0</modelVersion>
    <parent>
        <groupId>org.springframework.boot</groupId>
        <artifactId>spring-boot-starter-parent</artifactId>
        <version>3.2.4</version>
        <relativePath/> <!-- lookup parent from repository -->
    </parent>
    <groupId>com.customBanner</groupId>
    <artifactId>CustomBanner</artifactId>
    <version>0.0.1-SNAPSHOT</version>
    <name>CustomBanner</name>
    <description>Demo project for Spring Boot</description>
    <properties>
        <java.version>17</java.version>
    </properties>
    <dependencies>
        <dependency>
            <groupId>org.springframework.boot</groupId>
            <artifactId>spring-boot-starter</artifactId>
        </dependency>

        <dependency>
            <groupId>org.springframework.boot</groupId>
            <artifactId>spring-boot-starter-test</artifactId>
            <scope>test</scope>
        </dependency>
    </dependencies>

    <build>
        <plugins>
            <plugin>
                <groupId>org.springframework.boot</groupId>
                <artifactId>spring-boot-maven-plugin</artifactId>
            </plugin>
        </plugins>
    </build>

</project>
Step 3: Create a banner.txt file
After creating all the project configuration, now let us create the src/main/resources under the project.
- First we need to create a file called "banner.txt".
- To do this, right click on the src/main/resources we can follow the options: New > file , Now create a new "banner.txt" file.
We can see the below image created "banner.txt" file:
Step 4: Now click on banner.txt file
Now we can write text or ASCII spring Generator we can generate text online ASCII art generate also.

Step 5: Running the program
When we finish all the source file configurations and the last step is compile and run the program.
- To do this, right click on your project: Run as > Spring Boot app and run the application.
- At last we will be able to see the final output in the console as shown in below.
Output:
