Django protects your website from XSS attacks by employing CSRF tokens, unique for each user, hidden in forms. This article will show how to implement Cross-site scripting (XSS) protection in Django.
What is Cross-site scripting (XSS) Protection in Python Django?
In Django, they keep your website safe from XSS attacks by using CSRF tokens. These tokens are unique for each user and hidden in forms. When someone submits a form, Django checks if their token matches the one assigned to their session. This stops bad scripts from getting in, ensuring only legitimate users can interact with your site.
Implementation of Cross-Site Scripting (XSS) Protection in Django
Below, are the implementations of Cross-site scripting (XSS) protection Django in Python:
Starting the Project Folder
To start the project use this command
django-admin startproject xss_protected_project
cd xss_protected_project
To start the app use this command
python manage.py startapp xss_exampleNow add this app to the ‘settings.py’
INSTALLED_APPS = [
    "django.contrib.admin",
    "django.contrib.auth",
    "django.contrib.contenttypes",
    "django.contrib.sessions",
    "django.contrib.messages",
    "django.contrib.staticfiles",
    "xss_example",
]
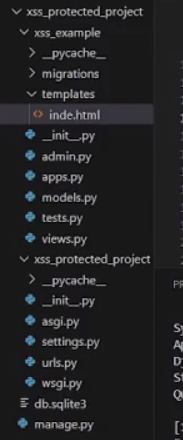
File Structure
Setting Necessary Files
views.py: Django view function, home, renders a template named 'home.html'. If the request method is POST, it retrieves user input from the POST data. Otherwise, it defaults to a demonstration JavaScript code that triggers an alert, which is vulnerable to XSS attacks. To prevent such attacks, ensure proper sanitization and escaping of user input in HTML templates.
# xss_example/views.py
from django.shortcuts import render

def home(request):
    if request.method == 'POST':
        user_input = request.POST.get('user_input', '')
    else:
        # Default value for demonstration
        user_input = "<script>alert('XSS attack!');</script>"
    return render(request, 'home.html', {'user_input': user_input})
urls.py : Below are the urls.py file which connect views.py file to HTML file.
# xss_protected_project/urls.py
from django.contrib import admin
from django.urls import path
from xss_example.views import home

urlpatterns = [
    path('admin/', admin.site.urls),
    path('', home, name='home'),
]
Creating GUI
xss_example/templates/inde.html : HTML template, 'index.html', creates a form for user input with a textarea field. The form sends a POST request with the user's input. To mitigate XSS vulnerabilities, the user input is rendered using the safe filter. However, it's crucial to sanitize and escape user input properly to prevent XSS attacks.
<!-- templates/inde.html -->
<!DOCTYPE html>
<html lang="en">
<head>
    <meta charset="UTF-8">
    <meta name="viewport" content="width=device-width, initial-scale=1.0">
    <title>XSS Example</title>
</head>
<body>
    <h1>XSS Example</h1>
    <form method="post">
        {% csrf_token %}
        <label for="user_input">User input:</label><br>
        <textarea id="user_input" name="user_input" rows="4" cols="50">{{ user_input }}</textarea><br>
        <input type="submit" value="Submit">
    </form>
    <p>Rendered user input:</p>
    <!-- Displaying sanitized user input -->
    <p>{{ user_input | safe }}</p>
</body>
</html>
Deployement of the Project
Run these commands to apply the migrations:
python3 manage.py makemigrations
python3 manage.py migrate
Run the server with the help of following command:
python3 manage.py runserverOutput
