How to Scan for Hardware Changes on Windows 11?
Last Updated :
28 Dec, 2023
In case of a hardware failure after updating its driver or if your computer doesn’t recognize a new device, you need to scan for hardware changes in your computer. Windows 11/10 automatically for hardware changes upon connecting or removing certain devices, though manual scanning may be more effective in identifying and configuring new devices. This may also help to solve the driver problems and hardware conflicts.
In this article, we will learn how to scan hardware changes on your Windows PC. But before that let’s know when should you do a hardware scan.
When Should You Do a Hardware Change Scan?
When installing new devices, windows autoloader automatically downloads the driver, but can often not be detected because of a malfunction or conflict with another device. It is also crucial to scan for hardware changes following the addition or updating of a new device. This can assist in solving the Windows problems like the black screen issues or BSOD.
Method 1: Scan for Hardware Changes Using the Device Manager
Device Manager is a Windows utility that comes with the operating system; it enables users to see and control hardware devices attached to the system. It is a necessary tool for fixing errors, driver updates, and in this context, to examine the hardware’s changes.
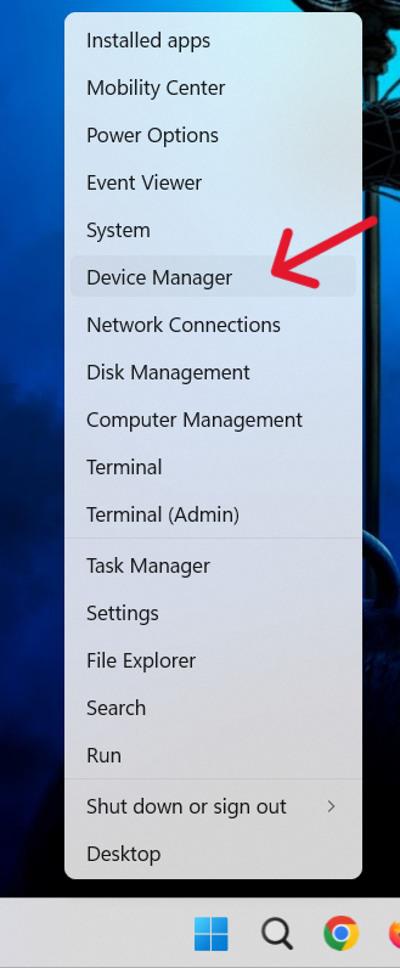
Step 1: Right-click on the Start button. Choose “Device Manager” from the context menu.
Step 2: In the Device Manager window, locate and click on the “Action” menu at the top. (Make sure you have selected at least one driver by clicking on that driver)
Step 3: From the “Action” menu, select “Scan for hardware changes.” or right-click on any driver then click on “Scan for hardware changes.“

Step 4: Windows will start scanning for any changes in hardware configurations. The process may take a few seconds.
Method 2: Scan for Hardware Changes Using Command Prompt
Step 1: To open Command prompt use shortcut Win + S then on search bar type “CMD” from right hand side select “Run as administrator“

Step 2: Type the following command and press Enter:
pnputil.exe /scan-devices
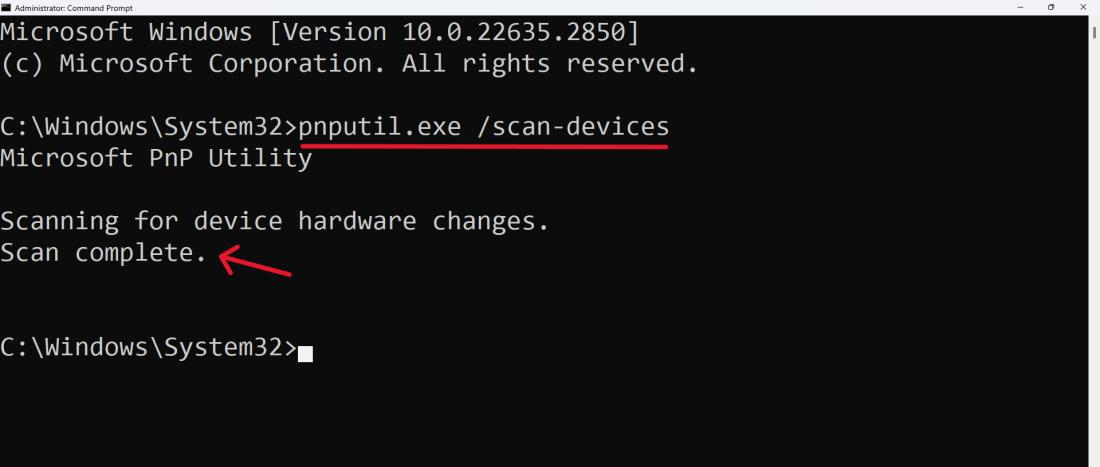
After completion, you will see a message “Scan complete”.
Conclusion
Windows 11 system requires scanning for hardware changes as one of its essential aspects. Device Manager and Command Prompt, whether you use a user-friendly interface or command line efficiency, both will ensure that your system recognizes and uses new hardware properly.
Also Read
FAQ’s To Scan for Hardware Changes on Windows 11
1. Why would I consider scanning for hardware and driver changes in Windows 11?
Scanning for changes in hardware recognizing and adjusting your system to newly added or removed hardware as well as to enhance its overall efficiency.
2. How often should I perform a hardware change scan?
You should check for hardware changes whenever you install new hardware or are having difficulty with device recognition. Moreover, regular checks would be useful in keeping the system up-to-date.
3. Will searching for a hardware change impact on my current files and settings?
No, scanning for hardware changes is not intrusive in the sense that it just looks for the new/removed one. It does not change your pre-existing files and settings.
Share your thoughts in the comments
Please Login to comment...