Cross-Site Scripting or XSS is the Vulnerability or Security Flaw which is listed in the OWASP Top 10 Vulnerability list. XSS flaw mainly deals with the arbitrary JavaScript code which can compromise the internal architecture of the application. Attacker or Hacker passes the malicious code snippet which consists of intention to stole or destroy the system architecture. This malicious string or code is passed to the server through various means like input fields, parameters, or even passed as a file. In this flaw, the web application generates the output based on the user input, which can be risky if user input is something dangerous.
XSS Example
Consider a web application that takes name string from the user via the name parameter provided on the query string.
http://geeksforgeeks.org/aform.html?name=Gaurav
The website server wants to show the name-value which is provided by the user on the HTML page. In this case, PHP is used to pull the value from the URL and generate the result HTML
<?php echo ‘You Searched: ‘ . $_GET[“name”]; ?>
A malicious script thus can be formed such that if a victim clicks on the URL, a malicious script would then be executed by the victim’s browser and send the session values to the attacker.
http://geeksforgeeks.org/aform.html?name=<script>alert(‘XSS by Gaurav on GeeksforGeeks’);</script>
What is XSpear Tool?
Cross-Site Scripting or XSS is the most common vulnerability detected on websites; malicious JavaScript payload is inserted into the data carrier parameters or input fields. There are various techniques for XSS detection on the target domain, like Burp Suite, ZAP, etc. But we can perform automated testing using the tool named XSpear. XSpear tool is an automated tool designed and developed in the Ruby language. XSpear tool checks various types of XSS vulnerabilities like Reflected, Blind, etc. We can provide the custom payload while testing the domain. The tool also extracts some Recon information like Server, Action, etc. XSpear tool is open-source and free to use.
Note: As XSpear is a Ruby language-based tool, so you need to have a Ruby environment on your system. So check this link to Install Ruby in your system. – Installation of Ruby in Linux
Key features
- XSpear tool supports Pattern Matching.
- XSpear tool supports Reflected Parameter, Filtered test event handlers, etc.
- XSpear tool can work with Raw files generated through Burp Suite and ZAP.
- XSpear tool supports results saving in the JSON format.
- XSpear tool runs on the Ruby Code.
- XSpear tool can perform deep analysis on Security Headers.
- XSpear tool supports Dynamic and Static Analysis.
Installation of XSpear Tool on Kali Linux
Step 1: Check the Ruby Environment Version using the following command.
gem -v

Step 2: Install the required package 1 using the following command.
sudo gem install colorize

Step 3: Install the required package 2 using the following command.
sudo gem install selenium-webdriver

Step 4: Install the required package 3 using the following command.
sudo gem install terminal-table

Step 5: Install the required package 4 using the following command.
sudo gem install progress_bar

Step 6: Now Install the XSpear tool Package using the following command.
gem install XSpear

Step 7: Check the help page of the tool for better understanding.
XSpear -h

Dependency gems
1. Colorize
gem install colorize

2. Selenium-Webdriver
gem install selenium-webdriver

3. Terminal-Table
gem install terminal-table

4. Progress_bar
gem install progress_bar

Working with XSpear Tool on Kali Linux
Example 1: Verbose Mode
XSpear -u “http://testphp.vulnweb.com/listproducts.php?cat=123” -v 2
In this example, we will be performing a scan on our target domain in verbose mode. -v tag is used for verbose mode.

Example 2: Scanning XSS
XSpear -u “http://testphp.vulnweb.com/search.php?test=query” -d “searchFor=yy”
In this example, We will be scanning the target domain from XSS Vulnerability.

Example 3: Only JSON output
XSpear -u “http://testphp.vulnweb.com/search.php?test=query” -d “searchFor=yy” -o json
1. In this example, we will be saving the results of the scan in JSON format. -o tag is used to save the output.

2. In the below Screenshot, We have got the results of our scan in JSON format.

3. In the below Screenshot, We have displayed the JSON format results from the output file.

Example 4: Set scanning thread
XSpear -u “http://testphp.vulnweb.com/search.php?test=query” -t 30
In this example, we are changing the default thread value. -t tag is used to change the default value.

Example 5: Testing at selected parameters
XSpear -u “http://testphp.vulnweb.com/search.php?test=query&cat=123&ppl=demo” -p cat,test
1. In this example, we will be testing only the selected parameters. -p tag is used to select the parameters for the scan.

2. In the below Screenshot, We have got the results of our above scan.

Example 6: Testing Only parameter analysis (aka no-xss mode)
XSpear -u “http://testphp.vulnweb.com/search.php?test=query&cat=123&ppl=demo” –no-xss
1. In this example, we are only testing the parameters without XSS testing. –no-xss tag is used.

2. In the below Screenshot, We have got the results of our scan.

Example 7: Testing blind XSS(all params)
XSpear -u “http://testphp.vulnweb.com/search.php?test=query” -b “https://hahwul.xss.ht” -a
1. In this example, we are testing the target domain for Blind XSS Vulnerability. We have passed the payload collection link.
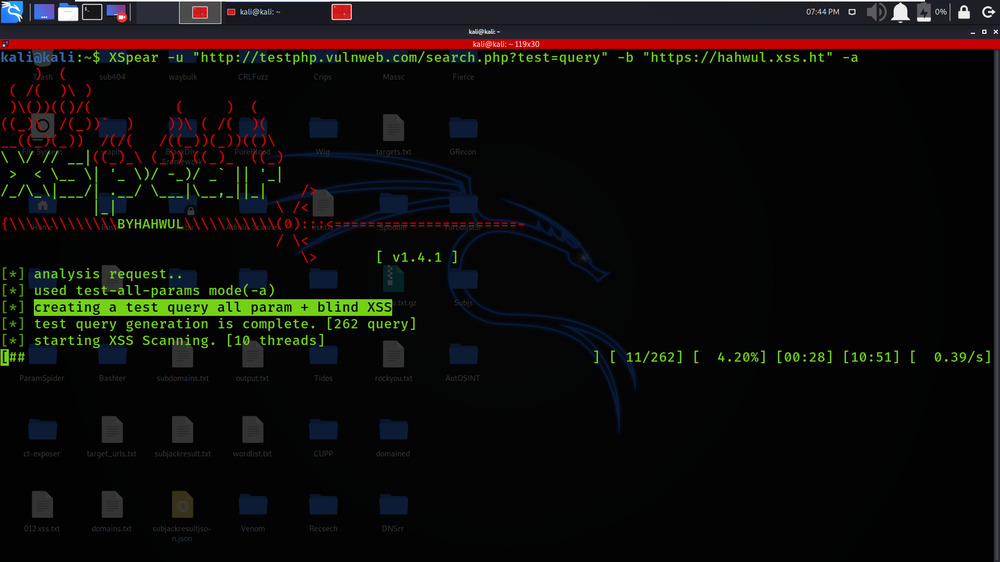
2. In the below Screenshot, We have got the results of our scan.

Example 8: Quite mode
XSpear -u http://testphp.vulnweb.com/listproducts.php?cat=123 -a -v2
In this example, we are implementing Quite Mode. We have used -v2 tag for Quite Mode

Example 9: Scanning log
XSpear -u http://testphp.vulnweb.com/listproducts.php?cat=123 -a -v3
1. In this example, we are displaying the live logs of the scan. We have used -v3 tag for live logs.

2. In the below Screenshot, We are getting the live log details of the scan.

Like Article
Suggest improvement
Share your thoughts in the comments
Please Login to comment...