wxPython – Change labels using button
Last Updated :
10 May, 2020
In this article we are going to learn how to make button interactive with the frame. In this article we will change the text label on the pressing button. So let’s start with the steps.
Step 1: Create a static text on the frame.
Step 2: Add button to the frame.
Step 3: Create event function for the button.
Step 4: Add code to change text label in this function.
Code :
import wx
class Example(wx.Frame):
def __init__(self, *args, **kw):
super(Example, self).__init__(*args, **kw)
def onButton(event):
print("Button")
st.SetLabel("GeeksforGeeks")
st = wx.StaticText(self, label ="Welcome to ")
button = wx.Button(self, wx.ID_ANY, 'Test', (10, 40))
button.Bind(wx.EVT_BUTTON, onButton)
def main():
app = wx.App()
ex = Example(None)
ex.Show()
app.MainLoop()
if __name__ == '__main__':
main()
|
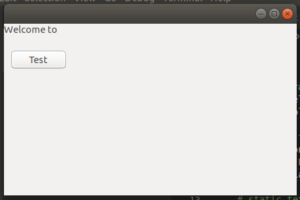
Output:
1. Before clicking:
2.After Clicking

Like Article
Suggest improvement
Share your thoughts in the comments
Please Login to comment...