Vagrant is an open-source tool that helps us to automate the creation and management of Virtual Machines. In a nutshell, we can specify the configuration of a virtual machine in a simple configuration file, and Vagrant creates the same Virtual machine using just one simple command. It provides command-line interfaces to automate such tasks.
Virtual Machine is a machine that does not exist physically but can be used just like a physical computer. Any task that can be done on a physical machine can also be executed in a virtual machine. But Virtual Machine is built on top of a physical system, and multiple virtual machines can be created in a single physical computer. All the virtual machines share the same hardware, but each of them might have a separate operating system. The physical system that hosts all the virtual machines is called the Host Computer. The medium that separates the Host Computer hardware and the virtual environments is something called Hypervisor, or Hyper-V.
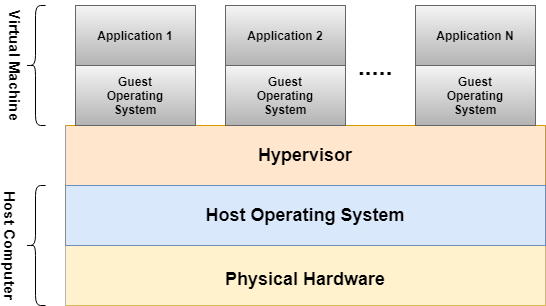
Fig: Structure of Virtual Machine
Each Virtual Machine should have its own configuration like operating system, CPUs, RAM, Hard Disk Memory, networking, etc. And the creation of such VMs, manually configuring all the properties is really a hectic task. In this scenario, Vagrant comes into the picture.
Why Vagrant?
An application consists of several components which need to be configured properly to run the application. For example, a modern web application might have components like Java, JavaScript, Python, etc. as a language, MySQL, Oracle, MongoDB, etc. as Databases, other components like webserver, load-balancer, API Gateway, Message Queue, etc. based on requirements.
Prior to Vagrant, all these components need to be set up manually. During the setup process, a lot of issues are faced-
- In every machine, the setup needs to be done separately, which takes a lot of time.
- The manual configuration might be erroneous, which needs to debug and fix every time.
- The development, testing, and production environment should be identical. But due to this manual installation and setup of the components, there might be a slight difference which provides us a lot of pain, because, in such a scenario, the application might run in a development environment, but face issues in the production one.
Vagrant is the modern solution to all these problems. Instead of setting up all the components manually, Vagrant provides us the feature of using one configuration file (called Vagrantfile), where all the required software components and their configuration information are specified. So, while this same configuration file is executed in multiple machines, Vagrant creates the Virtual Machine on top of each physical machine, installs and setups all the mentioned components automatically, and provides a ready start-to-work Virtual Machine. And since this provides a Virtual Machine, there is no need to bother about whether one software component would run on Windows OS or Linux OS and what should be their configuration and also developer, QA both work in a separate machine, but both machines should have a completely identical setup.
Terminologies Of Vagrant: Before getting into the details of Installation and how to use Vagrant, let’s first discuss the basic terminologies related to Vagrant.
1. Vagrant Box: The basic unit of Vagrant setup is Vagrant Box. Just like Docker Image, Vagrant Box is a self-contained image of the Operating System. More specifically, it is a packaged Virtual Machine. Instead of installing an operating system and all the software components inside a VM manually,
- The vagrant box is a ready-made base image of a Virtual Machine Environment.
- For example, if there is a need to get some VM with all default setups of Spring Boot application development, one can get the same Vagrant Box. All that is required to do is to download the Vagrant Box and run it. Vagrant creates the VM and development work can be started immediately.
- A lot of Vagrant Box is present in Vagrant Cloud box catalog, which we can use as a base image for our own Virtual Machine.
2. Vagrant File: Vagrant maintains one configuration file, called Vagrantfile, where all configurations of a VM are mentioned. And Vagrant creates the Virtual Machine with the same configuration mentioned in the file. Even if there is a need to install some software in the VM, one can specify the same in Vagrantfile, and Vagrant downloads and installs the same for us.
Let’s look into the steps for provisioning one VM using Vagrant.
Installation
Step 1: Download Vagrant based on your operating system and install it in the system.
Step 2: Verify vagrant installation using command vagrant -v in command prompt. It will show the version of our vagrant installed as below.

Step 3: Download Virtual Box based on your operating system and install it in the system.
Vagrant Project Setup
Step 1: Create a folder where we want to save all the Vagrant-related files.
Step 2: Create a file, named Vagrantfile for mentioning the configuration of the VM. Since this is the first time Vagrant is being used after the installation, so it is advisable to let Vagrant creates the file for us with minimum configuration. And modification can be done later.
Step 3: Open PowerShell (for Windows) or Terminal (for Linux) and go to the location of the folder that was created in step 1.
Step 4: Run command vagrant init bento/ubuntu-16.04, and let the execution complete.
This command will initialize the directory with the specified Vagrant Box (bento/ubuntu-16.04). We will find Vagrantfile created in this location. If opened, you will see that some sample configuration has already been mentioned with proper examples and all of them are commented. Anyone can check it out to build a Virtual Machine with a more specific configuration. A piece of important information mentioned in the file can be seen.
config.vm.box = "bento/ubuntu-16.04"
This is the Vagrant Box, that was mentioned during initialization.
Boot up Virtual Machine Using Vagrant:
vagrant up
This command will take Vagrantfile and provision one VM with all the configurations mentioned. For now, it boots up a Virtual machine with a Ubuntu-16.04 version of the Operating System.
SSH into Virtual Machine
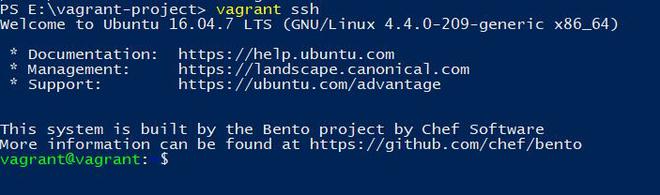
Step 1: Now, the VM has been created. So, to get into it, run command vagrant ssh. After executing this command you are now inside the newly created VM. Now, anything can be done inside the VM through this terminal. The following screen will be visible-
Step 2: To log out from Virtual Machine, run the command logout. Again the terminal will come back to the host machine.

Clean Up Vagrant:
Step 1: To shut down the VM using Vagrant, run command vagrant halt. This command will switch off the VM and again to power on the VM, run vagrant up command.

Step 2: In order to shut down a Virtual Machine, keeping its current state, run vagrant suspend. In this case, when the VM is started again using vagrant up, the system will start from the same position where it left off. All unsaved work can be restored.
But in this case, VM will not release the resources from the Host Machine, even it takes some more disk space to store the current state of its own RAM inside the Host Machine.

Step 3: To delete the VM with all its resources, run vagrant destroy. This command will shut down the VM and delete it from the Host System.

Setting Up Sample Project In VM Using Vagrant:
Let’s install a web server inside VM and access the same from your host computer. Follow the steps below-
Step 1: Do vagrant ssh, to go into the VM created.
Step 2: Inside the VM, install a web server, say Nginx, manually. Run below commands-
sudo apt update
sudo apt install nginx
Step 3: Check whether the Nginx service is running or not using the command-
systemctl status nginx

If the service is not running, start the service using the command-
sudo service nginx start
Note- The above installation can also be done with the Vagrantfile, but for now, let’s use vagrant ssh functionality.
Step 4: Go to /var/www/html and create one sample HTML file, say index1.html as below-
HTML
<!DOCTYPE html>
<html>
<body>
<h2 style = "color: green"> Welcome to GeeksforGeeks </h2>
<body>
</html>
|
Step 5: Now Nginx is running in its default port 80 inside the VM. But to access the VM’s Nginx server from the Host Machine, it is required to map port 80 of VM with some port in Host Computer. And this mapping is called Port Forwarding. Port forwarding can be done manually using Virtual Box Manager. But since Vagrant is being used here, let’s do it using Vagrantfile.
Step 6: Open Vagrantfile and add the line
config.vm.network "forwarded_port", guest: 80, host: 85
after the line
config.vm.box = "bento/ubuntu-16.04"
and save the file.
Here basically the 80 port of VM is mapped with 85 port of the host system.
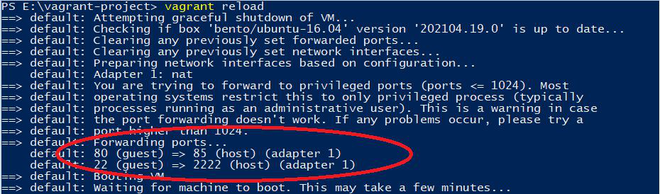
Step 7: Exit from the VM in PowerShell or terminal and run the command vagrant reload to reload the new setting that we added in Vagrantfile. During reload, one can see the forwarded port as below. In the below snapshot, the first forwarded port is the one that is recently added and the second one is the default for SSH connectivity.
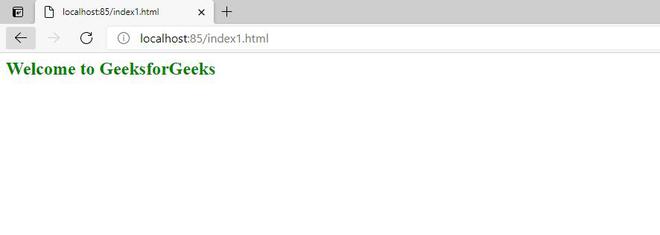
Step 8: Check whether Nginx is running or not. Now the Nginx server of the VM can be accessed using 85 port from the host system. The HTML file created above can be retrieved, using the URL- localhost:85/index1.html
Advantages Of Vagrant:
- Vagrant is free and open-source.
- It offers extremely efficient project scaffolding of a dev/ test environment.
- Vagrant has a great variety of community boxes and plugins.
Disadvantages Of Vagrant:
- Syntax updates have major repercussions for the plugin compatibility
- Community support is good, but it is a lengthy process.
- Major updates have introduced some serious bugs with consequences in the dev projects.
Like Article
Suggest improvement
Share your thoughts in the comments
Please Login to comment...