What is Routing and Nested Routing in Angular 9/8 ?
Last Updated :
15 Aug, 2021
In this article, we will learn the routing & nested routing concept in Angular. We will implement the concept to establish routing between different components by making their routes when a user clicks the link, it will be navigated to a page link corresponding to the required component. Let’s understand the routing in Angular.
Routing: Angular provides extensive navigation functions for simple scenes that are too complex. Defining navigation items and corresponding views is called routing. Routing allows the users to create a single-page application with multiple views and allows navigation between them. Users can switch between these views without losing the application state and properties. Angular provides a separate router module for adjusting navigation in the application. In this article, we will know how to perform routing and nested routing in an Angular application.
Syntax:
ng new app_name
- For routing, you will need components. Use the below command to create the component.
Syntax:
ng g c component_name
Routing means navigation and Nested-Routing mean sub-navigation or sub-page navigation. Here, we will make three main links name as Home, ContactUs, AboutUs. Inside the about-us component, we will create another two sub-components name as ourCompany & ourEmployees.
- Then in imports of app-routing.module.ts define the paths.
const routes: Routes = [
 { path: '', component: HomeComponent },
 { path: 'aboutus', component: AboutUsComponent },
 { path: 'contactus', component: ContactUsComponent }
];

@NgModule({
 imports: [RouterModule.forRoot(routes)],
 exports: [RouterModule]
})
- Define the HTML for about-us.component.html, contact-us.component.html & home.component.html.
- Now angular web app is ready to run.
Project Structure: Our project structure will look like the following image:
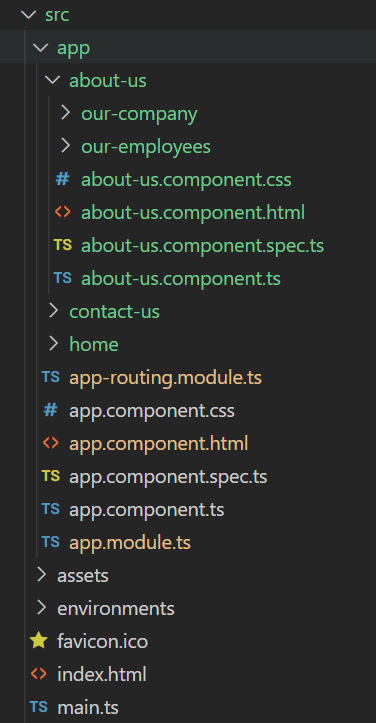
Project Structure
Let’s follow the steps to build the routing & nested routing for the application.
Step 1: Creating Simple Angular Application. In this step, we will create a simple angular application as an example using the command line argument. We need to run this below command on the command prompt:
ng new geeksforgeeks-routing
Once we run this command, on the command prompt, two things will be asked for creating a routing module and we need to answer yes.

Step 2: In this step, after the successful installation process, we will update our app.component.html with the given HTML code.
app.component.html
<!DOCTYPE html>
<html>
<head>
<style>
ul {
list-style-type: none;
margin: 0;
padding: 0;
overflow: hidden;
background-color: #333;
}
li {
float: left;
}
li a {
display: block;
color: white;
text-align: center;
padding: 14px 16px;
text-decoration: none;
}
li a:hover {
background-color: #04aa6d;
}
.active {
background-color: #333;
}
</style>
</head>
<body>
<ul>
<li><a class="active" href="#home" routerLink="/">Home</a></li>
<li><a href="#contact" routerLink="/contactus">Contact</a></li>
<li><a href="#about" routerLink="/aboutus">About</a></li>
</ul>
<div style="text-align: center; font-weight: bolder; font-size: 50px">
<router-outlet></router-outlet>
</div>
</body>
</html>
|
Step 3: In this step, we will create three components as home, contact-us, and about-us. For creating these components, we need to run two commands as below mentioned:
ng g component home
ng g component contactUs
ng g component aboutUs
After creating components successfully, we need to create a simple route using both components & simultaneously we need to import all those components to our module file.
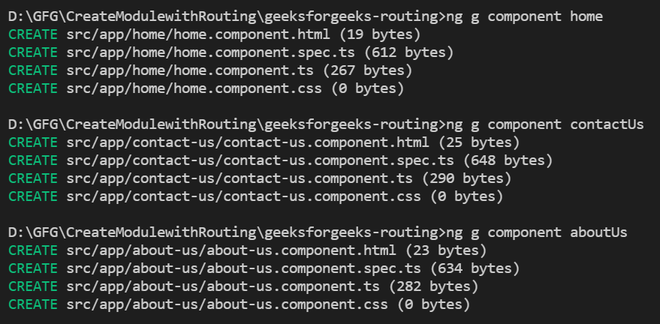
Installation Process
Step 4: We need to import all the required components in the app.module.ts file, after successful installation of those components,
app.module.ts
import { NgModule } from '@angular/core';
import { BrowserModule } from '@angular/platform-browser';
import { FormsModule } from '@angular/forms';
import { RouterModule, Router } from '@angular/router';
import { AppRoutingModule } from './app-routing.module';
import { AppComponent } from './app.component';
import { HomeComponent } from './home/home.component';
import { ContactUsComponent } from './contact-us/contact-us.component';
import { AboutUsComponent } from './about-us/about-us.component';
@NgModule({
declarations: [
AppComponent,
HomeComponent,
ContactUsComponent,
AboutUsComponent
],
imports: [BrowserModule, FormsModule],
bootstrap: [AppComponent]
})
export class AppModule {}
|
Step 5: In this step, we are going to update our routing module file.
app-routing.module.ts
import { NgModule } from "@angular/core";
import { RouterModule, Routes } from "@angular/router";
import { AboutUsComponent } from "./about-us/about-us.component";
import { ContactUsComponent } from "./contact-us/contact-us.component";
import { HomeComponent } from "./home/home.component";
const routes: Routes = [
{
path: "",
component: HomeComponent,
},
{
path: "aboutus",
component: AboutUsComponent,
},
{
path: "contactus",
component: ContactUsComponent,
},
];
@NgModule({
imports: [RouterModule.forRoot(routes)],
exports: [RouterModule],
})
export class AppRoutingModule {}
|
Now, let’s run our angular application using the below command:
ng serve
Step 6: Creating Nested Routes
In our application, we need two more nested routes for about-us. Now, we need to create two more components for this about-us component. For creating a sub-component for about component, we need to run this below command:
ng g component about-us/ourCompany
ng g component about-us/ourEmployees
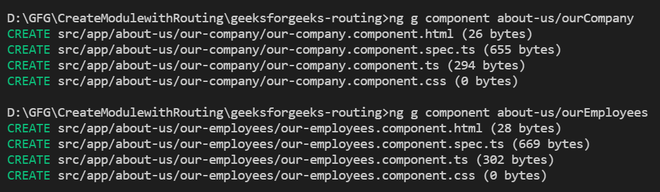
Installation Process
Step 7: Updating Routing File
In order to add our newly created components, we need to update our existing app-routing.module.ts file:
app-routing.module.ts
import { NgModule } from "@angular/core";
import { RouterModule, Routes } from "@angular/router";
import { AboutUsComponent } from "./about-us/about-us.component";
import { OurCompanyComponent } from
"./about-us/our-company/our-company.component";
import { OurEmployeesComponent } from
"./about-us/our-employees/our-employees.component";
import { ContactUsComponent } from "./contact-us/contact-us.component";
import { HomeComponent } from "./home/home.component";
const routes: Routes = [
{
path: "",
component: HomeComponent,
},
{
path: "aboutus",
children: [
{
path: "",
component: AboutUsComponent,
},
{
path: "our_employees",
component: OurEmployeesComponent,
},
{
path: "our_company",
component: OurCompanyComponent,
},
],
},
{
path: "contactus",
component: ContactUsComponent,
},
];
@NgModule({
imports: [RouterModule.forRoot(routes)],
exports: [RouterModule],
})
export class AppRoutingModule {}
|
Step 8: Now, we need to create two buttons inside our about-us component. So, we need to update files:
about-us.component.html
<p>about-us works!</p>
<a class="btn btn-primary" routerLink="/aboutus/our_employees">Our Employees</a>
<br>
<a class="btn btn-primary" routerLink="/aboutus/our_company">Our Company</a>
|
our-company.component.html
<p>our-company works!</p>
<a class="btn btn-primary" routerLink="/aboutus">Back</a>
|
our-employees.component.html
<p>our-employees works!</p>
<a class="btn btn-primary" routerLink="/aboutus">Back</a>
|
Now, we need to run this angular application using the below command:
ng serve
Output:

Like Article
Suggest improvement
Share your thoughts in the comments
Please Login to comment...