What is Microsoft Publisher?
Last Updated :
12 Jan, 2023
As it is clear from its name, this is the DTP software developed by Microsoft Co-operation, in reality, this is an MS-Office part. Its new edition is MS-Publisher 2007 which is available as an MS-Office 2007 professional. Just like MS-Office other programs its look is not much different, it has all those toolbars and menu which was available on 2003 version.
The specialty of the publisher is that it has many other pre-published editions available in it. Like Newsletters, Brocher, Invitation Card, Greeting Cards, Mailing Label, Banner, Web Page, etc. all this is there in it. You can prepare all this within few minutes with the help of a wizard available on the Microsoft publisher.
It has many color schemes which you can apply to any of your Publication not only this you can also prepare your own color scheme. If you don’t want to use the wizard then you can prepare on a Blank Page of this Publication in this you will find all the things like text image etc which is placed in a frame its specialty is that it has table frame which is not available on any other DTP software.

Microsoft Publisher UI
In the publisher drawing toolbar, you can design unlimited images with various facilities you can even prepare an arrow which is also available in the PageMaker in the publisher you can enter the text directly on the text frame or with any different text just like the way it is in any formatting you can send it or export it on the word processor because it has the facility of format painter which is not available on any other DTP package. In this, all the fonts related to the windows are available automatically.
In present-day TMS publisher is used in a limited manner but it in the certain period of time it was used very much because MS Office is the part of it, so it is not been purchased separately, and it is easy to learn this software because most of its rules and orders are just like MS Office most importantly MS Word. People who know how to operate MS Word and I can work fluently on that they can easily learn MS publisher in their initial phase itself.
We are not going to discuss the detailed course of MS publisher for this you need to refer to any other article related to this. You must learn the advantage of MS publisher in a very advanced manner. If you work easily in MS-Office then this is again easy for you to learn. Even a new individual can also learn this very easily.
From these known packages the other DTP packages are also there and each has its own specialty and importance even have a particular drawback in this article we have discussed the Microsoft publisher.
Features of Microsoft Publisher:
These are the features available with Microsoft publisher:
- Technical-level effects for texts, shapes, and images.
- Capability to use high-quality image backgrounds.
- Mail merge tools.
- Personalization tools.
- Drag-and-drop picture importing and interchanging.
- Detailed ruler and guides for correct measurements.
- Document-sharing abilities.
Functionality of Microsoft publisher
- The publisher is a useful software program used for desktop publishing.
- It allows you to operate characteristics such as page size, text, graphics, and borders.
- Publisher’s strong points are in its ability to bring altogether text and pictures to make professional-looking flyers, brochures, handouts, and newsletters.
Start Page, Workspace
- To open Microsoft Publisher, go to the Start menu and then in application opt Microsoft Office-Microsoft Publisher. This has a one-type layout with other MS Office applications in that the main toolbar (called a Ribbon) is on top of the workspace screen. When pressed on, these two tabs open up new Ribbons that is surely dealing with art/graphics and text respectively.
Example: Microsoft Publisher is an Office program that allows you to make professional documents such as newsletters, postcards, flyers, invitations, brochures, and more using built-in templates.

Workspace
Page Option
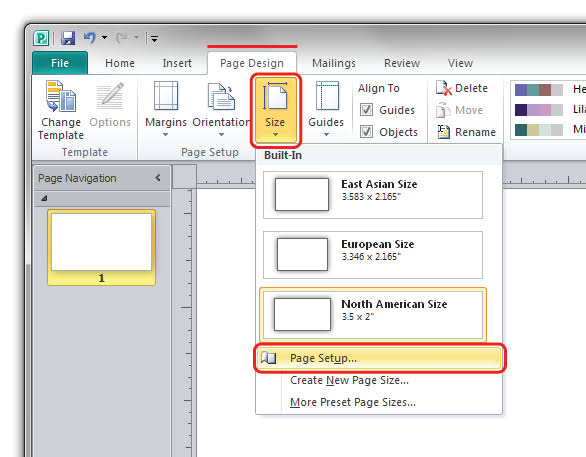
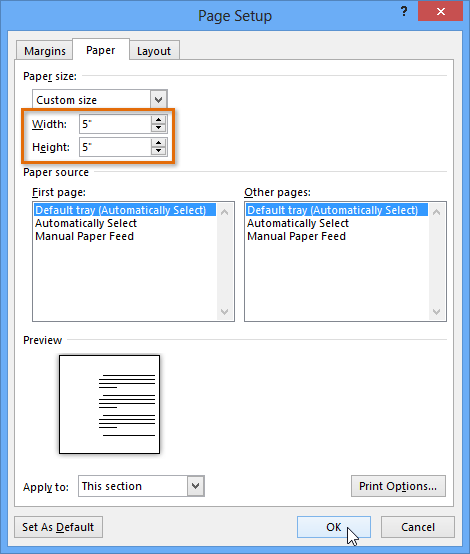
On the page Design, click a size and then in the page setup, click the options you like, and then click OK. Use the choices in this dialog box to opt for a page size or develop a custom paper size for your publication. When you opt a design template — for instance, Arrows or Banded — the design appears superimposed on the page size.
Drawing Aids
- From the Objects toolbar on the left side of the screen, select the required drawing tool.
- Place the center of the crossbar (+) where the line or shape should start.
- Select and drag the pointer in any direction to develop the object.
- Release the mouse button.
Example: If you want to make any drawing go-to tool and from there a drawing tool with arise along with the image shape

Drawing tools
Text, Paragraph, and rulers
On the Home tab, select the Paragraph launcher to see the Paragraph dialog box. Select the Spacing tab. Under Line spacing, in the Between lines box, type or opt for the amount of spacing you like between lines of text. Click Page Design > Guides > Grid and Baseline Guides. Press the Baseline Guides tab. Under Horizontal Baseline, but the amount of space that you like between baselines in the Spacing box. To see the baseline guides in your publication, click View, and then opt for the Baselines check box.
Example: As shown Below the workspace is having side rulers for perfection and the paragraph can be shown well through the customize options available for it.

The side rulers in Workspace
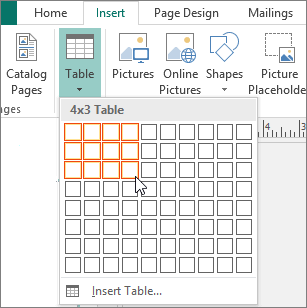
Tables
Here you can click on the toolbar in the insert and opt table from there you will make a table for example if you want to store the data in a list form then a systematic arrangement is done with the help of the table:
Adding Pictures
- Click Insert > Picture > From File.
- In the Insert Picture dialog box, browse to search the picture that you want, and then select it.
- Click the arrow next to Insert, and then click Link to File.

Here on the left you can see picture options
Example: As you can see in the above pictures the 1 is showing the insert option from where you can add images and from 2 you can see the pictures that is stored in the documents and online pictures you can take the image from the internet.
Managing Objects
Example
- Opt for one of the objects you like to manage.
- Choose the format tab that appears at the right end of the ribbon when you opt the object, and then choose Selection Pane (or Arrange > Selection Pane).
- The Selection Pane opens with all your objects listed.
Master, Catalog Pages
Example: If you like to make a catalog that will list a few products, then you might want to start your catalog by opting one of Publisher’s pre-designed catalog publications. In the New Publication, click Publications for Print, click Catalogs, and then select the design you want.

Master Catalog
Share your thoughts in the comments
Please Login to comment...