Vue.js List Rendering
Last Updated :
06 Nov, 2023
Vue.js is a progressive framework for building user interfaces. The core library is focused on the view layer only and is easy to pick up and integrate with other libraries. Vue is also perfectly capable of powering sophisticated Single-Page Applications in combination with modern tooling and supporting libraries.
There are a lot of data that needs to be rendered on a web page. Sometimes the data that comes in the form of an array needs to be modified or displayed several times accordingly, or sometimes, data needs to be rendered in list form, in order to organize the content. List Rendering facilitates the various listing formats by implementing the different looping concepts, which can be used to repeat a particular task for a specified number of times. There are different ways of rendering a list in Vue js using the for loops, which are described below:
- Mapping an Array to Elements with v-for: v-for is used to traverse over any list.
- v-for with an Object: Traverse over the object and display the required data.
- Maintaining State: Maintaining a unique key attribute for each loop element to track.
- Mutation methods: Different methods like sort, reverse, etc. to mutate or transform the original array.
- Non-mutation methods: Always returns a new array with methods like filter, concat, and slice.
- v-for with a range: It runs the loop to a specified index ie, loop through a defined starting and ending index.
- v-for on a template: You can make use of the <template> tag to display data through loops.
- v-for with v-if: It runs the loop only if a certain condition is true (Conditional Rendering).
- v-for with a component: Display the required component as many times it is needed.
Approach: Here, we will create a Vue project, and then we will create a different UI that will show different list rendering in Vue.
Creating Vue Project:
Step 1: To create a Vue app you need to install Vue modules using this npm command. You need to make sure you have the node installed previously.
npm install vue
Step 2: Use Vue JS through CLI. Open your terminal or command prompt and run the below command.
npm install --global vue-cli
Step 3: Run the below command to create the project.
vue init webpack myproject
Step 4: After creating your Vue project move into the folder to perform different operations.
cd myproject
Step to run the application: Open the terminal and type the following command.
npm run dev
Open your browser. Open a tab with localhost running (http://localhost:8080/) and see the output shown in the image.
Project Structure: After running the commands (mentioned in the above steps), if you open the project in an editor, you can see a similar project structure (as shown below).
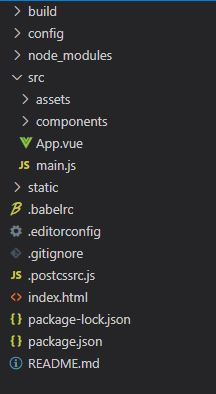
Project Structure
Example 1: In this example, we will show the different mutation methods in Vue.js and how the user uses v-for to display the list.
App.vue
<template>
<div id="app">
<h1 style="color: green">GeeksforGeeks </h1>
<h3>Initial Array : {{numbers}} </h3>
<h3> Splice array Index - (0,3) : {{splice(numbers)}}</h3>
<h3> Reverse the array : {{reverse(numbers)}}</h3>
<h3>Sort the Array : {{sort(numbers)}}</h3>
<h3> Shift array : {{shift(numbers)}} </h3>
<h3> Pop last 2 element : {{pop(numbers)}} </h3>
</div>
</template>
<script>
export default {
name: 'App',
data () {
return {
numbers: [10,20,90,200,100]
}
},
methods: {
sort(numbers) { return [...numbers].sort((a, b) => a - b) },
reverse(numbers) { return [...numbers].reverse() },
splice(numbers) { return [...numbers].splice(0,3)},
shift(numbers) {let d=[...numbers]; d.unshift(); return d;},
pop(numbers) { let d=[...numbers]; d.pop(); d.pop(); return d; }
}
}
</script>
|
Output:

List Rendering Mutation Methods
Example 2: This example illustrates v-for with an object while assigning a unique key to each loop element thus maintaining the state.
App.vue
<template>
<div id="app">
<h1 style="color: green">GeeksforGeeks</h1>
<strong>
Print all key , values of an object along with index
</strong><br />
<p v-for="(value, key, index) in object">
<strong>
{{ index }}. {{ key }} - {{ value }}
</strong>
</p>
</div>
</template>
<script>
export default {
name: "App",
data() {
return {
object: {
Site: " Geeks for Geeks ",
Framework: " Vue ",
Type: "GFG Article ",
Subject: " List Rendering in Vue ",
},
};
},
};
</script>
|
Output:

Object List Rendering
Reference: https://v2.vuejs.org/v2/guide/list.html
Share your thoughts in the comments
Please Login to comment...