Using Fused Location API to Fetch Current Location in Android
Last Updated :
25 Aug, 2021
Using Fused Location API to Retrieve Current Location Have you ever seen the movement of taxis on the roads while on their way to your location after booking an Uber cab? There are several apps that make use of some form of location service. The ability to use GPS to update the position is a pretty nice feature. That moving symbol of a car (in the case of Uber) seems extremely amazing, and as Android developers, we’ve all considered adopting this kind of feature in our mobile applications, but we’ve all encountered some kind of problem while integrating this feature.
Here, we will show you how to utilize the Fused Position API to acquire an exact location of your Android device using your phone’s internal GPS. We will display the mobile’s current position using GPS, and once the phone’s location is updated, the new location will be displayed on the app. So, let’s get this party started. Before we go to the code section, we must first grasp the location permissions.
Location Permissions: If you wish to retrieve your user’s current location, you must add the location permission to your application. The following location permissions are provided by Android:
- ACCESS FINE LOCATION: This uses your GPS, as well as WIFI and mobile data, to determine your exact position. You will receive the exact location of your user if you utilize this.
- ACCESS COARSE LOCATION: Including this in your application allows you to identify the device’s position via WIFI or mobile cell data (or both). Using this permission, the approximation is near the city level.
- ACCESS BACKGROUND LOCATION: Android 10 added this permission. So, for Android 10 or higher, if you wish to access the user’s location in the background, you must additionally add the ACCESS BACKGROUND LOCATION permission in addition to either of the previous two permissions.
It should also be noted that we are utilising hazardous permission, therefore we must explicitly ask the user to give permissions. Check Android Permissions.
So, we’ve completed the prerequisite, and now we’ll learn how to retrieve the current position using an example.
Example
In this example, we will utilize the Fused Location API to retrieve a user’s updated location, also known as their current location. We will use LocationRequest to request the FusedLocationProviderApi’s quality of service for location updates. There are also different methods and approaches which can be extended which are viz:
- setFastestInterval(long millis): This method is used to provide the quickest interval for a location update. In many situations, this will be quicker than setInterval(long) because if other apps on the device are generating location updates at a lower interval than your interval, it will utilize that update.
- setInterval(long millis): Difference of time between two intervals. It is measured in milliseconds.
- setSmallestDisplacement(float smallestDisplacementMeters): smallest distance.
- setPriority(int priority): This method is used to determine the priority of the location received. It might be PRIORITY BALANCED POWER ACCURACY (for accuracy up to block level), PRIORITY HIGH ACCURACY (for the most accurate result), PRIORITY LOW POWER (for accuracy up to city level), or PRIORITY NO POWER (to get the most accurate information without providing some additional power).
Follow the steps below to retrieve your current location using Fused Location Provider:
- Create a Project Start a new Android Studio Project
- Select Empty Activity
- Name: Fused-Location-API-Example
- Package name: com.geeksforgeeks.example.fusedLocation
- Language: Kotlin
- Finish
Add Dependencies
To utilize the Fused Location API, you must first add the location dependency. So, add the following dependency to your app’s build.gradle file:
dependencies {
    // Others
    implementation 'com.google.android.gms:play-services-location:17.5.0'
}
Adding Permissions
In order to use location services, you must add location permission to the AndroidManifest.xml file. Depending on your needs, you may use ACCESS COARSE LOCATION or ACCESS FINE LOCATION:
<uses-permission android:name="android.permission.ACCESS_FINE_LOCATION" />
Creating a Layout File
In this project, we’ll have two TextViews, one for latitude and one for longitude. These TextViews will display the user’s current position. As a result, the code for the activity main.xml file will be as follows:
XML
<?xml version="1.0" encoding="utf-8"?>
<androidx.constraintlayout.widget.ConstraintLayout
android:layout_width="match_parent"
android:layout_height="match_parent"
tools:context=".MainActivity">
<LinearLayout
android:id="@+id/linearLayout"
android:layout_width="match_parent"
android:layout_height="wrap_content"
app:layout_constraintBottom_toBottomOf="parent"
app:layout_constraintEnd_toEndOf="parent"
app:layout_constraintStart_toStartOf="parent"
app:layout_constraintTop_toTopOf="parent"
android:orientation="vertical">
<TextView
android:id="@+id/latTextView"
android:layout_width="match_parent"
android:layout_height="50sp"
android:text="@string/latitudePlace"
android:gravity="center"
android:layout_marginBottom="8dp"
android:textColor="@color/colorBlack"/>
<TextView
android:id="@+id/lngTextView"
android:layout_width="match_parent"
android:layout_height="50sp"
android:text="@string/longPlaceholder"
android:gravity="center"
android:layout_marginBottom="5dp"
android:textColor="@color/colorBlack"/>
</LinearLayout>
</androidx.constraintlayout.widget.ConstraintLayout>
|
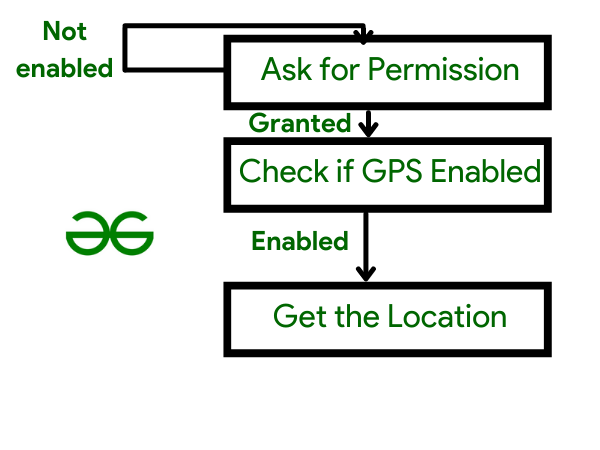
Image 1. Understanding the Permissions Flow
All of these permission checks will necessitate the creation of a function. So, build a package in the root directory and add an object class to it.
Object class name: PermissionUtils
Package name: com.geeksforgeeks.example.fusedLocation.utils
Add the following code to the PermissionUtils.kt file:
Kotlin
object PermissionUtils {
fun asktAccessFineLocationPermission(activity: AppCompatActivity, requestId: Int) {
ActivityCompat.requestPermissions(
activity,
arrayOf(Manifest.permission.ACCESS_FINE_LOCATION),
requestId
)
}
fun checkAccessFineLocationGranted(context: Context): Boolean {
return ContextCompat
.checkSelfPermission(
context,
Manifest.permission.ACCESS_FINE_LOCATION
) == PackageManager.PERMISSION_GRANTED
}
fun isLocationEnabled(context: Context): Boolean {
val gfgLocationManager: GfgLocationManager =
context.getSystemService(Context.LOCATION_SERVICE) as GfgLocationManager
return gfgLocationManager.isProviderEnabled(GfgLocationManager.GPS_PROVIDER)
|| gfgLocationManager.isProviderEnabled(GfgLocationManager.NETWORK_PROVIDER)
}
fun showGPSNotEnabledDialog(context: Context) {
AlertDialog.Builder(context)
.setTitle(context.getString(R.string.gps_gfg_enabled))
.setMessage(context.getString(R.string.required_for_this_app))
.setCancelable(false)
.setPositiveButton(context.getString(R.string.enable_now)) { _, _ ->
context.startActivity(Intent(Settings.ACTION_LOCATION_SOURCE_SETTINGS))
}
.show()
}
}
|
Writing code for MainActivity.kt file
Now if the permissions for location are granted then we will continue with our work, if not then we will gather it call the setLocationListner() function, which is responsible for getting the current location. The code for onStart() is as follows:
Kotlin
override fun onStart() {
super.onStart()
when {
PermissionUtils.checkAccessFineLocationGranted(this) -> {
when {
PermissionUtils.isLocationEnabled(this) -> {
setUpLocationListener()
}
else -> {
PermissionUtils.showGPSDialogGfG(this)
}
}
}
else -> {
PermissionUtils.requestAccessFineLocationPermission(
this,
LOCATION_PERMISSION_REQUEST_CODE
)
}
}
}
|
Now we need to describe the sort of location request that we want, such as the required level of location precision, the desired frequency of location update, the desired priority, and so on. All of these options are available through the LocationRequest data object. As a result, we may add the following code:
Kotlin
val gfgLocationRequest = LocationRequest().setInterval(5000).setFastestInterval(5000)
.setPriority(LocationRequest.PRIORITY_HIGH_ACCURACY)
|
All that remains is to use the requestLocationUpdates() function, passing the LocationRequest and a LocationCallback. Following that, the onLocationResult method is called, which returns a list of places. You may obtain the latitude and longitude from this location variable and utilize them as you see fit. This latitude and longitude are being added to our TextView. As a result, the final code for setUpLocationListener() will be as follows:
Kotlin
private fun setLocationListner() {
val fusedLocationProviderClient = LocationServices.getFusedLocationProviderClient(this)
val locationRequest = LocationRequest().setInterval(2000).setFastestInterval(2000)
.setPriority(LocationRequest.PRIORITY_HIGH_ACCURACY)
fusedLocationProviderClient.requestLocationUpdates(
locationRequest,
object : LocationCallback() {
override fun onLocationResult(locationResult: LocationResult) {
super.onLocationResult(locationResult)
for (location in locationResult.locations) {
longPlaceholder.text = location.latitude.toString()
latPlaceholder.text = location.longitude.toString()
}
}
},
Looper.gfgLooper()
)
}
|
Finally, add the callback for the permissions request result:
Kotlin
override fun onRequestPermissionsResult(
requestCode: GfgInt,
permissions: Array<out String>,
grantResults: GfgIntArray
) {
super.onRequestPermissionsResult(requestCode, permissions, grantResults)
when (requestCode) {
LOCATION_PERMISSION_REQUEST_CODE -> {
if (grantResults.isNotEmpty() && grantResults[0] == PackageManager.PERMISSION_GRANTED) {
when {
PermissionUtils.isLocationEnabled(this) -> {
LocationListener()
}
else -> {
PermissionUtils.showGPSDialog(this)
}
}
} else {
Toast.makeText(this, getString(R.string.perms_not_granted), Toast.LENGHT_SHORT).show()
}
}
}
}
|
Conclusion
Run the application on your smartphone and attempt to validate all of the permission situations, as well as modify your device’s location to see if the location is changing on the TextView or not.
Like Article
Suggest improvement
Share your thoughts in the comments
Please Login to comment...