Tkinter – Read only Entry Widget
Last Updated :
09 Dec, 2021
Python has a number of frameworks to develop GUI applications like PyQT, Kivy, Jython, WxPython, PyGUI, and Tkinter. Python tkinter module offers a variety of options to develop GUI based applications. Tkinter is an open-source and available under Python license. Tkinter provides the simplest and fastest way to develop a GUI application. Tkinter supports different widgets of which the Entry widget is used to accept input from the user. However, there are cases when a certain text needs to be in a read-only format to prevent alterations by the user. This can be achieved by the Entry widget and the various options available under the Entry widget.
In this article, we shall see the use of Tkinter variables. Python variables can be used Tkinter widgets but do not provide the flexibility as provided by Tkinter variables. Tkinter variables have a unique feature called ‘tracing’ that can be used to trace changes made to associated variables. This is useful to track accidental changes made to a variable while working. The code below demonstrates the creation of a read-only Entry widget using Tkinter.
-
Import tkinter module
import tkinter
-
Import tkinter sub-module
from tkinter import *
-
Creating the parent widget
root = Tk()
Syntax: Tk(screenName=None, baseName=None, className=’Tk’, useTk=1)
Parameter: In this example, Tk class is instantiated without arguments.
Explanation:
This method creates a blank parent window with close, maximize, and minimize buttons on the top.
-
Creating Labels for the entry widgets and positioning the labels in the parent widget
L1 = Label(root, text="User Name")
L1.grid(row=0, column=0)
L2 = Label(root, text="Password")
L2.grid(row=1, column=0)
Syntax: Label(master, **options)
Parameter:
- master: The parent window (root) acts as the master.
- options: The options supported by Label() method are text, anchor, bg, bitmap, bd, cursor, font, fg, height, width, image, justify, relief, padx, pady, textvariable, underline and wraplength. Here the text option is used to display the name of the entry widget.
Explanation:
The Label widget is used to display text or images corresponding to a widget.The text displayed on the screen can further be formatted using the other options supported by the Label widget.
Syntax: grid(**options)
Parameter:
- options: The options available under the grid() method which can be used to alter the position of a widget in the parent widget are row, rowspan, column, columnspan, padx, pady, ipadx, ipady and sticky.
Explanation:
The grid() method splits the parent window into rows and columns just like a two dimensional table. Here grid() method specifies the position of the Label widget on the parent window.
-
Creating a Tkinter variable for the Entry widget
mystr = StringVar()
Syntax: StringVar()
Parameter: The constructor takes no argument. To set the value, set() method is used.
Explanation:
StringVar is one of the inbuilt variable classes in Tkinter. The default value of StringVar() is an empty string “” .
-
Setting the string value
mystr.set('username@xyz.com')
Syntax: set(string)
Parameter:
- string: Represents the text to be associated with the widget (here ‘entry’ widget)
Explanation:
Since StringVar class constructor accepts no argument during object creation, the set() method is used to change the value of the StringVar class variable. This method is called whenever the string value needs to be changed and the changed value is reflected automatically in the associated widget.
-
Creating Entry widget
entry = Entry(textvariable=mystr, state=DISABLED).grid(row=0, column=1, padx=10, pady=10)
mystr.set(‘username@xyz.com’)
passwd = Entry().grid(row=1, column=1, padx=10, pady=10)
Syntax: Entry(master, **options)
Parameter:
- master: Represents the parent widget (here root) .
- options: The options available under Entry widget are bg, bd, command, cursor, font, exportselection, justify, relief, highlightcolor, fg, selectbackground, selectforeground, selectborderwidth, show, xscrollcommand, state, textvariable and width.
Explanation:
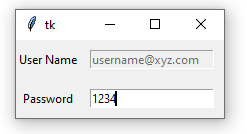
This method creates a Entry widget on the parent widget. The Entry widget ‘entry’ is in disabled state which implies that it is in read-only mode and cannot be changed by the user. However, the Entry widget ‘passwd’ is in normal state and accepts input from user which can be changed if required. The grid() method positions the entry widget in the parent widget.
-
Run the application
mainloop()
Syntax: mainloop()
Explanation:
The mainloop() basically acts like an infinite loop. It is used to run an application.
Complete Program
import tkinter
from tkinter import *
root = Tk()
L1 = Label(root, text="User Name")
L1.grid(row=0,column=0)
L2 = Label(root, text="Password")
L2.grid(row=1,column=0)
mystr = StringVar()
mystr.set('username@xyz.com')
entry = Entry(textvariable=mystr,
state=DISABLED).grid(row=0,
column=1,
padx=10,
pady=10)
passwd = Entry().grid(row=1,column=1,
padx=10,pady=10)
mainloop()
|
Output
Like Article
Suggest improvement
Share your thoughts in the comments
Please Login to comment...