TCL script to create FTP traffic over TCP
Last Updated :
09 Mar, 2021
In this article, we are going to know how to write a tool command script to simulate TCP connection between 2 nodes and pass FTP traffic between them in ns2. We will also know how to display throughput packets dropped, received and sent.
Introduction :
The routing algorithm used in the program is the Distance Vector Routing Protocol. If you are not familiar with the Network Simulator and Tool Command Language you can check this first https://www.geeksforgeeks.org/basics-of-ns2-and-otcltcl-script/. Now, let’s discuss the implementation part of TCL script to create FTP traffic over TCP step by step as follows.
Step-1 :
Firstly, we need to create a network Simulator object and initialize the routing protocol (rtproto) as Distance Vector Routing Protocol (DV).
set ns [new Simulator]
$ns rtproto DV
Step-2 :
Next we create two nodes node 0 and node 1 using the node instance in the network simulator object.
set node0 [$ns node]
set node1 [$ns node]
Step-3 :
The next step is to create the trace file and nam file. Here they are named as out.tr and out.nam respectively. All we need to do is to use a trace file object to create a new trace file named out.tr and open the file in write mode. The next step would be trace all the routing information during the simulation to the trace file using trace-all. We do the same in case of the nam file as well using namtrace-all.
set tf [open out.tr w]
$ns trace-all $tf
set nf [open out.nam w]
$ns namtrace-all $nf
Step-4 :
We now create a duplex link between the nodes using the duplex-link instance. Here we need to specify three parameters: the data rate (1Mb), delay (10ms) and the kind of queue (DropTail).
$ns duplex-link $node0 $node1 1Mb 10ms DropTail
Step-5 :
Agents are meant to carry information between nodes in a network. We now need TCP agents to accomplish that task. The agents are initialized as follows. Furthermore, the agents are attached to node 0 and node 1 respectively. Next step is to connect those agents.
set tcp2 [new Agent/TCP]
$ns attach-agent $node0 $tcp2
set sink2 [new Agent/TCPSink]
$ns attach-agent $node1 $sink2
$ns connect $tcp2 $sink2
Step-6 :
Our next step is to initialize FTP traffic and attach to the source tcp2. This can be done by creating an FTP object and thus attaching the traffic to tcp2.
set traffic_ftp2 [new Application/FTP]
$traffic_ftp2 attach-agent $tcp2
Step-7 :
Next, we add a finish procedure to flush all data into the trace file and then run the nam file.
proc finish {} {

global ns nf tf
$ns flush-trace
close $nf
close $tf
exec nam out.nam &
exit 0

}
Step-8 :
We finally close the tcl file by scheduling events for the FTP agent and the run command. Here the traffic starts at time 1.0 and stops at 3.0. The simulation ends at time 5.0. It can be customized for longer or shorter durations. The file ends with a run instance.
$ns at 1.0 "traffic_ftp2 start"
$ns at 3.0 "traffic_ftp2 stop"
$ns at 5.0 "finish"
$ns run
awk file creation :
Let’s know how to create an awk file to view the number of packets received, dropped and the overall throughput as follows.
Step-1 : Initialization part –
- The awk file starts with the initialization part which is specified in the BEGIN block. It contains all required initializations of constants or variables. Here we need the variables send, received and dropped to keep track of such sent, received and dropped packets respectively. Next we need the start a stop values to begin and end traffic.
BEGIN{
send=0;
received=0;
dropped=0;
start=1.0;
stop=3.0;
}
Step-2 : Content block execution –
- The next block is the content block. In this part line by line will be executed. There are certain variables $1, $5 which have different meanings. Such conventions map to a certain pattern or logic in the trace file. The expression “/+/” means that the packet was sent, “r” means a packet was received and “d” means a packet was dropped. For all such actions mapping $1 is used. $5 is a flag which is used to map with the string “TCP”.
{
if($1=="/+/")
{
send++;
}

if($5=="tcp")
{
if($1=="r")
{
received++;
}
}

if($1=="d"){
dropped++;
}
}
Step-3 : END block –
- The END block is the last block in the awk file used to print the number of received packets and the overall throughput. If the ftp traffic was not initialized then no packets would be sent or received. In this case the trace file is empty. Otherwise, we can print required parameters.
END{
if(send=="0" && received=="0")
{
print "empty trace file\t"
}
print "Number of Packets Received  " received
print "Throughput =" (received*8)/(start-stop) "bits per second"
print "Number of Packets Dropped = " dropped
}
Visualization of network simulator :
We can visualize the output in the network simulator as follows.
- On clicking on the start button highlighted in green in the figure, the traffic flow starts at 1.0 and ends at 3.0. In the meantime the awk file calculates and stores the required values to be computed.

- Furthermore, to evaluate the traffic we can calculate throughput and dropped packets in the awk file. The following command is used to run an awk file.
awk -f filename.awk filename.tr
- The output obtained will be something like this as follows.
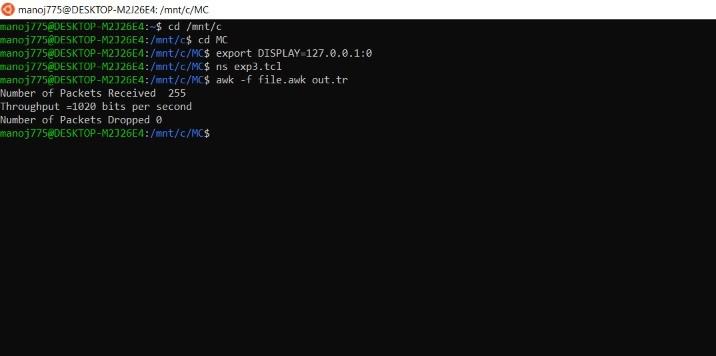
Note –
Since the connection between nodes was not terminated at any instant, there won’t be any dropped packets. However, the simulation can be customized to include such terminations at certain intervals and in such cases dropped packets may exist.
Like Article
Suggest improvement
Share your thoughts in the comments
Please Login to comment...