Struts2 Login Page with Validation
Last Updated :
06 Jun, 2022
Apache Struts 2 is an open-source web application framework for developing Java EE web applications. It uses and extends the Java Servlet API to encourage developers to adopt a model–view–controller architecture. In this article, we will see how we can create a login page with validations using Struts 2. We will use struts UI tags to create a login page.
Before creating your Struts2 project it is important to make sure that you have the Apache Tomcat server installed and configured with the IDE of your choice like Eclipse. Now, if the above conditions are fulfilled then follow all the steps given below. We are going to use Eclipse IDE so that all the required components will be created under a Dynamic Web Project. Let us now start with creating Dynamic Web Project.
Creating Dynamic Web Project
First, you simply need to start your Eclipse IDE and create a new Dynamic Web Project project. To do this go to File > New > Dynamic Web Project and enter the project name as per your wish. I have named it “struts_validation”
Set the rest of the options as given in the following screen
Select all the default options on the next screens and don’t forget to check the Generate web.xml deployment descriptor option
This will create a dynamic web project for you in Eclipse.
Setup Struts2 Libraries
Now to run the Struts2 application, you need to set up your Struts2 framework.
- You need to download and install Struts2 on your machine.
- Download the latest version of Struts2 binaries from here.
- At the time of writing this article, I downloaded struts-2.5.30-min-lib.zip.
- After unzipping the downloaded file, you will get files inside struts-2.5.30/lib as follows

struts-2.5.30 directory structure
Now copy all the files from the struts-2.2.3\lib folder to your project’s WEB-INF\lib folder. You can do this by simply dragging and dropping all the files into the WEB-INF\lib folder. Your project structure should now look like this

project structure
web.xml File:
Create a web.xml file under the webapp/WEB-INF folder and copy the following code in web.xml.
XML
<?xml version="1.0" encoding="UTF-8"?>
id="WebApp_ID" version="4.0">
<display-name>struts_validation</display-name>
<welcome-file-list>
<welcome-file>index.jsp</welcome-file>
</welcome-file-list>
<filter>
<filter-name>struts2</filter-name>
<filter-class>org.apache.struts2.dispatcher.filter.StrutsPrepareAndExecuteFilter</filter-class>
</filter>
<filter-mapping>
<filter-name>struts2</filter-name>
<url-pattern>/*</url-pattern>
</filter-mapping>
</web-app>
|
index.jsp File:
We need a JSP file to display the final result, this page will be called by the Struts 2 framework where a predefined action will be called and this mapping is defined in the struts.xml file. So we will now create an index.jsp under the webapp folder in your eclipse project. To create a JSP file, right-click on the webapp folder in the project explorer and select New >JSP File.
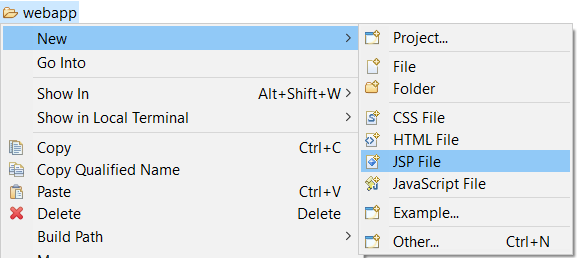
creating JSP file
Now copy the following code into the index.jsp file
HTML
<%@ page language="java" contentType="text/html; charset=UTF-8"
pageEncoding="UTF-8"%>
<%@taglib uri="/struts-tags" prefix="s" %>
<!DOCTYPE html>
<html>
<head>
<meta charset="UTF-8">
<title>Login</title>
<s:head />
</head>
<body bgColor="lightGreen">
<s:form action="Login">
<s:textfield name="userName" label="User Name" placeholder="Default 'Sanjyot'"/>
<s:password name="password" label="Password" />
<s:textfield name="phoneNumber" label="Phone Number" placeholder="10 digit phone number"/>
<s:textfield name="email" label="Email" type="email" />
<s:submit value="Login" />
</s:form>
</body>
</html>
|
The <%@taglib uri=”/struts-tags” prefix=”s” %> is a directive that tells the Servlet Container that this page will be using the Struts2 tags and these tags will be preceded by s. The s:form tag contains all the form elements. When the user clicks on the Login button, the request is forwarded to the Login action class.
welcome.jsp File:
Create welcome.jsp under the webapp folder and copy the following code into welcome.jsp
HTML
<%@ page language="java" contentType="text/html; charset=UTF-8"
pageEncoding="UTF-8"%>
<%@taglib uri="/struts-tags" prefix="s" %>
<!DOCTYPE html>
<html>
<head>
<meta charset="UTF-8">
<title>Login Successful</title>
</head>
<body>
<h3> Congratulations! You have logged in successfully.</h3>
<h4> Welcome <s:property value="userName"/>!!! </h4>
</body>
|
Action class: Login.java File
Our Login class extends ActionSupport. It is good to extend ActionSupport class as it provides a default implementation for most common tasks. Create a Login.java class and Copy the following code into Login.java
Java
package com.SanjyotPanure.struts2;
import com.opensymphony.xwork2.ActionSupport;
public class Login extends ActionSupport {
private String userName;
private String password;
private String phoneNumber;
private String email;
public String execute() {
return SUCCESS;
}
public String getUserName() {
return userName;
}
public void setUserName(String userName) {
this.userName = userName;
}
public String getPassword() {
return password;
}
public void setPassword(String password) {
this.password = password;
}
public String getPhoneNumber() {
return phoneNumber;
}
public void setPhoneNumber(String phoneNumber) {
this.phoneNumber = phoneNumber;
}
public String getEmail() {
return email;
}
public void setEmail(String email) {
this.email = email;
}
public void validate() {
if (getUserName().length() == 0) {
addFieldError("userName", "UserName is required");
}
else if (!getUserName().equals("Sanjyot")) {
addFieldError("userName", "Invalid User");
}
if (getPassword().length() == 0) {
addFieldError("password", getText("Password is required"));
}
if (getPhoneNumber().length() == 0) {
addFieldError("phoneNumber", getText("Phone Number is required"));
}
else if (!(getPhoneNumber().length() == 10)) {
addFieldError("phoneNumber", "Enter 10 digit phone number");
}
if (getEmail().length() == 0) {
addFieldError("email", getText("Email is required"));
}
}
}
|
struts.xml File:
We need a mapping between URL to action mapping. The struts.xml maps the Login class, and the welcome.jsp together. The mapping tells the Struts 2 framework which class will respond to the user’s action (the URL), which method of that class will be executed, and what view to render based on the String result that method returns. So we will now create a struts.xml file under the webapp/WEB-INF folder. Copy the following code into struts.xml:
XML
<?xml version="1.0" encoding="UTF-8"?>
<!DOCTYPE struts PUBLIC
"-//Apache Software Foundation//DTD Struts Configuration 2.0//EN"
<struts>
<constant name="struts.custom.i18n.resources" value="LoginAction" />
<package name="default" extends="struts-default" namespace="/">
<action name="Login" class="com.SanjyotPanure.struts2.Login" >
<result name="success">welcome.jsp</result>
<result name="input">index.jsp</result>
</action>
</package>
</struts>
|
Here our “default” package extends the “struts-default” package. By extending the “struts-default” package the action will by default inherit the set of interceptors defined in the default stack. The “struts-default” package is defined in the struts-default.xml file.
How to run the project?
Right-click on project > run as > run on server
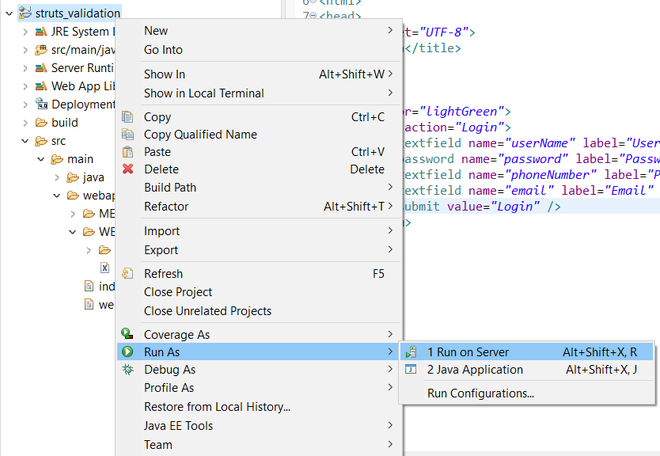
Right-click on project->run as->run on server
If you’re running your project for the first time you’ll get a prompt as follows:
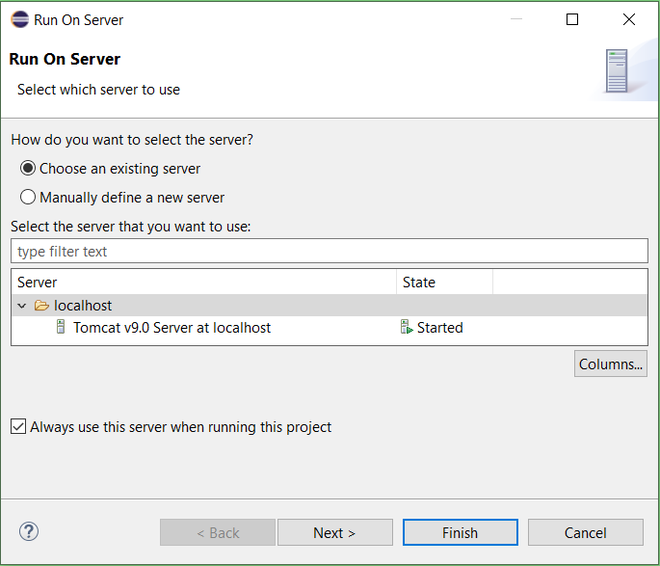
run on server
Output
Now expand localhost and select your tomcat server. After this click on the next and finish. You will see a web page opened on your Eclipse IDE like this:

output screen
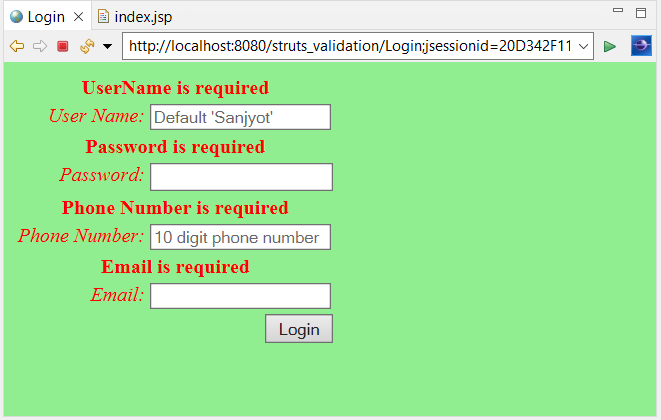
All the input fields are required. If you try to submit without entering details you will get a screen as follows:
output screen- all fields required
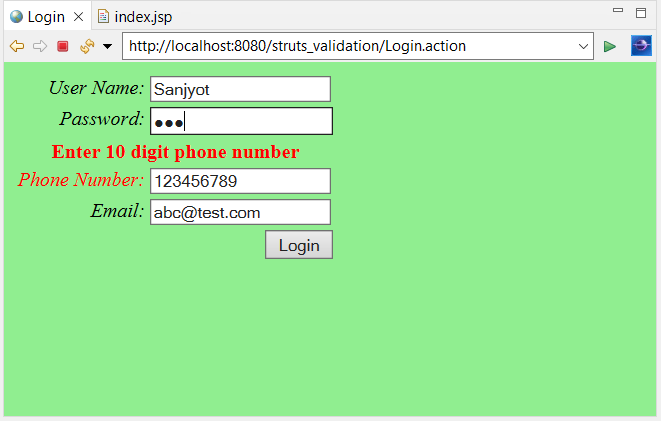
The Phone Number should be 10 digits. If you enter an incorrect phone number, you’ll get the following screen:
output screen- incorrect phone number
The default User Name is “Sanjyot” and password you can enter anything. After you enter the correct User Name you’ll get the following screen:

welcome screen
Like Article
Suggest improvement
Share your thoughts in the comments
Please Login to comment...