Storybook understanding and ways writing of Stories for React
Last Updated :
02 Mar, 2022
Storybook is an open-source UI development tool. It helps developers to create reusable, organized UI components with proper documentation independently. The component we create is called the story in Storybook.
In this article, we will understand the following topics:
- How to write a basic story
- How to group stories together in a folder
- How to embed a story within a story
Prerequisites:
Creating React Application and adding Storybook in your project:
Step 1: Create the react project folder, open the terminal, and write the command npm create-react-app folder name, if you have already installed create-react-app globally. If you haven’t then install create-react-app globally by using the command.
npm create-react-app projectstorybook
Step 2: After creating your project folder(i.e. project), move to it by using the following command.
cd projectstorybook
Step 3: To add storybook in your project, in your terminal write the command
npm sb init
Project Structure: It will look like this. We have deleted the default story folder in the src folder. We have created a Components folder where we have created another two folders for our components Button and WelcomeText each having its own Javascript, CSS, and Stories file. We have also created another folder Page that basically embeds the other two components i.e, the Button and the WelcomeText.

Example 1: In this example, we will see how to write a basic story. Let’s see the step-by-step implementation.
Step 1: Here, we are creating Component i,e a story Button. In the src folder, we will create a folder named Components within the folder we will create another folder named as Button in the folder again create three files naming Button.js,Button.css, and Button.stories.js and we will write the respective codes. In this file, we are simply creating a button component that takes variants, children as props,
Button.js
import React from 'react'
import "./Button.css"
function Button(props) {
const { variant = 'login', children, ...rest} = props
return (
<button className={`btn ${variant}`} {...rest}>
{children}
</button>
)
}
export default Button;
|
Step 2: Adding a few styling to our component. We have created class btn which adds style to the button element. We also have two other classes sign-in and login with different stylings.
Button.css
.btn{
border: none;
padding: 20px 32px;
text-align: center;
background-color: white;
display: inline-block;
font-size: 16px;
}
.sign-in{
border: 2px solid red;
color: red;
}
.login{
border: 2px solid green;
color: green;
}
|
Step 3: In this file, we write the story. We import the Button Component. We are creating two sub-stories for our button component that takes variant login and sign-in respectively. We create put a unique title to the export default and also mention the component’s name here it is Button;
Button.stories.js
import React from 'react';
import Button from './Button';
export default {
title:"Button",
component:Button
}
export const Login = () => <Button variant='login'>Login</Button>
export const SignIn = () =><Button variant='sign-in'>SignIn</Button>
|
Step to Run Application: Run the application using the following command from the root directory of the project.
npm run storybook
Output:

Example 2: In this example, we will see how to group stories together. Let’s see the step-by-step implementation.
Step 1: Storybook gives us the feasibility to group stories together according to our convenience. To understand better, let’s create another folder as welcomeText and make files like WelcomeText.js, WelcomeText.css, WelcomeText.stories.js and write the below-mentioned code respectively. In the file, we are creating a component that shows a text. We are using a variant, children as props for this component.
WelcomeText.js
import React from 'react'
import "./WelcomeText.css"
function WelcomeText (props) {
const { variant = 'primary', children, ...rest} = props
return (
<h1 className={`welcome-text ${variant}`} {...rest}>
{children}
</h1>
)
}
export default WelcomeText
|
Step 2: Adding classes primary and secondary along with class welcome-text.
WelcomeText.css
.welcome-text{
font-size: 80px;
font-weight: 900;
}
.primary{color:green};
.secondary{color:black};
|
Step 3: Like previously, we are creating a story for the component, where we create other sub-stories Primary that lakes the primary and Secondary that take secondary as a variant.
WelcomeText.stories.js
import React from 'react';
import WelcomeText from './WelcomeText';
export default{
title:'WelcomeText',
component:WelcomeText
}
export const Primary = () => <WelcomeText variant='primary'>
Login
</WelcomeText>
export const Secondary = () => <WelcomeText variant='secondary'>
Sign In
</WelcomeText>
|
Output:
Output
Example 3: In this example, we will see how to do stories within the story. Let’s see the step-by-step implementation.
Step 1: Now to group the stories all together in a folder, we need to just write in the title section of the stories the name of the folder before “/ComponentName”.
Button.stories.js
import React from 'react';
import Button from './Button';
export default {
title: "Home/Button",
component: Button
}
export const Login = () => <Button variant='login'>
Login
</Button>
export const SignIn = () =><Button variant='sign-in'>
Sign In
</Button
|
WelcomeText.stories.js
import React from 'react';
import WelcomeText from './WelcomeText';
export default{
title:'Home/WelcomeText',
component:WelcomeText
}
export const Primary = () => <WelcomeText variant='primary'>
Login
</WelcomeText>
export const Secondary = () => <WelcomeText variant='secondary'>
Sign In
</WelcomeText>
|
Here, both the stories are in the HOME folder.
Step 2: As in React, we can embed one component within another, we can similarly do it in the case of stories. Let’s create a story named Page, for that create a folder named Page and add a file naming Page.stories.js and write the below code where we are adding two of our stories that we created earlier one is the Login from Button.stories.js and another one Primary from WelcomeText.stories.js. Here we are embedding two of our stories Login and Primary within the new story Page.
Page.stories.js
import React from 'react';
import { Login } from '../Button/Button.stories';
import { Primary } from '../WelcomeText/WelcomeText.stories';
export default{
title:'Home/Page',
}
export const LoginPages = () => (
<>
<Primary/>
<Login/>
</>
)
|
Output:
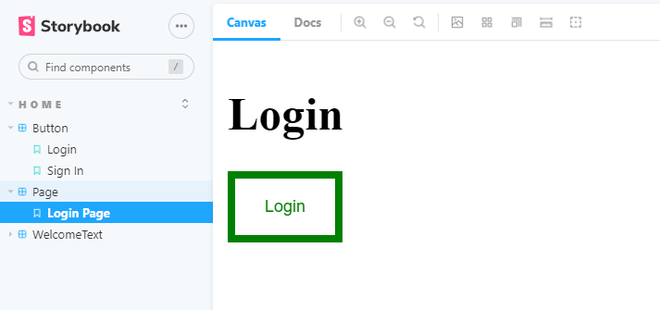
Output
Like Article
Suggest improvement
Share your thoughts in the comments
Please Login to comment...