Spring with Xstream
Last Updated :
10 Mar, 2022
Xstream is a simple Java-based serialization/deserialization library to convert Java Objects into their XML representation. It can also be used to convert an XML string to an equivalent Java Object. It is a fast, and efficient extension to the Java standard library. It’s also highly customizable. For this tutorial, we assume Java and environment variables are properly installed in your local environment.
Download the XStream Archive
Download the latest Xstream archive from this link. If you downloaded the jar then you’ve to set the CLASSPATH variable manually or with the help of IDE, (or)
With Maven:
If you added it to your project through the maven central repository, then you don’t need to set the CLASSPATH variable, maven will do this automatically for you.
<dependency>
  <groupId>com.thoughtworks.xstream</groupId>
  <artifactId>xstream</artifactId>
  <version>1.4.19</version>
</dependency>
Set CLASSPATH Variable
Manually:
Linux:
export CLASSPATH=$CLASSPATH:$XStream_HOME/xstream-1.4.19.jar:
Windows:
Set the environment variable CLASSPATH to
%CLASSPATH%;%XStream_HOME%\xstream-1.4.19.jar;
Mac:
export CLASSPATH=$CLASSPATH:$XStream_HOME/xstream-1.4.19.jar:
(OR)
With the help of an IDE: In IntelliJ IDEA follow the below steps:
Steps:
Right Click on Project -> Open Module Settings -> Libraries -> Click on ‘+’ -> Add Xstream Jar -> Apply and OK


XStream Application
Make sure you’ve already set up Spring core and web jar files
Java
import lombok.Getter;
@Getter
public class Employee {
private String firstName;
private String lastName;
private int salary;
private int age;
private String gender;
public Employee(String firstName, String lastName,
int salary, int age, String gender)
{
this.firstName = firstName;
this.lastName = lastName;
this.salary = salary;
this.age = age;
this.gender = gender;
}
}
|
Java
import com.thoughtworks.xstream.XStream;
import com.thoughtworks.xstream.io.xml.DomDriver;
import java.io.FileWriter;
import java.io.IOException;
import org.springframework.boot.autoconfigure.SpringBootApplication;
@SpringBootApplication
public class XStreamExampleApplication {
public static void main(String[] args)
throws IOException
{
XStream xStream = new XStream(new DomDriver());
xStream.alias("employee", Employee.class);
Employee e1 = new Employee("Sanyog", "Gautam", 1000,
19, "Male");
String xml
= xStream.toXML(e1);
System.out.println(xml);
try (FileWriter writer = new FileWriter(
"/home/anurag/xstreamExample.xml")) {
xStream.toXML(e1, writer);
}
catch (IOException e) {
e.printStackTrace();
}
}
}
|
As you can see, we get our clean XML
<employee>
  <firstName>Sanyog</firstName>
  <lastName>Gautam</lastName>
  <salary>100</salary>
  <age>19</age>
  <gender>Male</gender>
</employee>
We can deserialize our object from that XML
Java
import com.thoughtworks.xstream.XStream;
import com.thoughtworks.xstream.io.xml.DomDriver;
import java.io.IOException;
import org.springframework.boot.autoconfigure.SpringBootApplication;
@SpringBootApplication
public class XStreamExampleApplication {
public static void main(String[] args)
throws IOException
{
XStream xStream = new XStream(new DomDriver());
xStream.allowTypes(new Class[] { Employee.class });
xStream.alias("employee", Employee.class);
Employee e1 = new Employee("Sanyog", "Gautam", 1000,
19, "Male");
String xml
= xStream.toXML(e1);
Employee employee = (Employee)xStream.fromXML(xml);
System.out.println("First name of Employee: "
+ employee.getFirstName());
System.out.println("Last name of Employee: "
+ employee.getLastName());
System.out.println("Employee's age: "
+ employee.getAge());
System.out.println("Employee's gender: "
+ employee.getGender());
System.out.println("Employee's salary: $"
+ employee.getSalary());
}
}
|
We get our object back
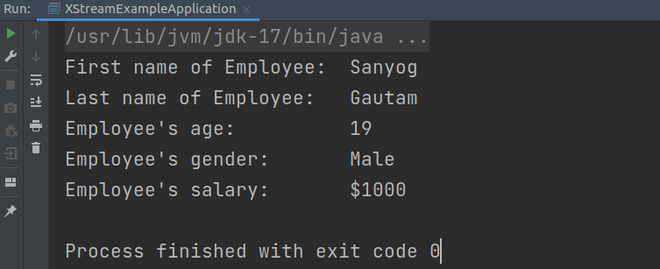
Deserialized object from XML
Like Article
Suggest improvement
Share your thoughts in the comments
Please Login to comment...