Spring – util:constant
Last Updated :
28 Feb, 2022
Spring 2.0 version introduced XML Schema-based configuration. It makes Spring XML configuration files substantially clearer to read and in addition to that, it allows the developer to express the intent of a bean definition. These new custom tags work best for infrastructure or integration beans: for example, AOP, collections, transactions, integration with 3rd-party frameworks such as Mule, etc., while the existing bean tags are best suited to application-specific beans, such as DAOs, service layer objects, validators, etc. Mainly, it replaces the old DTD style with the new XML Schema style. Below is the old DTD – style and its new equivalent XML Schema-style.
DTD – style:
<?xml version="1.0" encoding="UTF-8"?>
<!DOCTYPE beans PUBLIC "-//SPRING//DTD BEAN 2.0//EN"
    "http://www.springframework.org/dtd/spring-beans-2.0.dtd">
<beans>
<!-- bean definitions here -->
</beans>
XML Schema – style:
<?xml version="1.0" encoding="UTF-8"?>
<beans xmlns="http://www.springframework.org/schema/beans"
       xmlns:xsi="http://www.w3.org/2001/XMLSchema-instance"
       xsi:schemaLocation="http://www.springframework.org/schema/beans
                           http://www.springframework.org/schema/beans/spring-beans-2.0.xsd">
<!-- bean definitions here -->
</beans>
This Spring XML configuration fragment is boilerplate code that we can copy and paste in our XML and then plug <bean/> definitions into it like always.
The ‘util’ Schema
As the name specifies, the util tags deal with common, utility configuration issues, such as configuring collections, referencing constants, etc. To use the tags in the util schema, we need to include the below preamble at the top of the Spring XML configuration file; so that the tags in the util namespace are available to use in the XML file.
<?xml version="1.0" encoding="UTF-8"?>
<beans xmlns="http://www.springframework.org/schema/beans"
       xmlns:xsi="http://www.w3.org/2001/XMLSchema-instance"
       xmlns:util="http://www.springframework.org/schema/util"
       xsi:schemaLocation="
http://www.springframework.org/schema/beans http://www.springframework.org/schema/beans/spring-beans-2.0.xsd
http://www.springframework.org/schema/util http://www.springframework.org/schema/util/spring-util-2.0.xsd">

<!-- bean definitions here -->

</beans>
<util:constant/>
The ‘<util:constant/>’ tag is available in ‘util’ schema. It can be used to declare a bean that references one class’s final static field. We will build a simple Spring application using the ‘util:constant’ tag.
Project Structure:
- Create a new Java project – Spring_Application.
- Add all the required Spring Jar files to the project.
- Create a bean class – InfoBean.java, to define all the properties and constant values and getter/setter methods of those properties.
- Create a wrapper class – InfoWrapper.java, to wrap the InfoBean.java constants.
- Create XML configuration file – applicationContext.xml, for the bean configurations.
- Create the main class – InfoMain.java, to define the application context container, get the bean objects, and run the project.
- Run the application to get the output.
After creating the project, bean classes, and the XML configuration file, below will be the project structure.
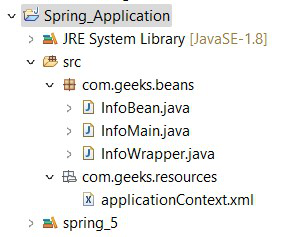
Project Structure
The spring jar files can be downloaded from Maven Repository.
Files to be created:
InfoBean.java:
Java
package com.geeks.beans;
public class InfoBean {
public static final InfoBean JAVA = new InfoBean("Java","Eclipse");
public static final InfoBean PYTHON = new InfoBean("Python","PyCharm");
private String language;
private String ide;
public InfoBean(String language, String ide) {
this.language = language;
this.ide = ide;
}
public String getLanguage() {
return language;
}
public void setLanguage(String language) {
this.language = language;
}
public String getIde() {
return ide;
}
public void setIde(String ide) {
this.ide = ide;
}
public static InfoBean getJava() {
return JAVA;
}
public static InfoBean getPython() {
return PYTHON;
}
@Override
public String toString() {
return "Coding Language = " + language + ", IDE = " + ide ;
}
}
|
- In the bean class, we defined properties ‘language’ and ‘ide’ as String types.
- we declared two static final constants ‘JAVA’ and ‘PYTHON’.
- Generate the getter/setter methods of all the properties.
- Override the ‘toString()’ method.
InfoWrapper.java:
Java
package com.geeks.beans;
public class InfoWrapper {
private InfoBean java;
private InfoBean python;
public InfoBean getJava() {
return java;
}
public void setJava(InfoBean java) {
this.java = java;
}
public InfoBean getPython() {
return python;
}
public void setPython(InfoBean python) {
this.python = python;
}
}
|
Wrapper class to wrap the ‘InfoBean’ properties and their getter/setter methods.
ApplicationContext.xml:
XML
<?xml version="1.0" encoding="UTF-8"?>
<util:constant id="JAVA"
static-field="com.geeks.beans.InfoBean.JAVA" />
<util:constant id="PYTHON"
static-field="com.geeks.beans.InfoBean.PYTHON" />
<bean name="infoWrapper" class="com.geeks.beans.InfoWrapper">
<property name="java" ref="JAVA" />
<property name="python" ref="PYTHON" />
</bean>
</beans>
|
- We are using the util:constant tag for the constant fields.
- Creating the bean definition for InfoWrapper class.
- The reference of the properties in the wrapper class is pointing to the constant fields.
InfoMain.java:
Java
package com.geeks.beans;
import org.springframework.context.ApplicationContext;
import org.springframework.context.support.ClassPathXmlApplicationContext;
public class InfoMain {
@SuppressWarnings("resource")
public static void main(String[] args) {
ApplicationContext context = new ClassPathXmlApplicationContext("com/geeks/resources/applicationContext.xml");
InfoWrapper info = (InfoWrapper) context.getBean("infoWrapper");
System.out.println(info.getJava());
System.out.println(info.getPython());
}
}
|
Main class to get the ‘infoWrapper’ bean created by the container using ‘getBean()’ method and display the values.
Output:
Run the ‘InfoMain’ class as a Java project to get the below output.
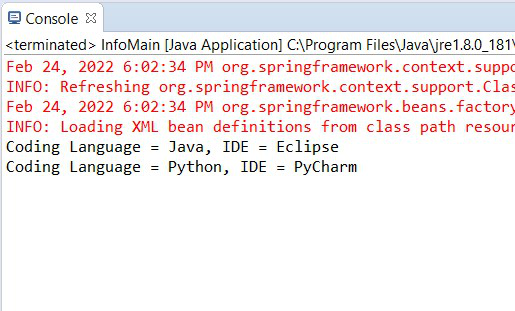
Output
Like Article
Suggest improvement
Share your thoughts in the comments
Please Login to comment...