Spring Security XML
Last Updated :
24 Mar, 2022
Spring Security is a powerful way to provide authentication as well as authorization to Spring application. Spring Security is a powerful tool that provides the feature of custom security configuration to the user, security configuration in spring can be customized in two ways as listed below as follows:
- XML-based configuration
- Java configuration.
Implementation: Here we will be creating a Spring MVC web application and add xml-based configuration.
Prerequisites: Introduction to Spring
Steps to Create an XML-Based Configuration in Spring MVC
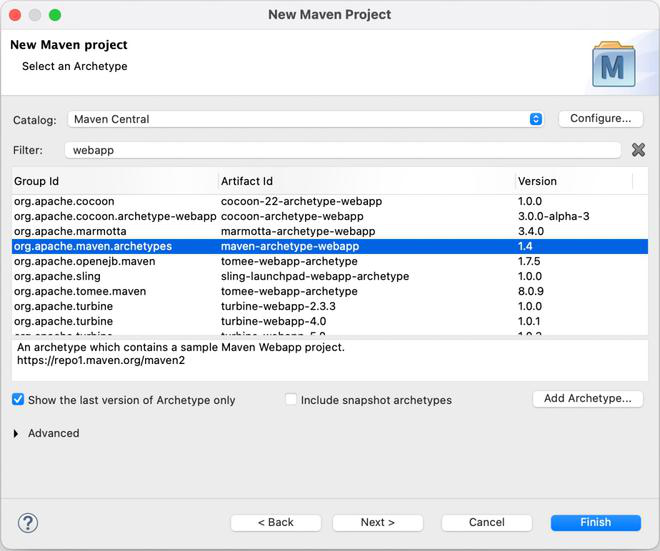
Step 1: Create a maven webapp project, we are using Eclipse IDE for creating this project. While creating a maven project select the archetype for this project as maven-archetype-webapp. Enter the group id and the artifact id for your project and click ‘Finish.’
Step 2: After creating the project your project structure would look something like this:

The pom.xml file defines all the dependencies required for the project. Make sure to add all the dependencies mentioned in this file for your project to work properly.
File: pom.xml
XML
<?xml version="1.0" encoding="UTF-8"?>
<modelVersion>4.0.0</modelVersion>
<groupId>com.gfg</groupId>
<artifactId>SpringSecurityXmlConfig</artifactId>
<version>0.0.1-SNAPSHOT</version>
<packaging>war</packaging>
<name>SpringSecurityXmlConfig Maven Webapp</name>
<properties>
<project.build.sourceEncoding>UTF-8</project.build.sourceEncoding>
<maven.compiler.source>1.7</maven.compiler.source>
<maven.compiler.target>1.7</maven.compiler.target>
</properties>
<dependencies>
<dependency>
<groupId>junit</groupId>
<artifactId>junit</artifactId>
<version>4.11</version>
<scope>test</scope>
</dependency>
<dependency>
<groupId>org.springframework</groupId>
<artifactId>spring-webmvc</artifactId>
<version>5.3.16</version>
</dependency>
<dependency>
<groupId>org.springframework.security</groupId>
<artifactId>spring-security-web</artifactId>
<version>5.6.2</version>
</dependency>
<dependency>
<groupId>org.springframework.security</groupId>
<artifactId>spring-security-core</artifactId>
<version>5.6.2</version>
</dependency>
<dependency>
<groupId>org.springframework.security</groupId>
<artifactId>spring-security-config</artifactId>
<version>5.6.2</version>
</dependency>
<dependency>
<groupId>javax.servlet</groupId>
<artifactId>javax.servlet-api</artifactId>
<version>4.0.1</version>
<scope>provided</scope>
</dependency>
</dependencies>
<build>
<finalName>SpringSecurityXmlConfig</finalName>
<pluginManagement>
<plugins>
<plugin>
<artifactId>maven-clean-plugin</artifactId>
<version>3.1.0</version>
</plugin>
<plugin>
<artifactId>maven-resources-plugin</artifactId>
<version>3.0.2</version>
</plugin>
<plugin>
<artifactId>maven-compiler-plugin</artifactId>
<version>3.8.0</version>
</plugin>
<plugin>
<artifactId>maven-surefire-plugin</artifactId>
<version>2.22.1</version>
</plugin>
<plugin>
<artifactId>maven-war-plugin</artifactId>
<version>3.2.2</version>
</plugin>
<plugin>
<artifactId>maven-install-plugin</artifactId>
<version>2.5.2</version>
</plugin>
<plugin>
<artifactId>maven-deploy-plugin</artifactId>
<version>2.8.2</version>
</plugin>
</plugins>
</pluginManagement>
</build>
</project>
|
The web.xml defines mapping with different URLs and servlets to handle requests for those URLs. Spring DelegatingFilterProxy provides link between web.xml and application context.
File: web.xml
XML
<?xml version="1.0" encoding="UTF-8"?>
<!DOCTYPE xml>
version="3.1">
<servlet>
<servlet-name>gfg</servlet-name>
<servlet-class>org.springframework.web.servlet.DispatcherServlet</servlet-class>
<load-on-startup>1</load-on-startup>
</servlet>
<servlet-mapping>
<servlet-name>gfg</servlet-name>
<url-pattern>/</url-pattern>
</servlet-mapping>
<listener>
<listener-class>org.springframework.web.context.ContextLoaderListener</listener-class>
</listener>
<filter>
<filter-name>springSecurityFilterChain</filter-name>
<filter-class>org.springframework.web.filter.DelegatingFilterProxy</filter-class>
</filter>
<filter-mapping>
<filter-name>springSecurityFilterChain</filter-name>
<url-pattern>/*</url-pattern>
</filter-mapping>
<context-param>
<param-name>contextConfigLocation</param-name>
<param-value>
/WEB-INF/gfg-servlet.xml
/WEB-INF/spring-security.xml
</param-value>
</context-param>
</web-app>
|
The gfg-servlet.xml file handles all HTTP requests for the web applications. The annotation-driven enable the spring annotation classes. The component scan locates and allocated beans according to the defined annotation. The bean configuration helps in identifying and locating JSP files in the project.
FIle: gfg-servlet.xml
XML
<?xml version="1.0" encoding="UTF-8"?>
<mvc:annotation-driven />
<context:component-scan base-package="com.gfg.controller">
</context:component-scan>
<context:annotation-config></context:annotation-config>
<bean class="org.springframework.web.servlet.view.InternalResourceViewResolver">
<property name="prefix" value="/WEB-INF/views/"></property>
<property name="suffix" value=".jsp"></property>
</bean>
</beans>
|
This is where you define the configuration for spring security, the http bean helps in intercepting all the http calls mentioned in the file, the user-service in the authentication-provider in the authentication-manager creates a user for the application with the username, password, and the role for that user.
XML
<?xml version="1.0" encoding="UTF-8"?>
<http auto-config="true">
<intercept-url pattern="/admin" access="hasRole('ROLE_ADMIN')" />
</http>
<authentication-manager>
<authentication-provider>
<user-service>
<user name="admin" password="{noop}pass" authorities="ROLE_ADMIN" />
</user-service>
</authentication-provider>
</authentication-manager>
<beans:bean id ="passwordEncoder"
class = "org.springframework.security.crypto.password.NoOpPasswordEncoder"
factory-method = "getInstance">
</beans:bean>
</beans:beans>
|
The WelcomeController class in the com.gfg.controller package defines the mappings for url, in this project we have defines two GET methods for two URLs. The welcome method redirects to the home view page and the admin method does it for the admin view page.
File: WelcomeController.java
Java
package com.gfg.controller;
import org.springframework.stereotype.Controller;
import org.springframework.web.bind.annotation.RequestMapping;
import org.springframework.web.bind.annotation.RequestMethod;
@Controller
public class WelcomeController {
@RequestMapping(value = "/", method = RequestMethod.GET)
public String welcome()
{
return "welcome";
}
@RequestMapping(value = "/admin",
method = RequestMethod.GET)
public String
admin()
{
return "admin";
}
}
|
This is the admin.jsp page in the views folder.
HTML
<html>
<head>
<meta http-equiv="Content-Type" content="text/html; charset=UTF-8">
<title>Admin</title>
</head>
<body>
Welcome Admin
<form action="<%=request.getContextPath()%>/appLogout" method="POST">
<input type="submit" value="Logout"/>
<input type="hidden" name="${_csrf.parameterName}" value="${_csrf.token}"/>
</form>
</body>
</html>
|
This is welcome.jsp page in the views folder.
HTML
<html>
<head>
<meta content="text/html; charset=UTF-8">
<title>Home Page</title>
</head>
<body>
<h2>Welcome to Spring Security using XML Configuration!</h2>
</body>
</html>
|
Step 3: After creating all the configuration files and classes your project would look something like this:

Step 4: Now that we have completed our project, it’s time to run it on a tomcat server, just start the tomcat server and type http:localhost:8080/SpringSecurityXmlConfig/login.


Like Article
Suggest improvement
Share your thoughts in the comments
Please Login to comment...