Spring @RequestMapping Annotation with Example
Last Updated :
13 Jul, 2022
One of the most important annotations in spring is the @RequestMapping Annotation which is used to map HTTP requests to handler methods of MVC and REST controllers. In Spring MVC applications, the DispatcherServlet (Front Controller) is responsible for routing incoming HTTP requests to handler methods of controllers. When configuring Spring MVC, you need to specify the mappings between the requests and handler methods. To configure the mapping of web requests, we use the @RequestMapping annotation. The @RequestMapping annotation can be applied to class-level and/or method-level in a controller. The class-level annotation maps a specific request path or pattern onto a controller. You can then apply additional method-level annotations to make mappings more specific to handler methods. So let’s understand @RequestMapping Annotation at Method-level and Class level by examples.
Requirements:
- Eclipse (EE version)/STS IDE
- Spring JAR Files
- Tomcat Apache latest version
@RequestMapping Annotation at Method-Level
Setting Up the Project
Note: We are going to use Spring Tool Suite 4 IDE for this project. Please refer to this article to install STS in your local machine How to Download and Install Spring Tool Suite (Spring Tools 4 for Eclipse) IDE?
Step 1: Create a Dynamic Web Project in your STS IDE. You may refer to this article to create a Dynamic Web Project in STS: How to Create a Dynamic Web Project in Spring Tool Suite?
Step 2: Download the spring JARs file from this link and go to the src > main > webapp > WEB-INF > lib folder and past these JAR files.
Step 3: Refer to this article Configuration of Apache Tomcat Server and configure the tomcat server with your application.
Now we are ready to go.
Configuring Dispatcher Servlet
It is suggested to go through Dispatcher Servlet in Spring as it serves as a pre-requisite in grasping out this topic. Now we are going to configure Dispatcher Servlet with our Spring MVC application.
Step 4: Go to the src > main > webapp > WEB-INF > web.xml file and the complete code for web.xml file is given below:
A. File: web.xml
XML
<?xml version="1.0" encoding="UTF-8"?>
<display-name>myfirst-mvc-project</display-name>
<welcome-file-list>
<welcome-file>index.html</welcome-file>
<welcome-file>index.jsp</welcome-file>
<welcome-file>index.htm</welcome-file>
<welcome-file>default.html</welcome-file>
<welcome-file>default.jsp</welcome-file>
<welcome-file>default.htm</welcome-file>
</welcome-file-list>
<absolute-ordering/>
<servlet>
<servlet-name>frontcontroller-dispatcher</servlet-name>
<servlet-class>org.springframework.web.servlet.DispatcherServlet</servlet-class>
<load-on-startup>1</load-on-startup>
</servlet>
<servlet-mapping>
<servlet-name>frontcontroller-dispatcher</servlet-name>
<url-pattern>/student.com/*</url-pattern>
</servlet-mapping>
</web-app>
|
Step 5: Now go to the src > main > webapp > WEB-INF and create an XML file. Actually, this is a Spring Configuration file like beans.xml file. And the name of the file must be in this format
YourServletName-servlet.xml
For example, for this project, the name of the file must be
frontcontroller-dispatcher-servlet.xml
So either you can create a Spring Configuration File or you can just create a simple XML file add the below lines of code inside that file. So the code for the frontcontroller-dispatcher-servlet.xml is given below.
B. File: frontcontroller-dispatcher-servlet.xml
XML
<?xml version="1.0" encoding="UTF-8"?>
<context:component-scan base-package="com.student.controllers"></context:component-scan>
</beans>
|
Create Your Controller Classes
Step 6: Now, let’s create some controllers. Go to the src/main/java and create a new controllers package (For ex. com.student.controllers) as per your choice. And inside that create a Java class and name the class as DemoController. Now how to tell the Spring that this is our controller class. So the way we are going to tell the Spring is by marking it with a @Controller annotation.
@Controller
public class DemoController {}
Note: Spring will automatically initialize the class having a @Controller annotation and register that class with the spring container.
Now let’s create a simple method inside the Controller class and use @RequestMapping annotation before the method something like this.
// Annotation
@RequestMapping("/hello")

// Method
public String helloWorld()
{
    return "Hello World!";
}
So this is the example of @RequestMapping Annotation at Method-Level.
Now let’s understand the annotation. @RequestMapping(“/hello”), so what does it mean? This line means, in the URL if somebody hits student.com/hello then this particular method will be executed and it is going to perform the operation that is written inside that particular method.
C. File: DemoController.java
Java
package com.student.controllers;
import org.springframework.stereotype.Controller;
import org.springframework.web.bind.annotation.RequestMapping;
import org.springframework.web.bind.annotation.ResponseBody;
@Controller
public class DemoController {
@ResponseBody
@RequestMapping("/hello")
public String helloWorld() {
return "Hello World!";
}
}
|
Run Spring MVC Controller
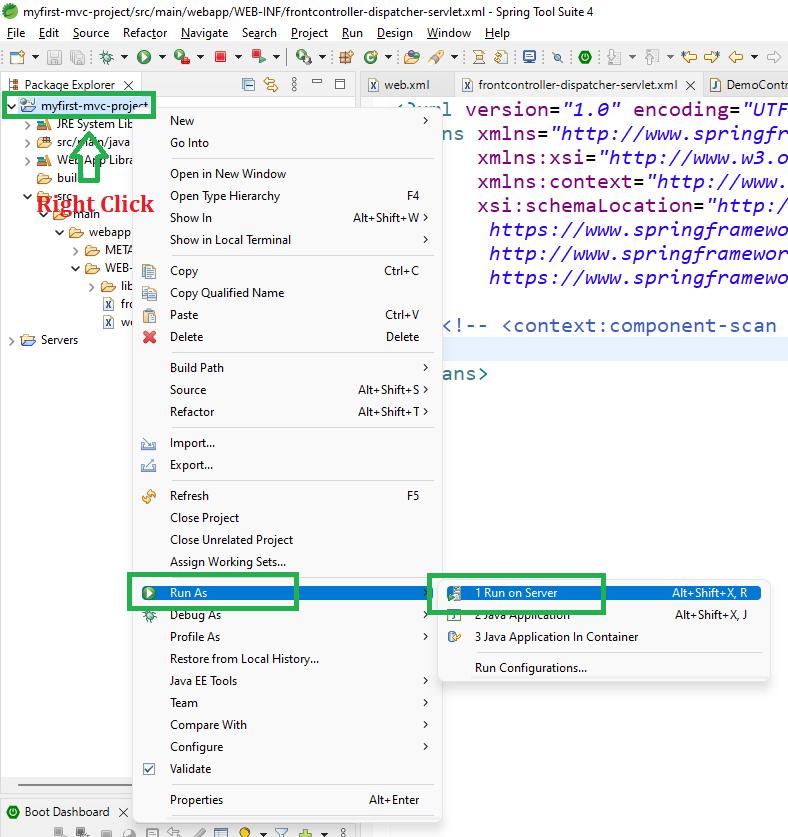
Step 7: To run your Spring MVC Application right-click on your project > Run As > Run on Server and run your application as shown in the below image.
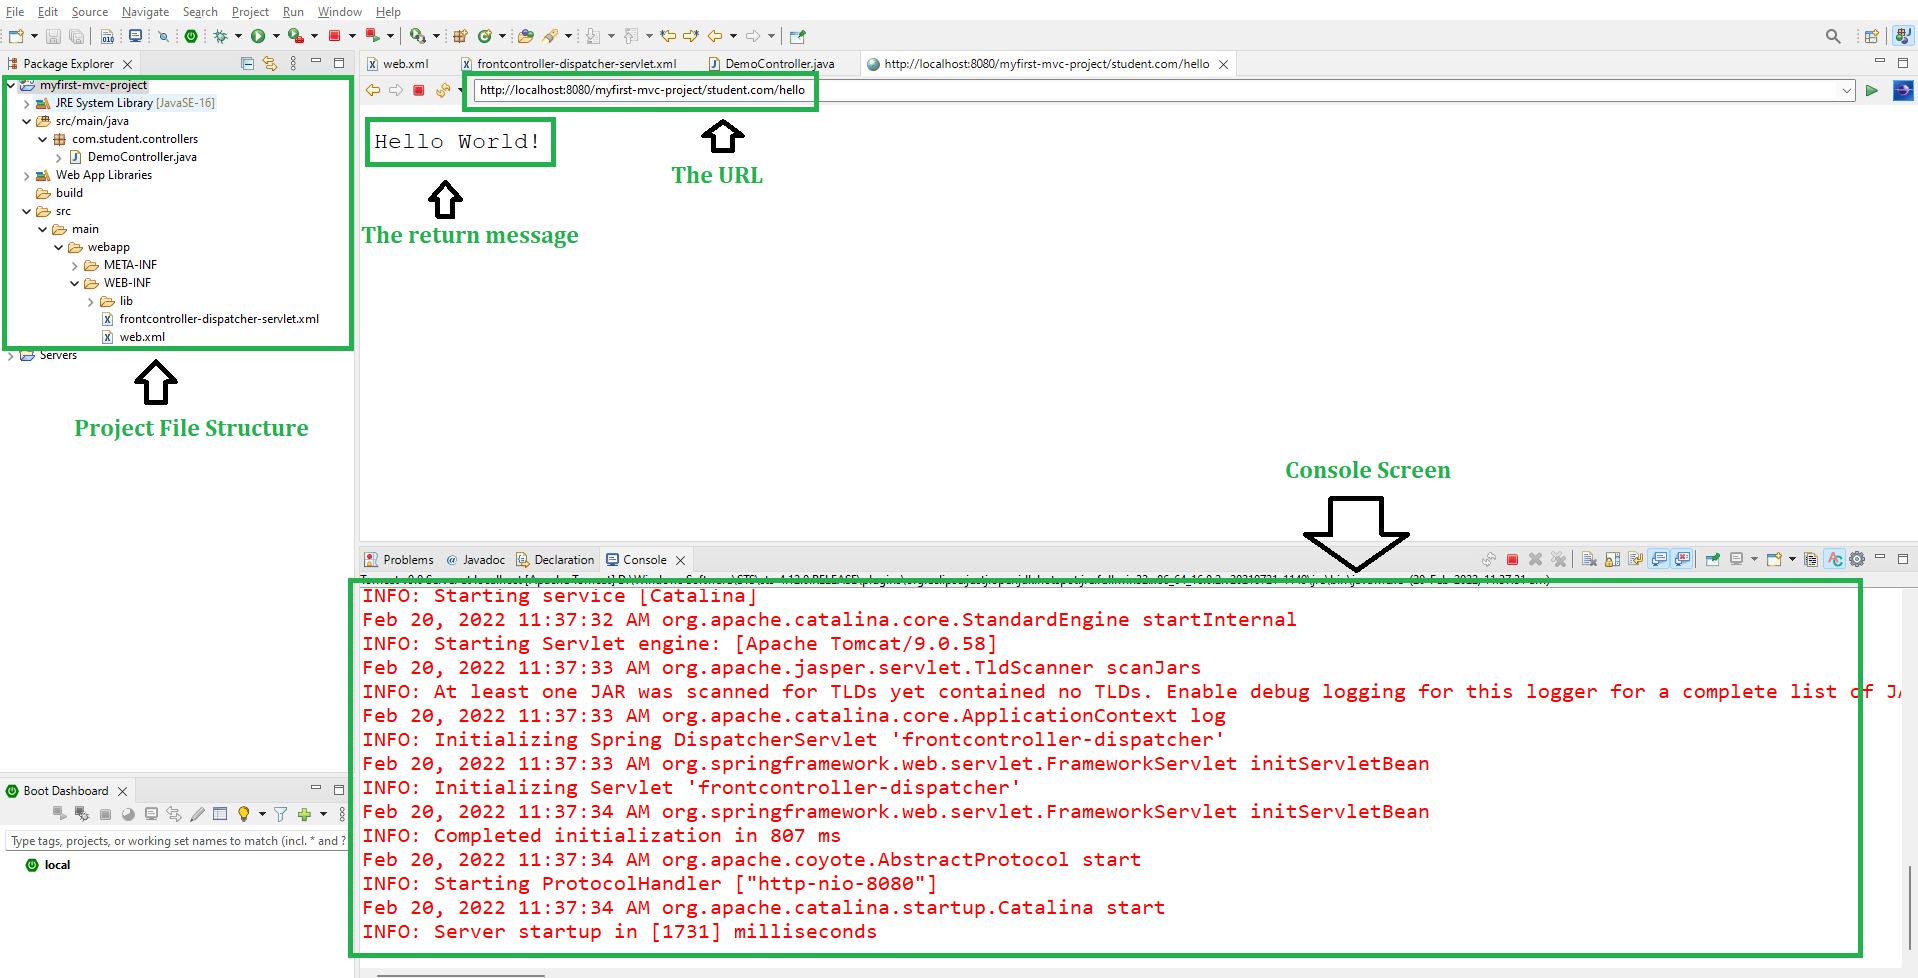
After that use the following URL to run your controller as shown in the below image. All other details are mentioned in the image.
http://localhost:8080/myfirst-mvc-project/student.com/hello
@RequestMapping Annotation at Class-Level
Implementation:
The class-level @RequestMapping annotation maps a specific request path or pattern onto a controller. You can then apply additional method-level annotations to make mappings more specific to handler methods. Let’s understand this line by an example project. The “Setting Up the Project” and the “Configuring Dispatcher Servlet” steps are the same. Just make changes in “Create Your Controller Classes” and “Run Your Spring MVC Controller“.
Create Your Controller Classes
So in this example, we are going to create Multi-Action Controller. MultiActionController is a Controller implementation that allows multiple request types to be handled by the same class. That means inside one controller class we can have many handler methods something like this.
File: DemoController.java
Java
package com.student.controllers;
import org.springframework.stereotype.Controller;
import org.springframework.web.bind.annotation.RequestMapping;
import org.springframework.web.bind.annotation.ResponseBody;
@Controller
public class DemoController {
@ResponseBody
@RequestMapping("/hello")
public String helloWorld() {
return "Hello World!";
}
@ResponseBody
@RequestMapping("/geeksforgeeks")
public String welcomeGfgMessage() {
return "Welcome to GeeksforGeeks";
}
}
|
Now let’s use the @RequestMapping Annotation at Class-Level means before the DemoController something like this. So our modified DemoController.java file is given below
File: DemoController.java
Java
package com.student.controllers;
import org.springframework.stereotype.Controller;
import org.springframework.web.bind.annotation.RequestMapping;
import org.springframework.web.bind.annotation.ResponseBody;
@Controller
@RequestMapping("/boys")
public class DemoController {
@ResponseBody
@RequestMapping("/hello")
public String helloWorld()
{
return "Hello World!";
}
@ResponseBody
@RequestMapping("/geeksforgeeks")
public String welcomeGfgMessage()
{
return "Welcome to GeeksforGeeks";
}
}
|
Yes, we can do that also. But we need to change our URL in order to run these requests.
Run Your Spring MVC Controller
To run your Spring MVC Application right-click on your project > Run As > Run on Server and run your application as shown in the below image.
And now, if you use this “http://localhost:8080/myfirst-mvc-project/student.com/hello” URL to run your controller then you are going to get the following warning and there will be no response
WARNING: No mapping for GET /myfirst-mvc-project/student.com/hello
In order to run your controller, you have to hit the following URL
http://localhost:8080/myfirst-mvc-project/student.com/boys/hello
Similarly, for the welcomeGfgMessage() handler method, you have to hit the following URL
http://localhost:8080/myfirst-mvc-project/student.com/boys/geeksforgeeks
Like Article
Suggest improvement
Share your thoughts in the comments
Please Login to comment...