Spring Boot – Starter Test
Last Updated :
10 Mar, 2022
Spring Boot is built on the top of the spring and contains all the features of spring. And is becoming a favorite of developers these days because of its rapid production-ready environment which enables the developers to directly focus on the logic instead of struggling with the configuration and setup. Spring Boot is a microservice-based framework and making a production-ready application in it takes very little time. Following are some of the features of Spring Boot:
- It allows avoiding heavy configuration of XML which is present in spring
- It provides easy maintenance and creation of REST endpoints
- It includes embedded Tomcat-server
- Deployment is very easy, war and jar files can be easily deployed in the tomcat server
The spring-boot-starter-test is the primary starter dependency for testing our spring boot application. It contains the majority of libraries that are required for tests including JUnit Jupiter, Hamcrest, and Mockito.
Example
In this example, we will create a spring boot project and add spring-boot-starter-test dependency, and run predefined tests of the application class.
Step By Step Implementation
Step 1: Create a spring boot project
In this step, we will create a spring boot project. For this, we will use Spring Initializr and once we create the project we will import it into our Eclipse IDE. Below is the screenshot is given for the spring boot project configuration. Once you are done with your configuration click on Generate button, it will automatically generate a zip file for our project.
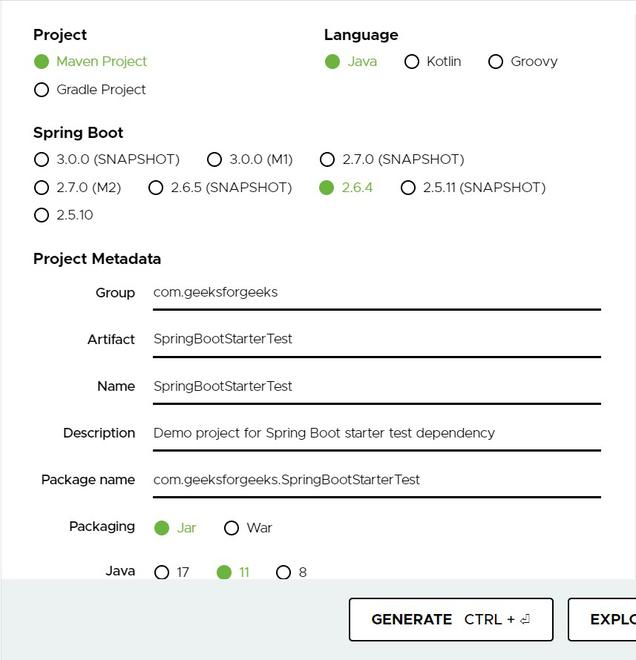
Fig 1 – Spring Boot Project Configuration
Step 2: Import spring boot project in Eclipse IDE
Once we will have the zip file for our project we will import it into our IDE. For this Go to File > Import.

Fig 2.1 – Importing Maven Project
After this Maven Projects > Existing Maven Project then click on the Next button.

Fig 2.2 – Existing Maven Projects
Now we need to browse to the project location and select the project directory and click on the Finish button.

Fig 2.3 – Project Local Path
Step 3: Dependency configuration
Once we will create a spring boot project and import it into our IDE, we will find there a file pom.xml that holds the dependencies of the project. In the pom.xml there is already a dependency is present for the spring boot starter test. If not, we will add the following dependency. It will add all the dependencies related to test.
XML
<dependencies>
<dependency>
<groupId>org.springframework.boot</groupId>
<artifactId>spring-boot-starter</artifactId>
</dependency>
<dependency>
<groupId>org.springframework.boot</groupId>
<artifactId>spring-boot-starter-test</artifactId>
<scope>test</scope>
</dependency>
</dependencies>
|
Above, we can look for spring-boot-starter-test dependency there is <scope>test</scope>. It means the scope of the test is only up to the development and test mode. Once the application is developed and bundled and packaged, all the test scope dependencies are ignored.
Step 4: SpringBootStarterTestApplicationTests Class
After the dependencies are added and the application is successfully built. We can look is our project root path, we will find classes for the test. In our case it is named “SpringBootStarterTestApplicationTests“. It is present at the src/test/java root path.

Fig 4 – Test Class
Step 5: Running the test class
In this step, we will run our SpringBootStarterTestApplicationTests class. Below is the predefined code for our test class.
Java
import org.junit.jupiter.api.Test;
import org.springframework.boot.test.context.SpringBootTest;
@SpringBootTest
class SpringBootStarterTestApplicationTests {
@Test
void contextLoads() {
}
}
|
In the above, spring boot by default has provided two annotations:
- @SpringBootTest – This annotation is marked over the test class that runs the standard spring boot tests. The @SpringBootTest annotation has the following features over the Spring Test Context framework.
- If @ContextConfiguration(loader=””) is explicitly defined, It uses the default SpringBootContextLoader.
- It supports various WebEnvironment modes.
- If an application uses a web server for a web test then it automatically registers for a TestRestTemplate or WebTestClient bean.
- It provides facilities for application arguments to be defined using the args attribute.
- @Test – This annotation marks a method as the test method.
Step 6: Output
In this step, we will run our application. For this we will go to our test class ‘SpringBootStarterTestApplicationTests‘ and we will right-click over it as run as JUnit Test. This will run the default contextLoads() test.

Fig 6 – Output
Like Article
Suggest improvement
Share your thoughts in the comments
Please Login to comment...