Spring Boot is a project that is built on top of the Spring Framework that provides an easier and faster way to set up, configure, and run both simple and web-based applications. It is one of the popular frameworks among developers these days because of its rapid production-ready environment which enables the developers to directly focus on the logic instead of struggling with the configuration and setup. It is a microservice-based framework used to create a stand-alone Spring-based application that we can run with minimal Spring configurations.
Salient Features
- There is no requirement for heavy XML configuration.
- Developing and testing the Spring Boot application is easy as it offers a CLI based tool and it also has embedded HTTP servers such as Tomcat, Jetty, etc.
- Since it uses convention over configuration, it increases productivity and reduces development time.
Clarification on Database Caching.
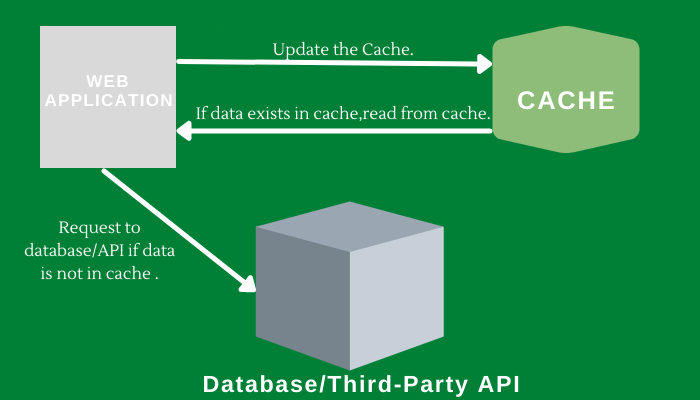
A Cache is any temporary storage location that lies between the application and persistence database or a third-party application that stores the most frequently or recently accessed data so that future requests for that data can be served faster. It increases data retrieval performance by reducing the need to access the underlying slower storage layer. Data access from memory is always faster in comparison to fetching data from the database. Caching keeps frequently accessed objects, images, and data closer to where you need them, speeding up access by not hitting the database or any third-party application multiple times for the same data and saving monetary costs. Data that does not change frequently can be cached.
Types of Caching
There are mainly 4 types of Caching :
- CDN Caching
- Database Caching
- In-Memory Caching
- Web server Caching
1. CDN Caching
A content delivery network (CDN) is a group of distributed servers that speed up the delivery of web content by bringing it closer to where users are. Data centers across the globe use caching, to deliver internet content to a web-enabled device or browser more quickly through a server near you, reducing the load on an application origin and improving the user experience. CDNs cache content like web pages, images, and video in proxy servers near your physical location.
2. Database Caching
Database caching improves scalability by distributing query workload from the backend to multiple front-end systems. It allows flexibility in the processing of data. It can significantly reduce latency and increase throughput for read-heavy application workloads by avoiding, querying a database too much.
3. In-Memory Caching
In-Memory Caching increases the performance of the application. An in-memory cache is a common query store, therefore, relieves databases of reading workloads. Redis cache is one of the examples of an in-memory cache. Redis is distributed, and advanced caching tool that allows backup and restores facilities. In-memory Cache provides query functionality on top of caching.
4. Web server Caching
Web server caching stores data, such as a copy of a web page served by a web server. It is cached or stored the first time a user visits the page and when the next time a user requests the same page, the content will be delivered from the cache, which helps keep the origin server from getting overloaded. It enhances page delivery speed significantly and reduces the work needed to be done by the backend server.
Cache Annotations of Spring Boot
1. @Cacheable
The simplest way to enable caching behavior for a method is to mark it with @Cacheable and parameterize it with the name of the cache where the results would be stored.
@Cacheable(“name”)
public String getName(Customer customer) {…}
The getName() call will first check the cache name before actually invoking the method and then caching the result. We can also apply a condition in the annotation by using the condition attribute:
@Cacheable(value=”Customer”, condition=”#name.length<10″)
public Customer findCustomer(String name) {…}
2. @Cache Evict
Since the cache is small in size. We don’t want to populate the cache with values that we don’t need often. Caches can grow quite large, quite fast. We can use the @CacheEvict annotation to remove values so that fresh values can be loaded into the cache again:
@CacheEvict(value=”name”, allEntries=true)
public String getName(Customer customer) {…}
It provides a parameter called allEntries that evicts all entries rather than one entry based on the key.
3. @CachePut
@CachePut annotation can update the content of the cache without interfering with the method execution.
@CachePut(value=”name”)
public String getName(Customer customer) {…}
@CachePut selectively updates the entries whenever we alter them to avoid the removal of too much data out of the cache. One of the key differences between @Cacheable and @CachePut annotation is that the @Cacheable skips the method execution while the @CachePut runs the method and puts the result into the cache.
4. @Caching
@Caching is used in the case we want to use multiple annotations of the same type on the same method.
@CacheEvict(“name”)
@CacheEvict(value=”directory”, key=”#customer.id”)
public String getName(Customer customer) {…}
The code written above would fail to compile since Spring-Boot does not allow multiple annotations of the same type to be declared for a given method.
@Caching(evict = {
@CacheEvict(“name”),
@CacheEvict(value=”directory”, key=”#customer.id”) })
public String getName(Customer customer) {…}
As shown in the code above, we can use multiple caching annotations with @Caching and avoid compilation errors.
5. @CacheConfig
With @CacheConfig annotation, we can simplify some of the cache configurations into a single place at the class level, so that we don’t have to declare things multiple times.
@CacheConfig(cacheNames={“name”})
public class CustomerData {
@Cacheable
public String getName(Customer customer) {…}
Conditional Caching
Sometimes, a method might not be suitable for caching all the time. The cache annotations support such functionality through the conditional parameter which takes a SpEL expression that is evaluated to either true or false. If true, the method is cached else it behaves as if the method is not cached, which is executed every time no matter what values are in the cache or what arguments are used.
@Cacheable(value=”name”, condition=”#customer.name == ‘Megan’ “)
public String getName(Customer customer) {…}
The above method will be cached, only if the argument name equals Megan.
Unless Parameter
We can also control caching based on the output of the method rather than the input via the unless parameter:
@Cacheable(value=”name”, unless=”#result.length() < 20″)
public String getName(Customer customer) {….}
The above annotation would cache addresses unless they were shorter than 20 characters. It’s important to know the condition and unless parameters can be used in conjunction with all the caching annotations.
Cache Dependency
If we want to enable a cache mechanism in a Spring Boot application, we need to add cache dependency in the pom.xml file. It enables caching and configures a CacheManager.
<dependency>
<groupId>org.springframework.boot</groupId>
<artifactId>spring-boot-starter-cache</artifactId>
</dependency>
Like Article
Suggest improvement
Share your thoughts in the comments
Please Login to comment...