Snip & Sketch Tool in Windows 10
Last Updated :
20 Jan, 2023
Screenshots allow users to capture what’s present on their screen. They are important if you want to share particular information with others or refer later. Talking, saving, and sharing screenshots is becoming most useful for everyone.
But did you know in Windows you can capture screenshots in a very easy and effective way? Windows 10 has a Snip & Sketch Tool you should also try.
In Windows 10 there are various ways by which users can capture a screenshot and save it for later. But among them, the easiest way to take a screenshot is by the keyboard shortcut “Windows key + PrtScn Button”. But this captures the whole total screen and there is no chance to make a selection of the screen or a particular section of the screen.
So, to overcome this problem, another better option is to use the Snip & Sketch tool that allows users to take a screenshot of a selection of a screen in four different forms according to the user’s convenience. It comes preinstalled with Windows 10 but If this tool is not installed on your machine, it is available in a Microsoft store for free.
4 Different Types of snip in the Snip & Sketch Tool:
- Rectangular Snip: In this type, you have to drag the cursor around the desired object to form a rectangular shape.
- Free-form Snip: You can draw a freeform shape around an object which you want to capture.
- Window Snip: This type captures a window snip such as a dialogue box, pop-up page, taskbar, etc.
- Full-screen Snip: As like a regular screenshot, This captures the entire screen.
Now let’s talk about what steps we need to be performed to use the Snip & Sketch Tool.
1. Open Snip & Sketch Tool:
Different ways are there to open a Snip & Sketch app,
A. Press the “Windows logo key + SHIFT + S” to open a snipping toolbar of Snip & Sketch.
B. Type Snip & Sketch in the search box present in the lower-left corner and then choose Snip & Sketch Tool.
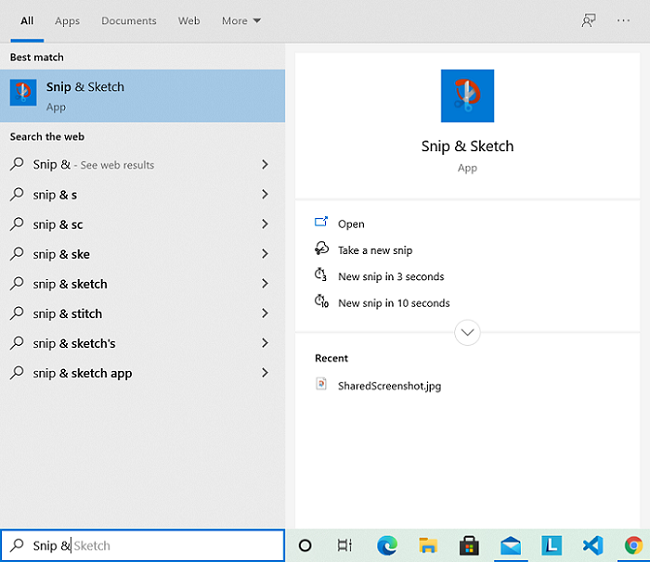
Search “Snip & Sketch” in the search box.
C. Open the Action Center and press the button labeled Screen snip. It should be there, but if not, you can turn on it through Notifications and Action Center settings.
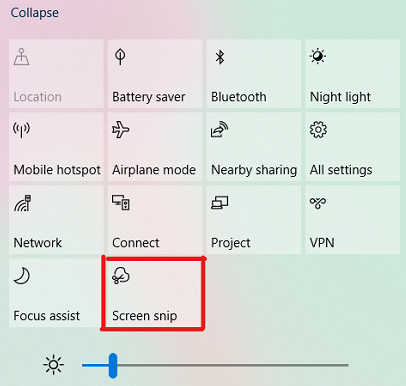
Select the “Screen snip” option from the Action center.
4. Press the Print Screen button, Go to the settings, and search for “PrtScn”, which will take you to the page with an on-off button that says, “Use the Print Screen to launch Screen snipping”. Turn on this toggle to open Snip & Sketch app with a single keypress of PrtScn button.
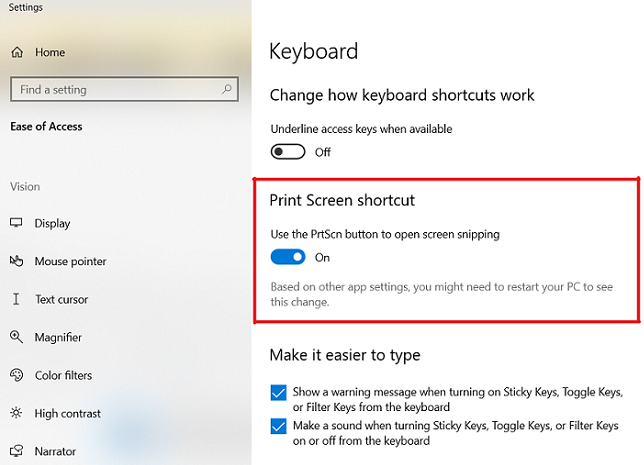
Turn on toggle through settings, to open Snip & Sketch by a single keypress.
As you will open a Snip & Sketch tool, this snipping toolbar will open up which consists of four modes. 1. Rectangular snip 2. Free-form snip 3. Window snip 4. Full-screen snip 5. Exit (Numbers are according to position)

Snipping Toolbar, Four types to take a snip.
2. Take a snip:
To take a snip, select a mode among four, and cover the region on your screen. As you take a snip, It gets copied to your clipboard. If you want to edit it click on Snip & Sketch notification arrived from the notification panel, and there you have options to edit, save and share the snip.
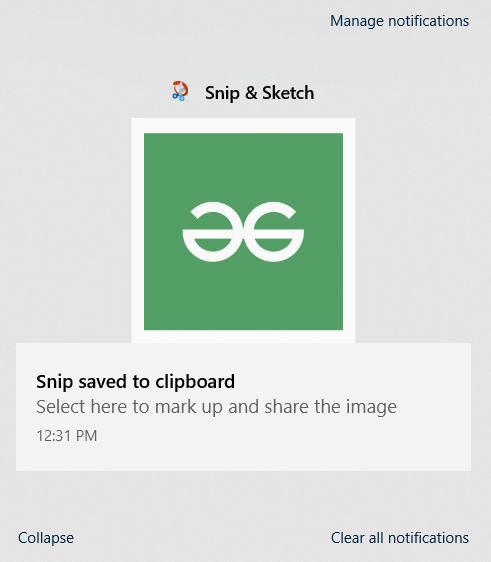
This notification will pop up when you take a snip, click on this to open snip in the app.
3. Annotate, Save and Share
As mentioned in the second step, after taking a snip, you’ll get a notification to take up your screenshot to the Snip & Sketch app. In the app, you can edit, save and share this snip. If you don’t want to edit, leave it as it is, the snip is also copied to the clipboard, so you can directly paste it wherever you want. In the top right corner, there are options to zoom, save as, copy and share the snip.
Here you can edit the snip, save and share.
That’s all, in this way you can capture, save, and share screenshots with the help of the “Snip & Sketch” Windows 10 Tool.
Share your thoughts in the comments
Please Login to comment...