Servlets are the Java programs that run on the Java-enabled web server or application server. They are used to handle the request obtained from the webserver, process the request, produce the response, then send a response back to the webserver. Properties of Servlets are as follows:
- Servlets work on the server-side.
- Servlets are capable of handling complex requests obtained from the webserver.
Prerequisites:
- Basic Servlet knowledge.
- JDBC connection in Java.
- We can use any database to store the data, in this example, the PostgreSQL database management system is used.
- SQL Language – Insert, Delete, Update & Select statements.
- Eclipse IDE and Tomcat server.
What we are going to build in this article?
In this example, we will be creating a simple “Student Database Management system” in which, we can insert, update, delete and view the student details.
Application
Step by Step Implementation
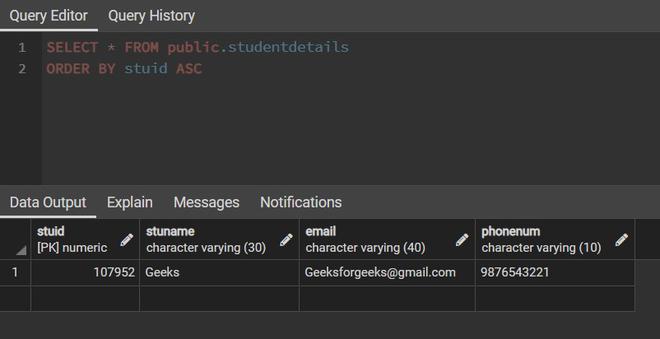
Step 1: Create Table in PostgreSQL
- Create a Table studentdetails to store details of students.
- Add columns, stuid- to store student id, stuname – to store student name, email – to store email id of student and phonenum – to store phone number of student. And insert some data into the table.
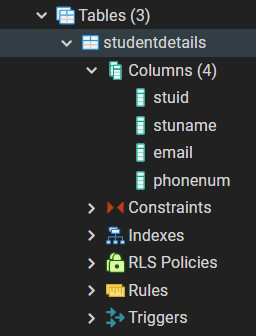
Table and columns
Step 2: Create a Dynamic web project in Eclipse
- In Eclipse IDE, create a Dynamic web project as the below project structure.
- To connect with PostgreSQL DB, add “postgresql-42.2.18.jar” in the project under “WEB-INF/lib” folder.
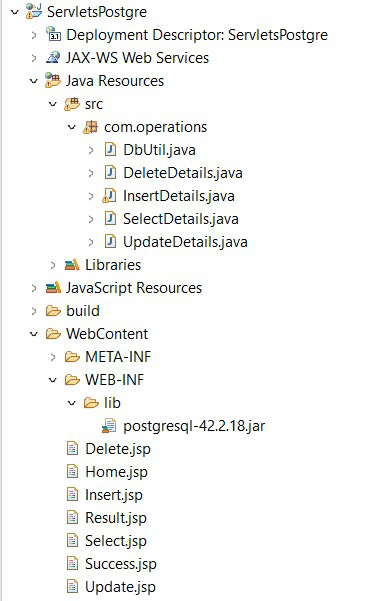
Project Structure
Step 3: Create required JSP’s to get the details from the student
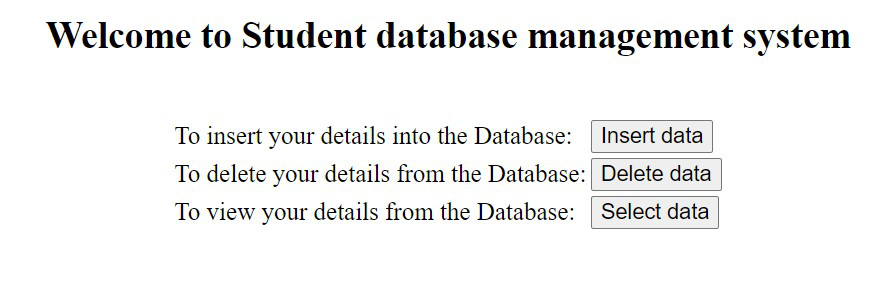
Home.jsp
This is the welcome page of the project. On this page, we will be displaying the different types of operations such as Insert, Delete and Select data on the Student details.
HTML
<%@ page language="java" contentType="text/html; charset=ISO-8859-1"
pageEncoding="ISO-8859-1"%>
<html>
<head>
<meta http-equiv="Content-Type" content="text/html; charset=ISO-8859-1">
<title>Welcome Page</title>
</head>
<body>
<h2 align="center">Welcome to Student database management system</h2>
<br />
<table align="center">
<tr>
<td>To insert your details into the Database:</td>
<td><input type="button" value="Insert data"
onclick="window.location.href='Insert.jsp'" /></td>
</tr>
<tr>
<td>To delete your details from the Database:</td>
<td><input type="button" value="Delete data"
onclick="window.location.href='Delete.jsp'" /></td>
</tr>
<tr>
<td>To view your details from the Database:</td>
<td><input type="button" value="Select data"
onclick="window.location.href='Select.jsp'" /></td>
</tr>
</table>
</body>
</html>
|
Based on the student selection, the respective JSP page will be displayed.
Insert.jsp
This page takes the required values from the student – Student Id, Student Name, Email Id, and Phone number and submits the page to Insert servlet to store the values in DB.
HTML
<%@ page language="java" contentType="text/html; charset=ISO-8859-1"
pageEncoding="ISO-8859-1"%>
<html>
<head>
<meta http-equiv="Content-Type" content="text/html; charset=ISO-8859-1">
<title>Insert Details</title>
</head>
<body>
<h2>Fill in the details</h2>
<form action="./InsertDetails" method="post">
<table>
<tr>
<td>ID:</td>
<td><input type="text" name="id" maxlength="6" size="7" /></td>
</tr>
<tr>
<td>Name:</td>
<td><input type="text" name="name" maxlength="30" size="25" /></td>
</tr>
<tr>
<td>Email Id:</td>
<td><input type="text" name="email" maxlength="40" size="35" /></td>
</tr>
<tr>
<td>Phone Number:</td>
<td><input type="text" name="phnum" maxlength="10" size="11" /></td>
</tr>
<tr />
</table>
<br /> <input type="submit" value="Insert Data" />
</form>
<br />
<input type="button" value="Return to Home"
onclick="window.location.href='Home.jsp'" />
</body>
</html>
|
Based on the action and method specified, it will map the respective servlet and go to the doPost method() in that servlet.
Delete.jsp
To delete the student information from DB, we need the ID of the student. This page takes the id from the student and submits the value to the Delete servlet.
HTML
<%@ page language="java" contentType="text/html; charset=ISO-8859-1"
pageEncoding="ISO-8859-1"%>
<html>
<head>
<meta http-equiv="Content-Type" content="text/html; charset=ISO-8859-1">
<title>Delete Details</title>
</head>
<body>
<form action="./DeleteDetails" method="post">
<table>
<tr>
<td>Enter ID:</td>
<td><input type="text" name="id" maxlength="6" size="7" /></td>
</tr>
</table>
<br /> <input type="submit" value="Delete Data" />
</form>
<br />
<input type="button" value="Return to Home"
onclick="window.location.href='Home.jsp'" />
</body>
</html>
|
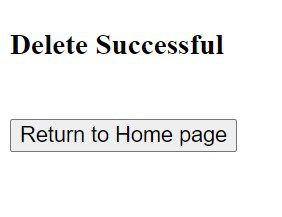
Success.jsp
To display the success message after insert, update and delete operations.
HTML
<%@ page language="java" contentType="text/html; charset=ISO-8859-1"
pageEncoding="ISO-8859-1"%>
<html>
<head>
<meta http-equiv="Content-Type" content="text/html; charset=ISO-8859-1">
<title>Success Page</title>
</head>
<body>
<form action="Home.jsp">
<h3>
<%=request.getParameter("msg")%>
Successful
</h3>
<br /> <input type="submit" value="Return to Home page" />
</form>
</body>
</html>
|
After successful insertion or deletion of the values, this page will display the success message to the UI.
Select.jsp
To populate the student information from DB, we need the ID of the student. This page takes the id provided and submits it to the Select servlet to fetch the details.
HTML
<%@ page language="java" contentType="text/html; charset=ISO-8859-1"
pageEncoding="ISO-8859-1"%>
<html>
<head>
<meta http-equiv="Content-Type" content="text/html; charset=ISO-8859-1">
<title>Select Details</title>
</head>
<body>
<form action="./SelectDetails" method="get">
<table>
<tr>
<td>Enter ID:</td>
<td><input type="text" name="id" maxlength="6" size="7" /></td>
</tr>
</table>
<br /> <input type="submit" value="View Data" />
</form>
<br />
<input type="button" value="Return to Home"
onclick="window.location.href='Home.jsp'" />
</body>
</html>
|
Result.jsp
This page is to populate the student information in the UI. To display the result set of the student details based on the given id.
HTML
<%@ page language="java" contentType="text/html; charset=ISO-8859-1"
pageEncoding="ISO-8859-1"%>
<html>
<head>
<meta http-equiv="Content-Type" content="text/html; charset=ISO-8859-1">
<title>Student Details - Result</title>
</head>
<body>
<h2>Details</h2>
<form>
<input type="hidden" name="stid"
value="<%=request.getParameter("id")%>">
<table>
<tr>
<td>ID:</td>
<td><%=request.getParameter("id")%></td>
</tr>
<tr>
<td>Name:</td>
<td><%=request.getParameter("name")%></td>
</tr>
<tr>
<td>Email Id:</td>
<td><%=request.getParameter("email")%></td>
</tr>
<tr>
<td>Phone Number:</td>
<td><%=request.getParameter("phone")%></td>
</tr>
<tr />
</table>
<br />
</form>
<br />
<input type="button" value="Update data" onclick="update()" />
<br />
<input type="button" value="Return to Home"
onclick="window.location.href='Home.jsp'" />
</body>
<script language="javascript" type="text/javascript">
function update() {
var sid = document.forms[0].elements['stid'].value;
window.location.href = "Update.jsp?id=" + sid;
}
</script>
</html>
|
Update.jsp
Once the information is populated, if the student wants to update their details, this page takes the updated information from the student and submits it to the Update servlet.
HTML
<%@ page language="java" contentType="text/html; charset=ISO-8859-1"
pageEncoding="ISO-8859-1"%>
<html>
<head>
<meta http-equiv="Content-Type" content="text/html; charset=ISO-8859-1">
<title>Update Details</title>
</head>
<body>
<h2>Fill in your details</h2>
<form action="./UpdateDetails" method="post">
<table>
<tr>
<td>ID:</td>
<td><input type="text" name="id"
value="<%=request.getParameter("id")%>" readonly="readonly">
</td>
</tr>
<tr>
<td>Name:</td>
<td><input type="text" name="name" maxlength="30" size="25" /></td>
</tr>
<tr>
<td>Email Id:</td>
<td><input type="text" name="email" maxlength="40" size="35" /></td>
</tr>
<tr>
<td>Phone Number:</td>
<td><input type="text" name="phnum" maxlength="10" size="11" /></td>
</tr>
<tr />
</table>
<br /> <input type="submit" value="Update Data" />
</form>
<br />
<input type="button" value="Return to Home"
onclick="window.location.href='Home.jsp'" />
</body>
</html>
|
We are making the ID value as read-only so that it won’t be changed and the information will be updated with respect to the ID value.
Step 4: Create DBUtil.java
To establish a JDBC connection with PostgreSQL, we need to specify the driver, URL, username, and password objects of the PostgreSQL. In order to reuse these objects in all the servlets to make a connection with the DB, we can provide these values in separate class like below.
Java
public class DbUtil {
public static String user = "root";
public static String password = "root";
public static String driver = "org.postgresql.Driver";
}
|
Instead of using a java class, we can specify these values in the properties file also.
Step 5: Create respective servlet classes
Servlet classes and JSP pages can be mapped through the web.xml(deployment descriptor) or by using annotations. In this example, we are using @WebServlet annotation to map the jsp pages to their respective servlets. To work with servlets, we need to extend the java class from HttpServlet.
InsertDetails.java
When the student enters the data through Insert.jsp and submits the page to insert the details into DB, based on the URL “/InsertDetails” in JSP page, InsertDetails.java servlet class will be mapped and executed.
Java
import java.io.IOException;
import java.sql.Connection;
import java.sql.DriverManager;
import java.sql.PreparedStatement;
import javax.servlet.ServletException;
import javax.servlet.annotation.WebServlet;
import javax.servlet.http.HttpServlet;
import javax.servlet.http.HttpServletRequest;
import javax.servlet.http.HttpServletResponse;
@WebServlet("/InsertDetails")
public class InsertDetails extends HttpServlet {
private static final long serialVersionUID = 1L;
protected void doPost(HttpServletRequest request, HttpServletResponse response)
throws ServletException, IOException {
try {
Class.forName(DbUtil.driver);
} catch (ClassNotFoundException e) {
System.out.println("Class not found " + e);
}
try {
Connection conn = DriverManager.getConnection(DbUtil.url, DbUtil.user, DbUtil.password);
System.out.println("connection successful");
PreparedStatement st = conn.prepareStatement("insert into studentdetails values(?, ?, ?, ?)");
st.setInt(1, Integer.valueOf(request.getParameter("id")));
st.setString(2, request.getParameter("name"));
st.setString(3, request.getParameter("email"));
st.setString(4, request.getParameter("phnum"));
st.executeUpdate();
st.close();
conn.close();
response.sendRedirect("Success.jsp?msg=Insert");
} catch (Exception e) {
e.printStackTrace();
}
}
}
|
- We need to import all the required packages for the servlet and JDBC connection.
- To insert the details, we need to use the doPost method of the servlet class.
- First, establish the JDBC connection inside the try/catch block to handle the exception if arises.
- Using Class.forName(), load the PostgreSQL driver.
- Then using Connection and DriverManager object, get the connection to the PostgreSQL server.
- Prepare statement object with the insert query and set the student information into respective parameters and execute the query.
- Once the query is executed, close the statement and connection object to avoid resource leak.
- Then redirect the page to Success.jsp page with a successful message to display on the screen.
DeleteDetails.java
Same as the insert operation delete servlet also will be mapped based on the URL specified. When a student enters the ID value to delete the student information, DeleteDetails.java servlet class will be mapped and executed.
Java
import java.io.IOException;
import java.sql.Connection;
import java.sql.DriverManager;
import java.sql.PreparedStatement;
import javax.servlet.ServletException;
import javax.servlet.annotation.WebServlet;
import javax.servlet.http.HttpServlet;
import javax.servlet.http.HttpServletRequest;
import javax.servlet.http.HttpServletResponse;
@WebServlet("/DeleteDetails")
public class DeleteDetails extends HttpServlet {
private static final long serialVersionUID = 1L;
protected void doPost(HttpServletRequest request, HttpServletResponse response)
throws ServletException, IOException {
try {
Class.forName(DbUtil.driver);
} catch (ClassNotFoundException e) {
System.out.println("Class not found " + e);
}
try {
Connection conn = DriverManager.getConnection(DbUtil.url, DbUtil.user, DbUtil.password);
System.out.println("connection successful");
PreparedStatement st = conn.prepareStatement("delete from studentdetails where stuid=?");
st.setInt(1, Integer.valueOf(request.getParameter("id")));
st.executeUpdate();
st.close();
conn.close();
response.sendRedirect("Success.jsp?msg=Delete");
} catch (Exception e) {
e.printStackTrace();
}
}
}
|
- As specified in the insert servlet, the same way delete the servlet also will work.
- First, establish JDBC connection and prepare to delete statement which takes an ID as an input parameter.
- Once the delete operation is completed, display the success message in the UI.
SelectDetails.java
To populate the student information based on the ID submitted.
Java
import java.io.IOException;
import java.sql.Connection;
import java.sql.DriverManager;
import java.sql.PreparedStatement;
import java.sql.ResultSet;
import javax.servlet.ServletException;
import javax.servlet.annotation.WebServlet;
import javax.servlet.http.HttpServlet;
import javax.servlet.http.HttpServletRequest;
import javax.servlet.http.HttpServletResponse;
@WebServlet("/SelectDetails")
public class SelectDetails extends HttpServlet {
private static final long serialVersionUID = 1L;
protected void doGet(HttpServletRequest request, HttpServletResponse response)
throws ServletException, IOException {
try {
Class.forName(DbUtil.driver);
} catch (ClassNotFoundException e) {
System.out.println("Class not found " + e);
}
try {
int id = 0;
String name = "", email = "", ph = "";
Connection conn = DriverManager.getConnection(DbUtil.url, DbUtil.user, DbUtil.password);
System.out.println("connection successful");
PreparedStatement st = conn.prepareStatement("select * from studentdetails where stuid=?");
st.setInt(1, Integer.valueOf(request.getParameter("id")));
ResultSet rs = st.executeQuery();
while (rs.next()) {
id = rs.getInt(1);
name = rs.getString(2);
email = rs.getString(3);
ph = rs.getString(4);
}
rs.close();
st.close();
conn.close();
response.sendRedirect("Result.jsp?id=" + id + "&name=" + name + "&email=" + email + "&phone=" + ph);
} catch (Exception e) {
e.printStackTrace();
}
}
}
|
- Here, we are fetching the details, so we need to use the doGet() method of the servlet class.
- Establish a JDBC connection and prepare a select statement with ID as input parameter and get all the details.
- In order to display this information, send these values to the Result.jsp page.
UpdateDetails.java
If the student wants to update any information, then we need to get the respective ID and perform the operation.
Java
import java.io.IOException;
import java.sql.Connection;
import java.sql.DriverManager;
import java.sql.PreparedStatement;
import javax.servlet.ServletException;
import javax.servlet.annotation.WebServlet;
import javax.servlet.http.HttpServlet;
import javax.servlet.http.HttpServletRequest;
import javax.servlet.http.HttpServletResponse;
@WebServlet("/UpdateDetails")
public class UpdateDetails extends HttpServlet {
private static final long serialVersionUID = 1L;
protected void doPost(HttpServletRequest request, HttpServletResponse response)
throws ServletException, IOException {
try {
Class.forName(DbUtil.driver);
} catch (ClassNotFoundException e) {
System.out.println("Class not found " + e);
}
try {
Connection conn = DriverManager.getConnection(DbUtil.url, DbUtil.user, DbUtil.password);
System.out.println("connection successful");
PreparedStatement st = conn
.prepareStatement("update studentdetails set stuname=?, email=?, phonenum=? where stuid=?");
st.setString(1, request.getParameter("name"));
st.setString(2, request.getParameter("email"));
st.setString(3, request.getParameter("phnum"));
st.setInt(4, Integer.valueOf(request.getParameter("id")));
st.executeUpdate();
st.close();
conn.close();
response.sendRedirect("Success.jsp?msg=Update");
} catch (Exception e) {
e.printStackTrace();
}
}
}
|
- We are updating the student information, hence the doPost() method is called.
- Establish JDBC connection and prepare update statement passing ID as the input parameter.
- Execute the query and display the success message in the UI.
Step 6: Run the Application
Now, run the application using Run As -> Run on Server. The application will be deployed on the Tomcat server. Run the URL, http://localhost:8081/ServletsPostgre/Home.jsp, in the browser to get the home page of the application.
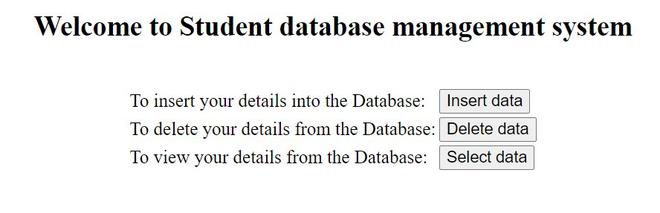
Home.jsp
- To insert the details, click on Insert data. On clicking, redirects to Insert.jsp page and displays below UI.
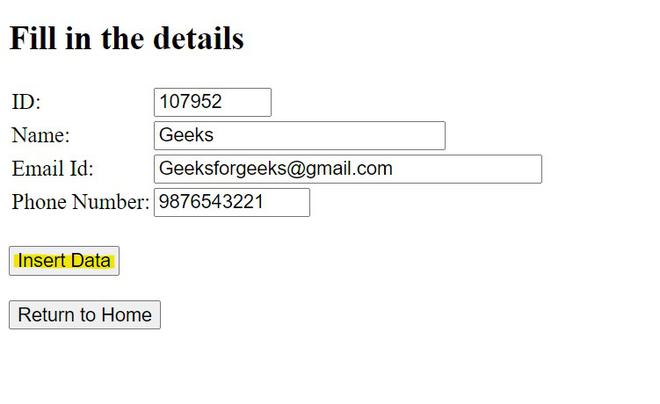
Insert.jsp
- Enter all the details and click on Insert Data.
- After successful insertion, a success message will be displayed on the screen.
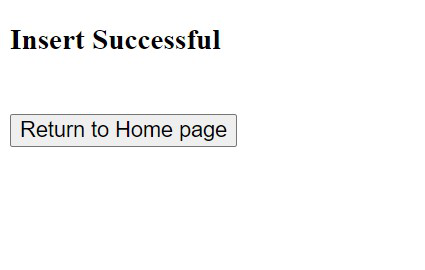
Successful message
- Return to the home page.
- Check if the data is inserted successfully in PostgreSQL DB.
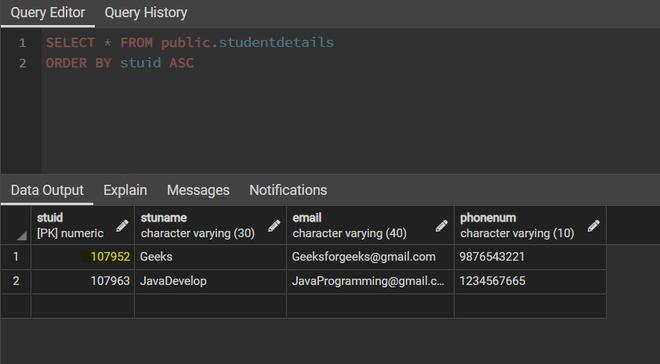
Insertion
- To fetch the values from the DB, click on Select Data on the Home page.
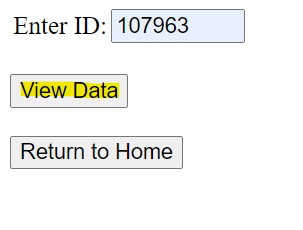
Select.jsp
- Enter the ID which you want to fetch the details and click View data.
- The result will be displayed on the Result.jsp page.
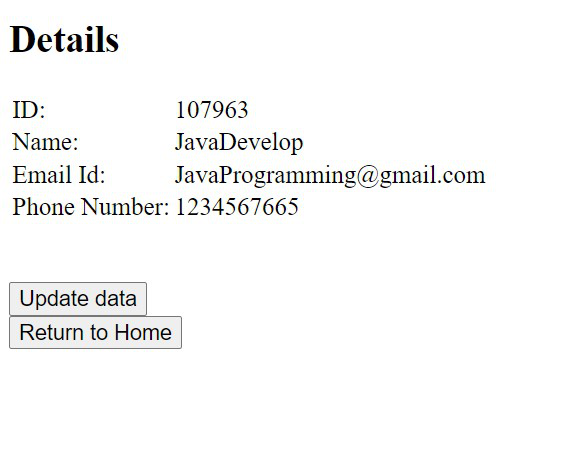
Student_info
- If the data needs to be updated, click on Update Data, or if don’t just return to the home page.
- If we click on update data, redirect to the Update.jsp page.

Update.jsp
- Here, the Id will be displayed on the load of the page and will be read-only.
- Update the data and click on update data. After updating success message will be displayed.
- Check if the data is updated in PostgreSQL DB.
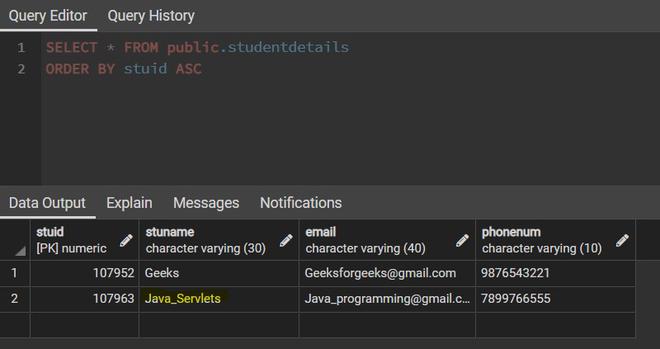
Updated_details
- Finally, to delete the data from DB, click on Delete data on the home page.
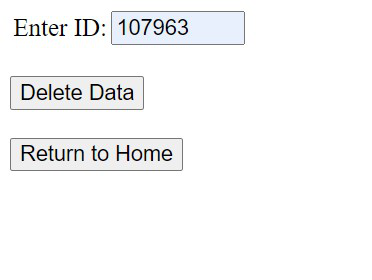
Delete.jsp
- Enter the ID which has to be deleted and click on Delete Data.
- The information will be deleted from the DB and a success message will be displayed as below.
Deletion_successful
- Check in the DB if the information is deleted.
After delete operation
In this way, we can perform all the insert, update, delete and select operations using Servlets with JDBC.
Like Article
Suggest improvement
Share your thoughts in the comments
Please Login to comment...