ReactJS Calculator App (Building UI)
Last Updated :
27 Sep, 2023
We created our first app and deleted all those files we did not need, and created some of the files that we will need in the future. Now as we stand in our current situation we have a blank canvas before us where we will have to create our calculator app.
We will be creating the project in multiple steps with a component approach and each file code is given below for you, so let’s start building the project.
- Create a calculatorTitle.js file for showing the title of the calculator and paste the code given below for this file.
Javascript
import React from "react";
const CalculatorTitle = (props) => {
return (
<div className="calculator-title">{props.value}</div>
);
};
export default CalculatorTitle;
|
- Now create a file outputScreenRow.js for taking input and showing the output of the calculation, code of this file is given below.
Javascript
import React from "react";
const OutputScreenRow = () => {
return (
<div className="screen-row">
<input type="text" readOnly />
</div>
);
};
export default OutputScreenRow;
|
- Create an outputScreen.js file and import the outputScreenRow.js file. The code of this file is given below.
Javascript
import React from "react";
import OutputScreenRow from "./outputScreenRow.js";
const OutputScreen = () => {
return (
<div className="screen">
<OutputScreenRow />
<OutputScreenRow />
</div>
);
};
export default OutputScreen;
|
- Create a button.js file and paste the code given below.
Javascript
import React from "react";
const Button = (props) => {
return (
<input type="button" value={props.label} />
);
};
export default Button;
|
- Now create a calculator.js file and import calculatorTitle.js, outputScreen.js, and button.js files. The code for this program is below.
Javascript
import React from "react";
import CalculatorTitle from "./calculatorTitle.js";
import OutputScreen from "./outputScreen.js";
import Button from "./button.js";
class Calculator extends React.Component {
render() {
return (
<div className="frame">
<CalculatorTitle value="GeeksforGeeks Calculator" />
<div class="mainCalc">
<OutputScreen />
<div className="button-row">
<Button label={"Clear"} />
<Button label={"Delete"} />
<Button label={"."} />
<Button label={"/"} />
</div>
<div className="button-row">
<Button label={"7"} />
<Button label={"8"} />
<Button label={"9"} />
<Button label={"*"} />
</div>
<div className="button-row">
<Button label={"4"} />
<Button label={"5"} />
<Button label={"6"} />
<Button label={"-"} />
</div>
<div className="button-row">
<Button label={"1"} />
<Button label={"2"} />
<Button label={"3"} />
<Button label={"+"} />
</div>
<div className="button-row">
<Button label={"0"} />
<Button label={"="} />
</div>
</div>
</div>
);
}
}
export default Calculator;
|
- Inside the index.js file import, the calculator.js file and the code for this file is given below.
Javascript
import React from "react";
import ReactDOM from "react-dom";
import Calculator from "./components/calculator.js";
ReactDOM.render(<Calculator />, document.getElementById("root"));
|
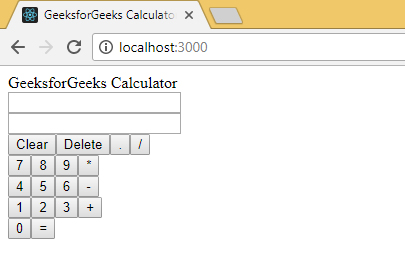
Output: The output of this code will look like the below-given image.
So now we can finally see the output in our browser, but wait this is nothing like what we showed you in the introductory article! Yes, it is nowhere near to be the finished project, it is rather a barebone structure and all it needs is the CSS touch-ups that we will provide in one of the upcoming articles, but before that, we have to implement the working logic of this calculator so that at least it works before we transform this rigid design into some eye-catching masterpiece or at least a decent model. ReactJS | Calculator App ( Adding Functionality )
Like Article
Suggest improvement
Share your thoughts in the comments
Please Login to comment...