Razorpay Integration in Django
Last Updated :
08 Sep, 2022
Payments are an integral part of the online ecosystem, be it at e-commerce stores to process the orders or a simple donation to someone. Integrating a payment gateway into your website can be a tedious process. Let us have a look at how you can integrate Razorpay into a Django website.
What are we building?
We will build a basic replica of Buy Me Coffee, uhh Buy Me Chai 😉 where users can give donations to us.
The integration process though remains the same for whatever you are building. Let’s break down the whole process into simple steps.
Step 1: Initiate the Django project
Make sure you are done with the django installation. Create a new project called dj_razorpay and then start a new app called payment. Add “payment” to the list of installed_apps in the settings.py file. Also, apply the migrations.
INSTALLED_APPS = [
    ...
    'payment',
    ...
]
Step 2: Get Razorpay Keys
First, create an account on Razorpay’s website, you simply have to signup with your email and password and add some basic information such as your phone number.
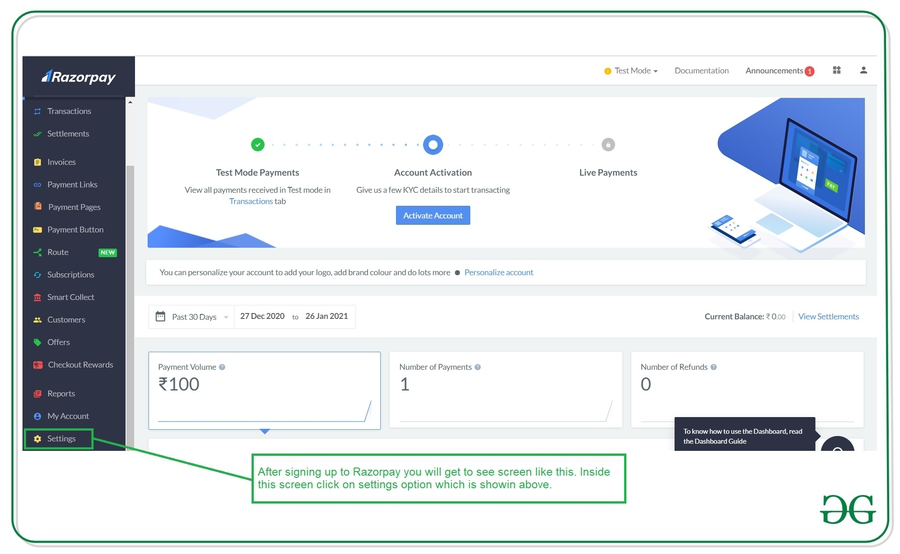
Inside the setting screen, click on Create a new key option your key will be generated. You will get Key ID and Key Secret. Currently our payments will be in “test mode” i.e no real transaction would happen and the payment options are also limited. To accept real money and unlock more payment options you need to complete your KYC and provide your bank details. The integration process remains the same irrespective of the mode.
Note: You will be shown the Key Secret only once, so immediately copy it somewhere.
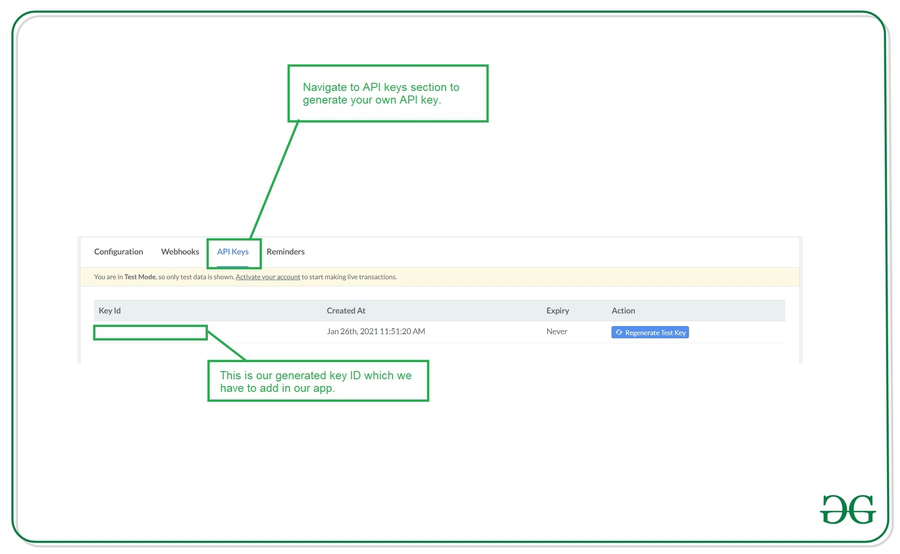
Now add the Key Id and Key Secret to settings.py file.
RAZOR_KEY_ID = YOUR_KEY_ID
RAZOR_KEY_SECRET = YOUR_KEY_SECRET
Before we move ahead let’s install razorpay’s python package.
pip install razorpay
Step 3: Views.py
- This is the main step of the process. First, we need to understand how payment works in Razorpay.
- Create a Razor Order from our Django Server.
- Pass Order Id and Other Options to the Frontend.
- The user clicks the payment button and pays with one of the payment methods.
- Razorpay handles Payment Success and Failure.
- On Failure, Razorpay facilitates retry of the payments.
- On Success, Razorpay makes a post request to a callback URL on our server.
- Verify the payment signature, to confirm that payment is authentic and isn’t tampered with.
- Once verified, capture the payment and render the success page.
See code comments for more details.
Note: Amount in Razorpay works in subunits of currency i.e Rs 500 would become 50000 paise.
Python3
from django.shortcuts import render
import razorpay
from django.conf import settings
from django.views.decorators.csrf import csrf_exempt
from django.http import HttpResponseBadRequest
razorpay_client = razorpay.Client(
auth=(settings.RAZOR_KEY_ID, settings.RAZOR_KEY_SECRET))
def homepage(request):
currency = 'INR'
amount = 20000
razorpay_order = razorpay_client.order.create(dict(amount=amount,
currency=currency,
payment_capture='0'))
razorpay_order_id = razorpay_order['id']
callback_url = 'paymenthandler/'
context = {}
context['razorpay_order_id'] = razorpay_order_id
context['razorpay_merchant_key'] = settings.RAZOR_KEY_ID
context['razorpay_amount'] = amount
context['currency'] = currency
context['callback_url'] = callback_url
return render(request, 'index.html', context=context)
@csrf_exempt
def paymenthandler(request):
if request.method == "POST":
try:
payment_id = request.POST.get('razorpay_payment_id', '')
razorpay_order_id = request.POST.get('razorpay_order_id', '')
signature = request.POST.get('razorpay_signature', '')
params_dict = {
'razorpay_order_id': razorpay_order_id,
'razorpay_payment_id': payment_id,
'razorpay_signature': signature
}
result = razorpay_client.utility.verify_payment_signature(
params_dict)
if result is not None:
amount = 20000
try:
razorpay_client.payment.capture(payment_id, amount)
return render(request, 'paymentsuccess.html')
except:
return render(request, 'paymentfail.html')
else:
return render(request, 'paymentfail.html')
except:
return HttpResponseBadRequest()
else:
return HttpResponseBadRequest()
|
Note: It is necessary to capture the payment, otherwise it would be auto refunded to the payer.
Now map the above views to the urls in the urls.py.
Python3
from django.contrib import admin
from django.urls import path
from payment import views
urlpatterns = [
path('', views.homepage, name='index'),
path('paymenthandler/', views.paymenthandler, name='paymenthandler'),
path('admin/', admin.site.urls),
]
|
Step 4: Frontend
We need to pass the Razorpay order id and other options mentioned in the previous step. First load the Razorpay’s javascript code that would render the payment window and initialize it with the options received from the backend. Add an event listener to the payment button so the payment window gets opened once it is clicked.
Here we are rendering the payment button on the homepage itself. We would also need another two pages for payment success and failure.
HTML
<!DOCTYPE html>
<html lang="en">
<head>
<meta charset="UTF-8" />
<meta http-equiv="X-UA-Compatible" content="IE=edge" />
<meta name="viewport" content="width=device-width, initial-scale=1.0" />
<title>GFG</title>
<style>
* {
box-sizing: border-box;
padding: 0px;
margin: 0px;
font-family: cursive;
}
html,
body {
height: 100%;
}
body {
background-color: #f1f5f8;
display: flex;
justify-content: center;
align-items: center;
}
.card {
background-color: white;
padding: 25px;
border: 1px solid #bbbbbb;
border-radius: 5px;
box-shadow: 1px 1px 10px 0px rgb(0 0 0 / 25%);
}
.title {
text-align: center;
letter-spacing: 1px;
}
.muted {
color: #8e7f7f;
display: block;
margin-bottom: 10px;
text-align: center;
}
.btn_container {
padding: 20px;
text-align: center;
}
.btn {
border-radius: 4px;
cursor: pointer;
padding: 4px 8px;
background-color: #ffaaa7;
color: white;
font-size: 1.2em;
font-weight: 600;
letter-spacing: 1px;
}
</style>
</head>
<body>
<div class="card">
<h1 class="title">Buy Me a Chai ☕</h1>
<small class="muted"
>If you like my work, you can support me by donating ₹200</small
>
<div class="btn_container">
<button class="btn" id="pay-btn">Donate❤️</button>
</div>
</div>
</body>
<script>
var options = {
// Enter the Key ID generated from the Dashboard
key: "{{ razorpay_merchant_key }}",
// Amount is in currency subunits.
// Default currency is INR. Hence,
// 50000 refers to 50000 paise
amount: "{{ razorpay_amount }}",
currency: "{{ currency }}",
// Your/store name.
name: "Dj Razorpay",
// Pass the `id` obtained in the response of Step 1
order_id: "{{ razorpay_order_id }}",
callback_url: "{{ callback_url }}",
};
// initialise razorpay with the options.
var rzp1 = new Razorpay(options);
// add event listener to the payment button.
document.getElementById("pay-btn").onclick = function (e) {
rzp1.open();
e.preventDefault();
};
</script>
</html>
|
Step 5: Testing
Now let’s fire up the server and check if everything is working fine!
python manage.py runserver
We successfully received the payment!! You can check these payments in Razorpay’s dashboard.
Like Article
Suggest improvement
Share your thoughts in the comments
Please Login to comment...