Python | Progressbar widget in kivy using .kv file
Last Updated :
07 Feb, 2020
Kivy is a platform-independent GUI tool in Python. As it can be run on Android, IOS, linux and Windows etc. It is basically used to develop the Android application, but it does not mean that it can not be used on Desktops applications.
👉🏽 Kivy Tutorial – Learn Kivy with Examples.
Progressbar Widget:
ProgressBar widget is used to visualize the progress of some task. Only the horizontal mode is currently supported: the vertical mode is not yet available. The progress bar has no interactive elements and is a display-only widget.
To work with the progressbar widget you must have to import it by the command:
from kivy.uix.progressbar import ProgressBar
The progress bar take takes two arguments:
1) max: Maximum value allowed for value. It is a Numericproperty and defaults to 100.
2) value: Current Value for the slider
Basic Approach:

1) import kivy
2) import kivyApp
3) import progressbar
4) import Boxlayout(according to need)
5) Set minimum version(optional)
6) Create Layout class:
7) Create App class
8) Create .kv file:
         1) Add progress bar
         2) Add label
         3) Add canvas if you want as i did
8) return Layout/widget/Class(according to requirement)
9) Run an instance of the class
Implementation of the Approach:
.py file
import kivy
from kivy.app import App
kivy.require('1.9.0')
from kivy.uix.label import Label
from kivy.uix.progressbar import ProgressBar
from kivy.uix.boxlayout import BoxLayout
class ProgBar(BoxLayout):
pass
class mainApp(App):
def build(self):
return ProgBar()
if __name__=='__main__':
mainApp().run()
|
.kv file
<ProgBar>:
orientation: 'vertical'
canvas:
Color:
rgb: .45, .28, .5
Rectangle:
pos: self.pos
size: self.size
Label:
text: '[size = 40px]Progress Bar 1 (at .25)'
color: .5, 0, .5, 1
markup: True
ProgressBar:
value: .25
min: 0
max: 1
pos_hint: {'x':.1}
size_hint_x: .8
Label:
text: '[size = 40px]Progress Bar 2 (at .55)'
color: .5, 0, .5, 1
markup: True
ProgressBar:
value: .55
min: 0
max: 1
pos_hint: {'x':.1}
size_hint_x: .8
|
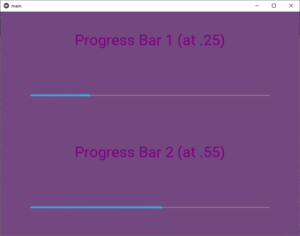
Output:
Share your thoughts in the comments
Please Login to comment...