Python OpenCV – Smoothing and Blurring
Last Updated :
03 Jan, 2023
In this article, we are going to learn about smoothing and blurring with python-OpenCV.
When we are dealing with images at some points the images will be crisper and sharper which we need to smoothen or blur to get a clean image, or sometimes the image will be with a really bad edge which also we need to smooth it down to make the image usable. In OpenCV, we got more than one method to smooth or blur an image, let’s discuss them one by one.
Method 1: With 2D Convolution
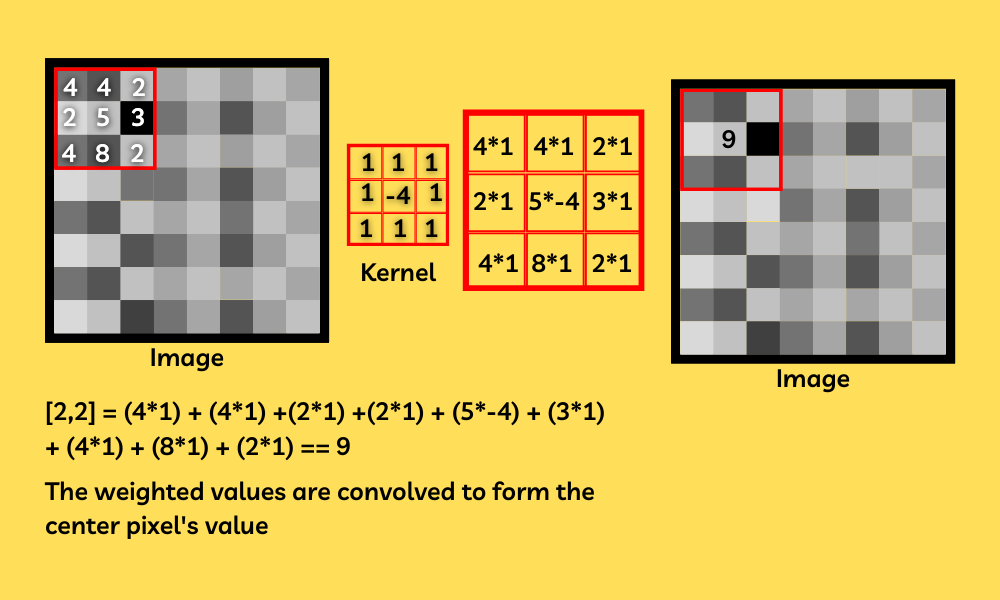
In this method of smoothing, we have complete flexibility over the filtering process because we will be using our custom-made kernel [a simple 2d matrix of NumPy array which helps us to process the image by convolving with the image pixel by pixel]. A kernel basically will give a specific weight for each pixel in an image and sum up the weighted neighbor pixels to form a pixel, with this method we will be able to compress the pixels in an image and thus we can reduce the clarity of an image, By this method, we can able to smoothen or blur an image easily.
Note: By using these kernels [2d matrices] we can perform many functions like sharpening and edge detecting an image. But remember each process has a different kernel i.e., different values of matrices. The kernel we are going to use in this article is a 5 by 5 averaging kernel which is basically a matrix of ones which in whole divided by 25, Which will look like,

To smoothen an image with a custom-made kernel we are going to use a function called filter2D() which basically helps us to convolve a custom-made kernel with an image to achieve different image filters like sharpening and blurring and more.
Syntax: filter2D(sourceImage, ddepth, kernel)
Code:
Python3
import cv2
import numpy as np
image = cv2.imread('image.png')
kernel2 = np.ones((5, 5), np.float32)/25
img = cv2.filter2D(src=image, ddepth=-1, kernel=kernel2)
cv2.imshow('Original', image)
cv2.imshow('Kernel Blur', img)
cv2.waitKey()
cv2.destroyAllWindows()
|
Output:

Method 2: With pre-built functions
OpenCV comes with many prebuilt blurring and smoothing functions let us see them in brief,
1. Averaging:
Syntax: cv2.blur(image, shapeOfTheKernel)
- Image– The image you need to smoothen
- shapeOfTheKernel– The shape of the matrix-like 3 by 3 / 5 by 5
The averaging method is very similar to the 2d convolution method as it is following the same rules to smoothen or blur an image and uses the same type of kernel which will basically set the center pixel’s value to the average of the kernel weighted surrounding pixels. And by this, we can greatly reduce the noise of the image by reducing the clarity of an image by replacing the group of pixels with similar values which is basically similar color. We can greatly reduce the noise of the image and smoothen the image. The kernel we are using for this method is the desired shape of a matrix with all the values as “1” and the whole matrix is divided by the number of values in the respective shape of the matrix [which is basically averaging the kernel weighted values in the pixel range]. The kernel we used in this example is,

Code:
Python3
import cv2
import numpy as np
image = cv2.imread('image.png')
averageBlur = cv2.blur(image, (5, 5))
cv2.imshow('Original', image)
cv2.imshow('Average blur', averageBlur)
cv2.waitKey()
cv2.destroyAllWindows()
|
Output:

2. Gaussian Blur:
Syntax: cv2. GaussianBlur(image, shapeOfTheKernel, sigmaX )
- Image– the image you need to blur
- shapeOfTheKernel– The shape of the matrix-like 3 by 3 / 5 by 5
- sigmaX– The Gaussian kernel standard deviation which is the default set to 0
In a gaussian blur, instead of using a box filter consisting of similar values inside the kernel which is a simple mean we are going to use a weighted mean. In this type of kernel, the values near the center pixel will have a higher weight. With this type of blurs, we will probably get a less blurred image but a natural blurred image which will look more natural because it handles the edge values very well. Instead of averaging the weighted sum of the pixels here, we will divide it with a specific value which is 16 in the case of a 3 by 3 shaped kernel which will look like this.

Note: We can achieve the same result when we use this exact same kernel in the filter2D() function but in this case, we don’t need to create the kernel because this function automatically will do it for us.
Code:
Python3
import cv2
import numpy as np
image = cv2.imread('image.png')
gaussian = cv2.GaussianBlur(image, (3, 3), 0)
cv2.imshow('Original', image)
cv2.imshow('Gaussian blur', gaussian)
cv2.waitKey()
cv2.destroyAllWindows()
|
Output:

3. Median blur:
Syntax: cv. medianBlur(image, kernel size)
- Image– The image we need to apply the smoothening
- KernelSize– the size of the kernel as it always takes a square matrix the value must be a positive integer more than 2.
Note: There are no specific kernel values for this method.
In this method of smoothing, we will simply take the median of all the pixels inside the kernel window and replace the center value with this value. The one positive of this method over the gaussian and box blur is in these two cases the replaced center value may contain a pixel value that is not even present in the image which will make the image’s color different and weird to look, but in case of a median blur though it takes the median of the values that are already present in the image it will look a lot more natural.
Code:
Python3
import cv2
import numpy as np
image = cv2.imread('image.png')
medianBlur = cv2.medianBlur(image, 9)
cv2.imshow('Original', image)
cv2.imshow('Median blur', medianBlur)
cv2.waitKey()
cv2.destroyAllWindows()
|
Output:

4. Bilateral blur:
Syntax: cv2.bilateralFilter(image, diameter, sigmaColor, sigmaSpace)
- Image– The image we need to apply the smoothening
- Diameter– similar to the size of the kernel
- SigmaColor– The number of colors to be considered in the given range of pixels [the higher value represents the increase in the number of colors in the given area of pixels]—Should not keep very high
- SigmaSpace – the space between the biased pixel and the neighbor pixel higher value means the pixels far out from the pixel will manipulate in the pixel value
The smoothening methods we saw earlier are fast but we might end up losing the edges of the image which is not so good. But by using this method, this function concerns more about the edges and smoothens the image by preserving the images. This is achieved by performing two gaussian distributions. This might be very slow while comparing to the other methods we discussed so far.
Code:
Python3
import cv2
import numpy as np
image = cv2.imread('image.png')
bilateral = cv2.bilateralFilter(image, 9, 75, 75)
cv2.imshow('Original', image)
cv2.imshow('Bilateral blur', bilateral)
cv2.waitKey()
cv2.destroyAllWindows()
|
Output:

Like Article
Suggest improvement
Share your thoughts in the comments
Please Login to comment...