Python OpenCV – Pose Estimation
Last Updated :
04 Jan, 2023
What is Pose Estimation?
Pose estimation is a computer vision technique that is used to predict the configuration of the body(POSE) from an image. The reason for its importance is the abundance of applications that can benefit from technology.
Human pose estimation localizes body key points to accurately recognize the postures of individuals given an image. These estimations are performed in either 3D or 2D.
The main process of human pose estimation includes two basic steps: i) localizing human body joints/key points ii) grouping those joints into valid human pose configuration
In the first step, the main focus is on finding the location of each key points of human beings. E.g. Head, shoulder, arm, hand, knee, ankle. The second step is grouping those joints into valid human pose configuration which determines the pairwise terms between body parts.

Fig(b) represents detecting the key points and Fig(a) represents grouping of key points
What is OpenCV ?
OpenCV Python is a library of Python bindings designed to solve computer vision problems. It mainly focuses on image processing, video capture and analysis including features like face detection and object detection.
Use of OpenCV in python :
OpenCV Python is nothing but a wrapper class for the original C++ library to be used with Python. Using this, all the OpenCV array structures gets converted to/from NumPy arrays. This makes it easier to integrate it with other libraries which use NumPy. For example, libraries such as SciPy and Matplotlib.
To know more about OpenCV, https://opencv.org/about/
Datasets you can use:
In datasets selection, COCO and MPII are default picks in recent cases. Especially, COCO is a famous dataset by its property of having very wide human poses and an enormous number of images. LSP and FLIC datasets are also used next to COCO and MPII.
You can download the model weight files using the scripts provided at this location.
Code for Human Pose Estimation in OpenCV
In this section, we will see how to load the trained models in OpenCV and check the outputs. We will discuss code for only single person pose estimation to keep things simple. These outputs can be used to find the pose for every person in a frame if multiple people are present. We will cover the multiple-person case in a future post.
First, download the code and model files from below. There are separate files for Image and Video inputs. Please go through the README file if you encounter any difficulty in running the code.
Step 1: Download Model Weights
Use the getModels.sh file provided with the code to download all the model weights to the respective folders. Note that the configuration proto files are already present in the folders.
Python3
sudo chmod a+x getModels.sh
./getModels.sh
|
Check the folders to ensure that the model binaries (.caffemodel files) have been downloaded. If you are not able to run the above script, then you can download the model by clicking here for the MPII model and here for COCO model.
Step 2: Load Network
We are using models trained on Caffe Deep Learning Framework. Caffe models have 2 files –
- prototxt file which specifies the architecture of the neural network — how the different layers are arranged etc.
- caffemodel file which stores the weights of the trained model
We will use these two files to load the network into memory.
Python3
protoFile = "pose/mpi/pose_deploy_linevec_faster_4_stages.prototxt"
weightsFile = "pose/mpi/pose_iter_160000.caffemodel"
net = cv2.dnn.readNetFromCaffe(protoFile, weightsFile)
|
Step 3: Read Image and Prepare Input to the Network
The input frame that we read using OpenCV should be converted to an input blob (like Caffe) so that it can be fed to the network. This is done using the blobFromImage function which converts the image from OpenCV format to Caffe blob format.
The parameters are to be provided in the blobFromImage function. First, we normalize the pixel values to be in (0,1). Then we specify the dimensions of the image. Next, the Mean value to be subtracted, which is (0,0,0). There is no need to swap the R and B channels since both OpenCV and Caffe use RGB format.
Python3
frame = cv2.imread("single.jpg")
inWidth = 368
inHeight = 368
inpBlob = cv2.dnn.blobFromImage(
frame, 1.0 / 255, (inWidth, inHeight), (0, 0, 0), swapRB=False, crop=False)
net.setInput(inpBlob)
|
Step 4: Make Predictions and Parse Key points
The output is a 4D matrix :
- The first dimension being the image ID ()in case you pass more than one image to the network).
- The second dimension indicates the index of a key point. The model produces Confidence Maps and Part Affinity maps which are all concatenated. For COCO model it consists of 57 parts — 18 key point confidence Maps + 1 background + 19*2 Part Affinity Maps. Similarly, for MPII, it produces 44 points. We will be using only the first few points which correspond to Key points.
- The third dimension is the height of the output map.
- The fourth dimension is the width of the output map.
Once the key points are detected, we just plot them on the image.
Python3
H = out.shape[2]
W = out.shape[3]
points = []
for i in range(len()):
probMap = output[0, i, :, :]
minVal, prob, minLoc, point = cv2.minMaxLoc(probMap)
x = (frameWidth * point[0]) / W
y = (frameHeight * point[1]) / H
if prob > threshold:
cv2.circle(frame, (int(x), int(y)), 15, (0, 255, 255),
thickness=-1, lineType=cv.FILLED)
cv2.putText(frame, "{}".format(i), (int(x), int(
y)), cv2.FONT_HERSHEY_SIMPLEX, 1.4, (0, 0, 255), 3, lineType=cv2.LINE_AA)
points.append((int(x), int(y)))
else:
points.append(None)
cv2.imshow("Output-Keypoints", frame)
cv2.waitKey(0)
cv2.destroyAllWindows()
|
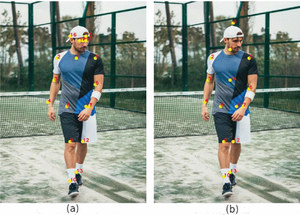
Fig(a) shows the key points plotted using COCO model. Fig(b) shows the key points plotted using MPII model.
Step 5: Draw Skeleton
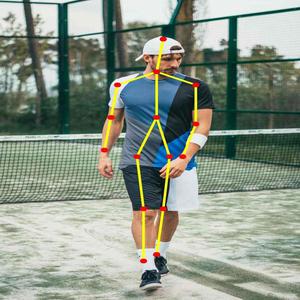
This figure shows the skeleton formed by all the key points joined
Python3
for pair in POSE_PAIRS:
partA = pair[0]
partB = pair[1]
if points[partA] and points[partB]:
cv2.line(frameCopy, points[partA], points[partB], (0, 255, 0), 3)
|
We found that COCO model is 1.5 times slower than the MPI model.
Applications of Pose Estimation :
- Sign languages to help disabled people.
- Human tracking
- Gaming
- Video surveillance
- Advanced Driver Assistance Systems (ADAS)
- Action recognition
REFERENCES:
Like Article
Suggest improvement
Share your thoughts in the comments
Please Login to comment...