Python OpenCV – Filter2D() Function
Last Updated :
03 Jan, 2023
In this article, we are going to see about the filter2d() function from OpenCV. In a nutshell, with this function, we can convolve an image with the kernel (typically a 2d matrix) to apply a filter on the images.
Syntax: filter2D (src, dst, ddepth, kernel)
Parameters:
- Src – The source image to apply the filter on.
- Dst – Name of the output image after applying the filter
- Ddepth – Depth of the output image [ -1 will give the output image depth as same as the input image]
- Kernel – The 2d matrix we want the image to convolve with.
Using this function, we can create a convolution between the image and the given kernel for creating filters like smoothing and blurring, sharpening, and edge detection in an image. This function will simply convolute the 2d matrix with the image at pixel level and produce an output image. To understand this concept, we shall first skim through the concept of the kernel.
Kernel: A simple 2d matrix used in convolution or Convolution Matrix or a mask used to blur, sharpen and edge detect an image.
Working of the kernel: So, how this kernel works? Let’s see, we all know that images are represented as pixel values in OpenCV. These pixels are arranged as a matrix to form an image and as we know that a kernel is a simple 2d matrix with specific values in it based on the function of the kernel like if the kernel is used for blurring and sharpening the images are different.
Let us take an example, In this image take the first 3 rows and columns like a matrix and we have a kernel of 3 by 3 matrix. Each of the pixels in the image has a pixel value (i.e. pixel intensity) as shown. Now the convolution is done by multiplying the values of each pixel value with the kernel value in the respective places and adding all the values which were just weighted by the kernel by multiplying and forming one pixel (the center pixel which in this case it is [2,2]). And this method is repeated for the rest of the pixel value matrices in the image.
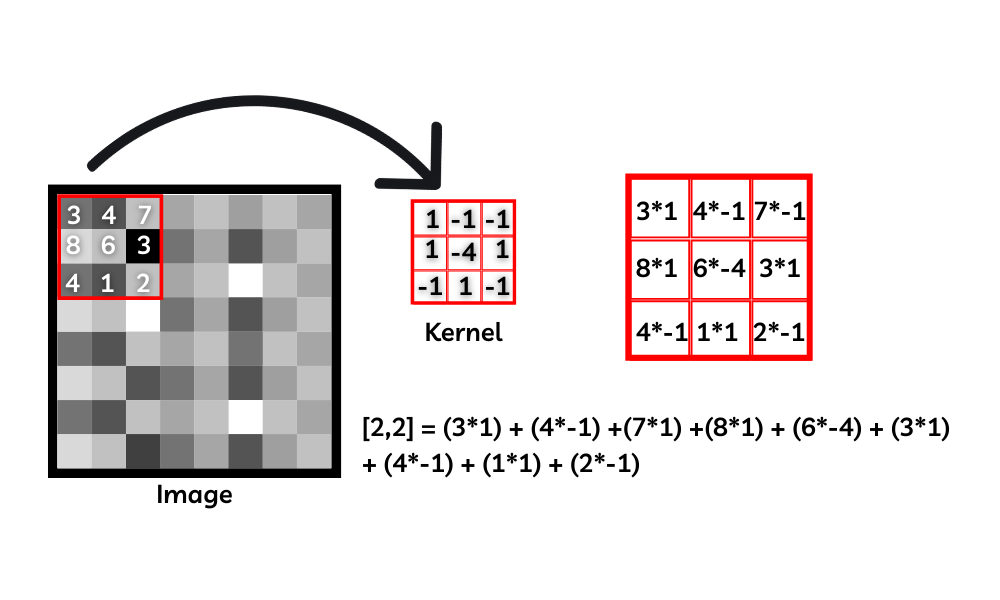
Working of convolution
Note: We have specific kernels [2d convolution matrices] to do specific tasks like blurring, sharpening, and edge detection. And the kernel shown in the image is just an example and not any specific kernel.
Some Common kernels are,
- Identity kernel
- Edge detection kernel
- Sharpening kernel
- Box blurring kernel
- Gaussian blurring kernel
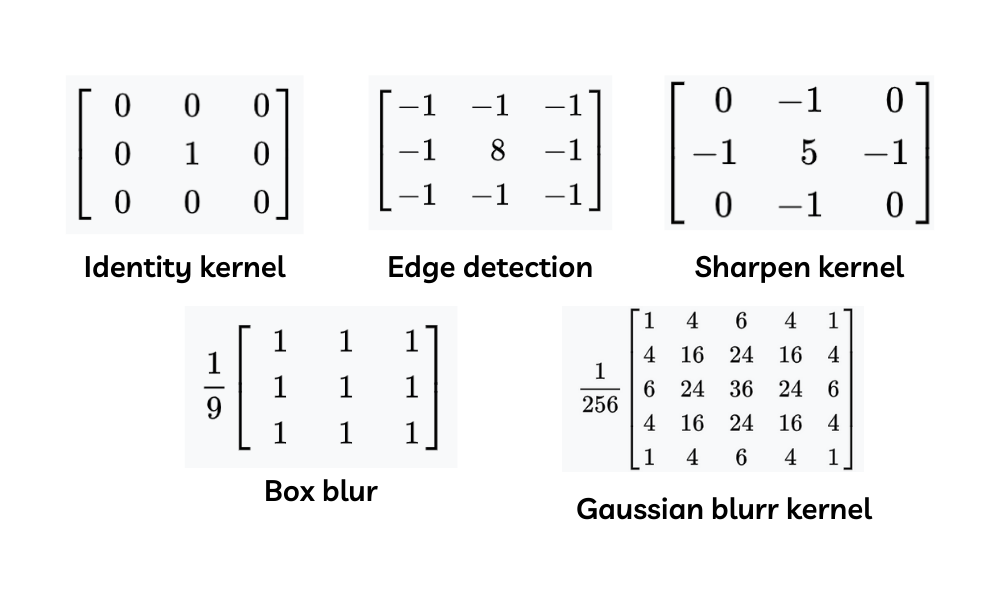
different kernels
With the use of these kernels, we can form the filtered image by simply convoluting the pixel values of the image and the values in the kernel.
Blur an image with a 2d convolution matrix
We are creating a kernel by NumPy which will look like this and passing the kernel as a parameter of the filter2d function.
np.ones() will create an array of the desired shape filled all with the ones

Blur kernel
Example 1: Blur an image with a 2d convolution matrix
Python3
import cv2
import numpy as np
image = cv2.imread('image.png')
kernel1 = np.ones((5, 5), np.float32)/30
img = cv2.filter2D(src=image, ddepth=-1, kernel=kernel1)
cv2.imshow('Original', image)
cv2.imshow('Kernel Blur', img)
cv2.waitKey()
cv2.destroyAllWindows()
|
Output:

Blur an image with a 2d convolution matrix
Example 2: Edge detect an image with a 2d convolution matrix
We are creating a kernel by NumPy array which will look like this and passing the kernel as a parameter of the filter2d function.
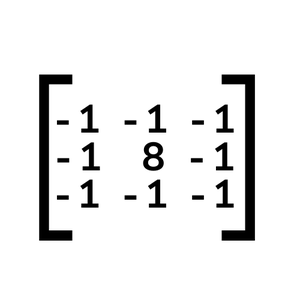
edge detection kernel
Python3
import cv2
import numpy as np
image = cv2.imread('image.png')
kernel2 = np.array([[-1, -1, -1],
[-1, 8, -1],
[-1, -1, -1]])
img = cv2.filter2D(src=image, ddepth=-1, kernel=kernel2)
cv2.imshow('Original', image)
cv2.imshow('Kernel Blur', img)
cv2.waitKey()
cv2.destroyAllWindows()
|
Output:
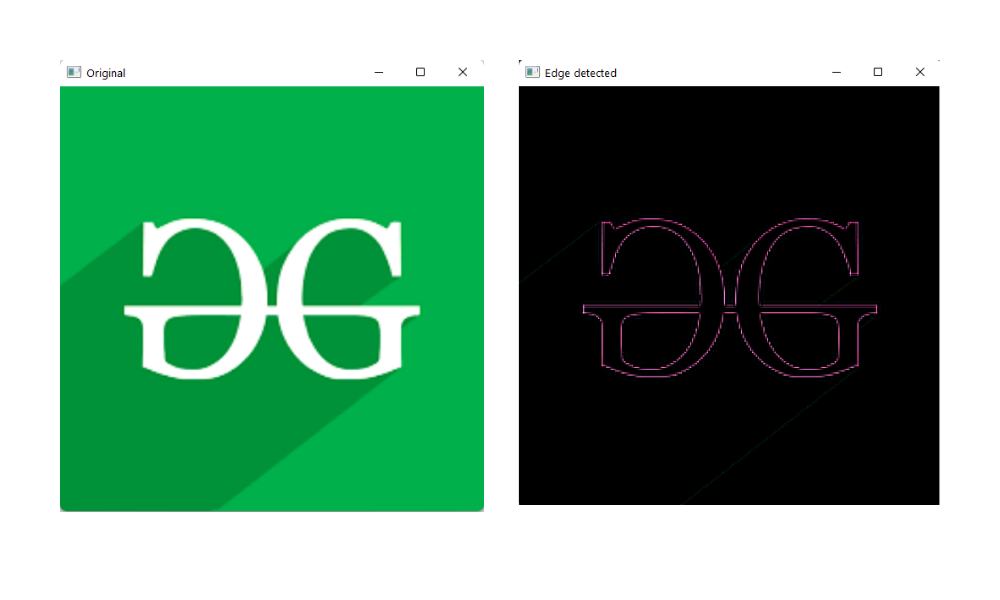
Edge detect an image with a 2d convolution matrix
Like Article
Suggest improvement
Share your thoughts in the comments
Please Login to comment...