Python | AnchorLayout in Kivy using .kv file
Last Updated :
07 Feb, 2020
Kivy is a platform independent GUI tool in Python. As it can be run on Android, IOS, linux and Windows etc. It is basically used to develop the Android application, but it does not mean that it can not be used on Desktops applications.
👉🏽 Kivy Tutorial – Learn Kivy with Examples.
AnchorLayout:
The AnchorLayout aligns its children to a border (top, bottom, left, right) or center. The class given below is used to implement the anchor layout.
kivy.uix.anchorlayout.AnchorLayout
AnchorLayout can be initialized with parameters:
anchor_x
Parameters can be passed: “left”, “right” and “center”.

anchor_y
Parameters can be passed:“top”,  “bottom” and “center”.
to select the place where the widgets are placed in the parent container.
There are 9 different layout regions where the Anchorlayout can be placed for effect:
Top-left, top-center, top-right, center-left, center-center, center-right, bottom-left, bottom-center and bottom-right.
Basic Approach:

1) import kivy
2) import kivyApp
3) import gridlayout(not necessary according to requirement)
4) import Anchorlayout
5) Set minimum version(optional)
6) create Layout class
7) create App class
8) Set up .kv file
9) Return the instance of layout class
10) Run an instance of the Appclass
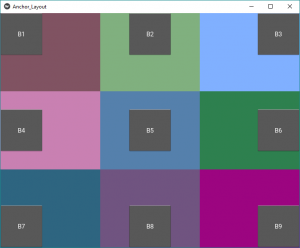
In the below example code, we have used a GridLayout as our root widget class. The GridLayout, will be the parent of 9 AnchorLayouts. The 9 AnchorLayouts will be anchored at the 9 different anchoring positions i.e we are using all the 9 Anchorlayout positions in a single program with the help of 9 Buttons.
Implementation of the Approach:
main.py file –
from kivy.app import App
from kivy.uix.gridlayout import GridLayout
from kivy.config import Config
Config.set('graphics', 'resizable', True)
class Anchor_Layout(GridLayout):
pass
class Anchor_LayoutApp(App):
def build(self):
return Anchor_Layout()
if __name__=='__main__':
Anchor_LayoutApp().run()
|
.kv file –
<MyButton@Button>:
size_hint: [None, None]
size: [100, 100]
<Anchor_Layout>:
rows: 3
AnchorLayout:
anchor_x: 'left'
anchor_y: 'top'
canvas:
Color:
rgb: [.5, .324, .384]
Rectangle:
pos: self.pos
size: self.size
MyButton:
text: 'B1'
AnchorLayout:
anchor_x: 'center'
anchor_y: 'top'
canvas:
Color:
rgb: [.5, .692, .498]
Rectangle:
pos: self.pos
size: self.size
MyButton:
text: 'B2'
AnchorLayout:
anchor_x: 'right'
anchor_y: 'top'
canvas:
Color:
rgb: [.5, .692, 1]
Rectangle:
pos: self.pos
size: self.size
MyButton:
text: 'B3'
AnchorLayout:
anchor_x: 'left'
anchor_y: 'center'
canvas:
Color:
rgb: [.789, .5, .699]
Rectangle:
pos: self.pos
size: self.size
MyButton:
text: 'B4'
AnchorLayout:
anchor_x: 'center'
anchor_y: 'center'
canvas:
Color:
rgb: [.333, .5, .673]
Rectangle:
pos: self.pos
size: self.size
MyButton:
text: 'B5'
AnchorLayout:
anchor_x: 'right'
anchor_y: 'center'
canvas:
Color:
rgb: [.180, .5, .310]
Rectangle:
pos: self.pos
size: self.size
MyButton:
text: 'B6'
AnchorLayout:
anchor_x: 'left'
anchor_y: 'bottom'
canvas:
Color:
rgb: [.180, .398, .5]
Rectangle:
pos: self.pos
size: self.size
MyButton:
text: 'B7'
AnchorLayout:
anchor_x: 'center'
anchor_y: 'bottom'
canvas:
Color:
rgb: [.438, .329, .5]
Rectangle:
pos: self.pos
size: self.size
MyButton:
text: 'B8'
AnchorLayout:
anchor_x: 'right'
anchor_y: 'bottom'
canvas:
Color:
rgb: [.611, .021, .5]
Rectangle:
pos: self.pos
size: self.size
MyButton:
text: 'B9'
|
Output:
Like Article
Suggest improvement
Share your thoughts in the comments
Please Login to comment...