Multi-Language Support in ReactJS
Last Updated :
30 Oct, 2023
Multi-language support in React JS applications can be enabled by using API created through i18nexus. This is a very easy way to integrate your React project. i18nrxus already has the support of Google Translate which automatically changes the text to the respective languages. Very easily one can add a lot of languages to their projects just by writing a few lines of code.
Prerequisites
Approach
Use the i18n library and link it to the React application to translate the data on the webpage for multi-language support. Add the option to switch between the languages and translate the data into the required languages.
Creating React Application:
Step 1: Create the react project folder, using this command in the terminal.
npm create-react-app project
Step 2: After creating your project folder(i.e. project), move to it by using the following command.
cd project
Step 3: Now we need to download all the dependencies of i18next
npm i i18next i18next-http-backend i18next-browser-languagedetector react-i18next
Project Structure
The project structure will look like this.

Dependencies list after installion all packages
{
    "dependencies": {
        "@testing-library/jest-dom": "^5.17.0",
        "@testing-library/react": "^13.4.0",
        "@testing-library/user-event": "^13.5.0",
        "i18next": "^23.6.0",
        "i18next-browser-languagedetector": "^7.1.0",
        "i18next-http-backend": "^2.2.2",
        "react": "^18.2.0",
        "react-dom": "^18.2.0",
        "react-i18next": "^13.3.1",
        "react-scripts": "5.0.1",
        "web-vitals": "^2.1.4"
    }
}
Steps to add a project on the i18nexus
Step 1: Follow the link https://app.i18nexus.com/ Create your own account by entering details like name, email, and teams name.
Step 2: After signing in you will be on the multi-language page, where you need to select the languages you want to add to the project.
Click on +Add Language and a drop-down will be there having a huge number of options.

After that, click on Open Project which will lead to the dashboard. For this project, we have selected the languages English, Hindi, Bengali.
Step 3: In the dashboard, we need to put the key to any unique value that we will use in the code, and for the value put the text you want to show. We can add a new key and value by clicking on the + sign on the top.
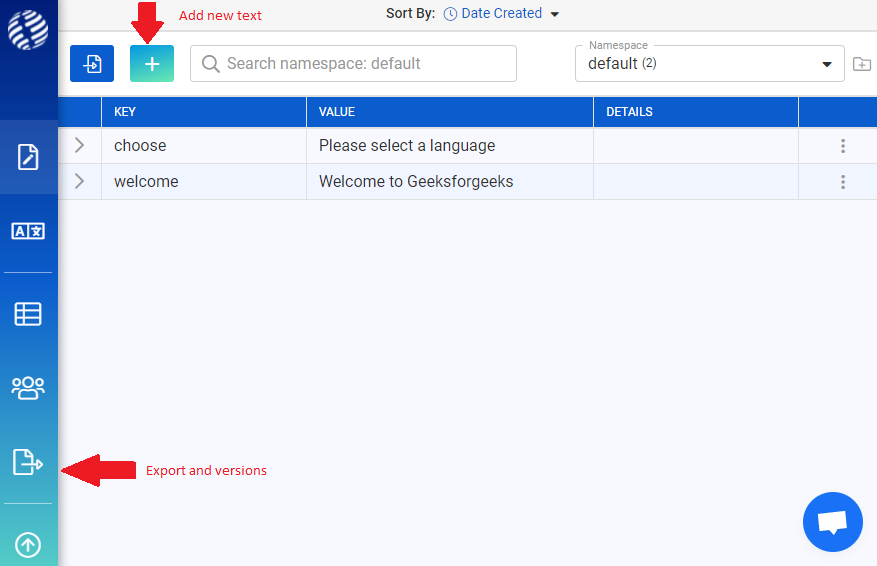
For this project, we put two keys choose and welcome with values like “please select a language” and “welcome to Geeksforgeeks”.
After that click on Export and versions.
Step 4: Now, on the page click on React tab and copy the entire code, this page contains your API key and load path.

Example: In your working directory, create a file i18n.js, and in the file paste the entire code that we copied to configure the languages to the react project.
Javascript
import i18next from "i18next";
import HttpBackend from "i18next-http-backend";
import LanguageDetector from "i18next-browser-languagedetector";
import { initReactI18next } from "react-i18next";
const apiKey = "";
const loadPath = ``;
i18next
.use(HttpBackend)
.use(LanguageDetector)
.use(initReactI18next)
.init({
fallbackLng: "en",
ns: ["default"],
defaultNS: "default",
supportedLngs: ["en", "hi", "bn"],
backend: {
loadPath: loadPath,
},
});
|
Example: We are creating a simple welcome page having a welcome text and a number of options of language to choose from which are here English, Hindi, and Bengali.
Javascript
import React, { useState } from "react";
import { useTranslation } from "react-i18next";
const languages = [
{ value: "", text: "Options" },
{ value: "en", text: "English" },
{ value: "hi", text: "Hindi" },
{ value: "bn", text: "Bengali" },
];
function App() {
const { t } = useTranslation();
const [lang, setLang] = useState("en");
const handleChange = (e) => {
setLang(e.target.value);
window.location.replace(
loc + "?lng=" + e.target.value
);
};
return (
<div className="App">
{
}
<h1>{t("welcome")}</h1>
<label>{t("choose")}</label>
<select value={lang} onChange={handleChange}>
{languages.map((item) => {
return (
<option
key={item.value}
value={item.value}
>
{item.text}
</option>
);
})}
</select>
</div>
);
}
export default App;
|
Step to Run Application: Run the application using the following command from the root directory of the project.
npm start
Output: This output will be visible on http://localhost:3000/ on browser window

Reference: https://www.i18next.com/
Like Article
Suggest improvement
Share your thoughts in the comments
Please Login to comment...